Quickrace
The quickrace, quickplay or time trials mode can be accessed from the main menu via Play/Time Trials. Here, you can select a map, track and vehicle. After configuring the track parameters like laps, rolling start and reverse, you can start the race through the Play button. This section explains all the things needed to understand a quickrace track is structured, and how you can create your own.
Overview
Creating a track for the Quick Play system is actually quite similar to creating a scenario, but all the files are placed in the folder inside the level instead of the scenario/ folder. All the files share a single identifier: this could for example be industrial_rc_eight,*skycurve2* or something similar, usually some short version of the scenario name. In all the examples on this page, the identifier qrfile is used. A single quickrace consists of multiple files:
- qrfile.json: The main file, storing general info about the track.
- qrfile.jpg: The preview that will be shown in the menu for this track.
- qrfile_reverse.jpg: Same as above, but only shown when the track is set to reverse mode. This file is optional.
- qrfile.prefab: This file contains in-game objects, like waypoints and decoration, as well as the starting positions.
- qrfile_reverse.prefab: Same as above, those objects are additionally loaded when the track is reversed. This file is optional.
- qrfile_forward.prefab: Same as above, those objects are additionally loaded when the track is not reversed. This file is optional.
- qrfile.html: If this file exists, the player will see this HTML-content before starting the race in-game. This file is optional.
For clarification, some terms explained:
- Closed Track: A closed track is like a circle, it has no beginning and no end. The finish line is placed somewhere along its path, as well as some checkpoint, and you can complete any number of laps around.
- Open Track: An open track is like a line with a beginning and an end and checkpoints in between, thus allowing only a single 'lap' for this kind of track.
- Standing Start: The 'regular' kind of timing. The vehicle is placed at the start line, and after the countdown the timer ticks and the driver starts. This is usually used if the time for the whole race, e.g. all lap times combined, matters.
- Rolling Start: In this kind of timing, the vehicle is placed some distance before the start line, and is allowed to accelerate, until they reach the start line, at which point the timer starts. This kind of timing is used, if the individual lap time matters, as the first lap in a standing start configuration will always have the penalty of having to accelerate first.
The JSON-File
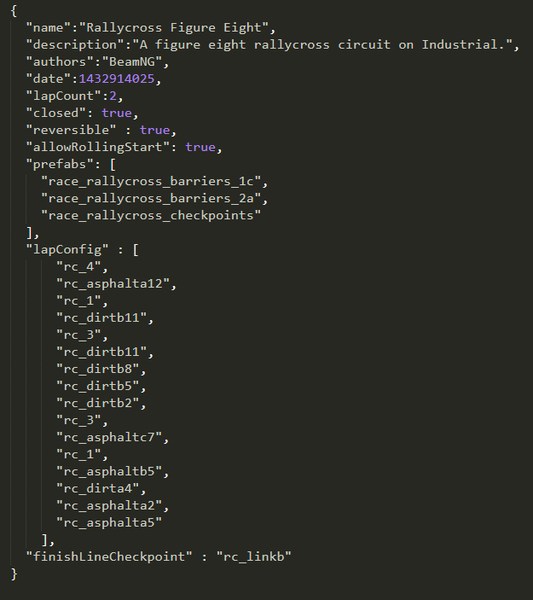
The main part of a quickrace is the JSON-file. It stores general information about the track, like the name, description and author, as well as information about the track itself. Here, you also define the checkpoints used, similar to regular scenarios. Also, you can allow or disable reversing the track, rolling start or changing of the lap count. Furthermore, you can specify a list of prefab-files which are loaded, as well as custom spawning positions.
The following fields are required:
- name: The name of the track.
- description: The description of the track.
- lapConfig: The name of the checkpoints of your course, see below.
- finishLineCheckpoint: The checkpoint directly on the finish line goes here, see below.
These fields are optional. Some of them have a default value, and some are only needed in
- authors: Who made the track.
- date: Time of creation as UNIX-timestamp.
- prefabs: A list of all the prefabs that should be loaded, see below. By default, this will contain qrfile.prefab, if the file exists.
- reversePrefabs: A list of all the prefabs that should be loaded only in reverse mode, see below. By default, this will contain qrfile_reverse.prefab, if the file exists.
- forwardPrefabs: A list of all the prefabs that should be loaded only in forward mode, see below. By default, this will contain qrfile_forward.prefab, if the file exists.
- startLineCheckpoint: The checkpoint directly on the starting line goes here, see below. This field is only sometimes needed, see below.
- lapCount: The amount of laps for this track. This field defaults to 1.
- closed: If true, the player can change the amount of laps when configuring the track. Also indicates if the track is a open or closed. This field defaults to false.
- reversible: If true, the player can drive the track in reverse. This field defaults to false.
- allowRollingStart: If true, the player can also start the track with a rolling start. This field defaults to false.
- tod: This number indicates the default time of day for this track, see below. This field defaults to 3 (Early Noon).
Prefabs
The prefabs that should be loaded are divided into three fields:
- prefabs contains a list of all the prefab files that should always be loaded, regardless of configuration. If there is a file named qrfile.prefab in the folder, it will automatically be loaded and does not need to be put in this list. Thus, if all your game objects are in this one file, the prefabs-field can be skipped.
- reversePrefabs is a list of prefabs, that will only be loaded when the game is in reverse mode, alongside the qrfile_reverse.prefab file in the folder, if it exists, similar to the case above. If the only prefab-file you need for reverse is this qrfile_reverse.prefab, you can skip this entry.
- forwardPrefabs functions the same as reversePrefabs, but will only be loaded in forward mode and includes qrfile_forward.prefab.
What goes where? When organizing your prefabs, follow these guidelines as to where to put the different objects:
- prefabs: Spawn Spheres, waypoints, barriers, general decoration, ambient objects
- reverse/forwardPrefabs: checkpoint markers, starting platform, finish line decoration, signs/turn markers
Lap Config
The field lapConfig is a list which contains the name of all the waypoints that your track should include. Those waypoints are stores in the prefabs. Of course, the order must be the same as they have to be traversed in order to complete one lap. The exception here is the waypoint on the finish line: The name of that one must be entered in the field finishLineCheckpoint. Both of these fields are required.
If the track is not closed, but a rally, lapConfig should contain neither the waypoints on the start-, nor the finish line. Those are then placed in their separate fields named startLineCheckpoint and finishLineCheckpoint. In this case, the startLineCheckpoint field is also required. See the example images below.


Time of Day
When configuring the track in the menu, you can chose from several options for the position of the sun. You can set the initial value in the field tod in the JSON-file. The default value is 3 (Early Noon).
- 0 Night
- 1 Sunrise
- 2 Morning
- 3 Early Noon
- 4 Noon
- 5 Late Noon
- 6 Afternoon
- 7 Evening
- 8 Sunset
Spawn Positions
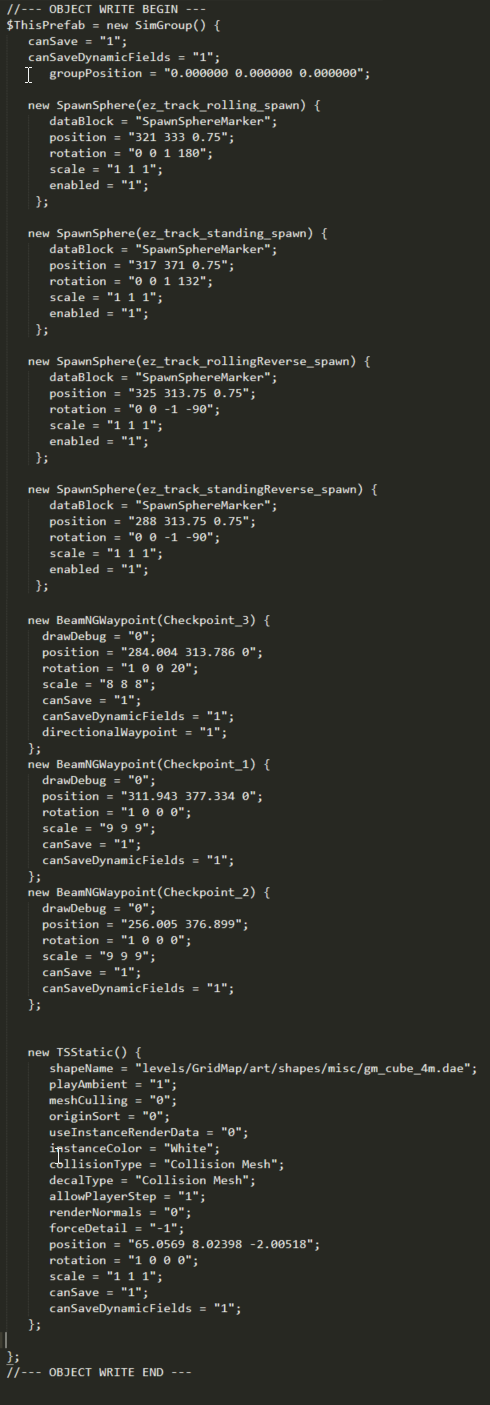
The starting position of the vehicle is defined via a SpawnSphere-Object in the prefabs. Whether you enable reverse and/or rolling start, you need up to 4 of those objects, one for each combination. Each of those spawns needs to have a specific name, as defined below:
- Standing Forward: qrfile_standing_spawn
- Standing Reverse: qrfile_standingReverse_spawn
- Rolling Forward: qrfile_rolling_spawn
- Rolling Reverse: qrfile_rollingReverse_spawn
To ensure maximum enjoyment of your track, the spawn spheres should be placed with these guidelines in mind:
- Standing Forward: This is the regular spawning position. For any kind of race, it should be placed directly before the start-/finish line.
- Standing Reverse: This spawn sphere should be placed directly behind the finish line, and also face the other way of course.
- Rolling Forward: The rolling spawn sphere should be placed some distance before the finish line, preferably directly before the last corner of the circuit. This ensures, that the player will have a about the same velocity as if they just completed a lap once they pass the finish line. For an open track, you can place it at a reasonable distance before the start line, since there will be only one 'lap' anyway.
- Rolling Reverse: Same as above, but behind the finish line, and also just around the first corner of the track.
Quick Guide / Step by Step
This section will show you in a step-by-step guide how to create your own quickrace.
-
Find Location: Choose a map and find a suitable location for your track. Maybe have a test drive already.
-
File structure: Create the basic files for your track. The easiest way here is to copy the files from an already existing quickrace. At first, it will be enough to rename the files, though you should also change the name field in the .json to find your quickrace easier in the next step. If you create a quickrace for a new map, remember to create the quickrace- folder in the map folder.
-
Move Objects: Start the quickrace you just created, go to the world editor (F11), and locate the quickrace prefab in the scene tree (in the folder ScenarioObjectGroup). Right click it, then select “Unpack Prefab”.
- Waypoints: Find the waypoints in the prefab or create new ones and move them to your track. Make sure that the waypoints are at ground level (snapping helps). Also, the waypoint should be scaled so that they are a bit bigger than the road you can drive on, this ensures that you can't miss it. If you need to create new waypoints, make sure to name them in similar fashion like the others.
- Spawns: Find all the SpawnSpheres in the preab or create new ones and move them to your track. Also, rename them to fit the naming conventions as stated above. Usually it is enough to replace the first part with the file name of your new quickrace. The objects should float slightly above ground level. The vehicle will spawn facing the negative y-axis of the object (switch to Object Transform to check local axes.)
- Decoration: Create decorations such as barriers and signs. If the track is located in an area with a lot of roads, it helps if all the unused roads are blocked off.
- Save: When you're done, don't forget to pack the prefab again. Click on the prefab in the Scene Tree, then use the Button in the top bar “Make the Selection a Prefab”. Save the file in the Documents/BeamNG.drive folder. Replace the copied prefab from step 1 with this newly saved prefab. You can also just replace the contents.
-
Adjust JSON: Open the .json file of your quickrace. Expand or cull the lapConfig list to include all the waypoint your created. Make sure to put the waypoint on the finish line in the field finishLineCheckpoint though. For open tracks, put the waypoint on the start line in the field startLineCheckpoint. Also adjust the other fields like description, author, lap count etc.
-
Test: Time to test your map. If objects are not placed correctly, you can repeat step 2. You should drive the track in all configurations at least once to make sure the track is completable. Also pay attention if all roads are blocked off. If you're happy with your track, you can do a final check for all objects and check that there are no floating/submerged objects.
-
Preview: Add a preview image for your track. Create a .jpg image with the same name as your .json, and put a nice picture in it. Feel free to share your track!