The Terrain Editor is used to create and modify Terrain object of the current level. With the various Brushes it is possible to create valleys, mountains and so on. This tool also packs the Terrain Painter which is used to assign terrain’s textures and materials, changing the look and feel of a given surface (e.g. asphalt, dirt, gravel, mud, etc.).
Basics
Below the main toolbar is displayed the terrain editor toolbar:

- Heightmap Import / Export
- Brush Shape
- Sculpt Modes
- Terrain Painter
- Brush Properties
Terrain Editing & Sculpting
The Sculpt Modes allows to edit the terrain heightmap in real-time. Once a mode is selected, simply click on the terrain to sculpt the terrain accordingly. The red circle indicates your brush size.
Basic Sculpt Modes


 ) to easily get the height of the terrain at a given point. The value is automatically inserted in the Height property of the brush. Use this together with the Set Height sculpt mode to flatten a terrain in a more controlled way.
Advanced Sculpt Modes
These modes offers unique functionality that can be helpful in certain situations:


Terrain Painter & Groundmodels
This brush mode is used to paint the terrain surfaces with different textures and materials.
The Terrain Painter window will display all the available Materials that are available in the current level. Once a material is selected, click on the terrain to paint it in real time.
Double-click a material to access the Terrain Material Editor, from where to edit the existing materials and create new ones.
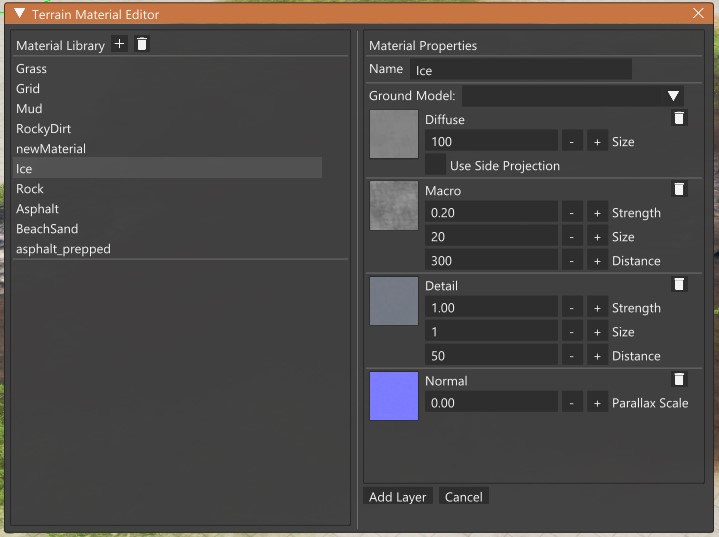 Terrain Material Editor window
Groundmodels
The name of each material is not casual, but matches a Groundmodel. This determines the surface’s physics (e.g. asphalt, beachsand, ice, etc.)
The full list of available groundmodels can be found in: BeamNG.drive\gameengine.zip\art\groundmodels.json
The groundmodels.json file defines the physics of all the surfaces in the game.
To assign a specific groundmodel to a terrain material, simply name the latter with either the main Name or one of the Aliases of the groundmodel
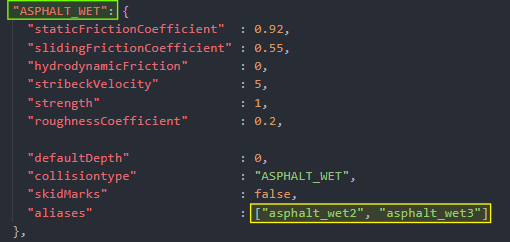
In the above example, ASPHALT_WET is the main name of the groundmodel, while asphalt_wet2 and asphalt_wet3 are aliases. If the terrain material is named with any of them, surfaces painted with it will have the ASPHALT_WET surface’s physics.