C++ Bridge and ROS2 Editor
Alongside the Python bridge documented in the rest of these pages, BeamNG.tech also ships a native C++ integration. Instead of running a separate ROS 2 node that talks to the simulator over the BeamNGpy socket, the C++ bridge is loaded inside BeamNG.tech itself as a plugin and is configured through a dedicated ROS2 Editor in the in-game World Editor.
Note
The C++ integration lives on the cpp branch of the
beamng-ros2-integration
repository and is published on GitHub as-is. This page summarizes how it
works; for the full in-simulator tool reference, see the ROS2 Editor
page in the BeamNG.tech documentation.
Python bridge vs. C++ bridge
The two integrations expose vehicles and sensors to ROS 2, but differ in how they run:
Aspect |
Python bridge (this branch) |
C++ bridge ( |
|---|---|---|
Runtime |
Standalone ROS 2 node ( |
Native plugin ( |
Configuration |
Scenario/sensor JSON files + ROS 2 services |
Interactive ROS2 Editor in the World Editor |
Connection |
BeamNGpy socket (can be remote) |
In-process; same machine and OS required |
Best for |
Scripted/remote setups, cosimulation, teleop examples |
High-performance, low-latency sensor streaming |
Prerequisites
For the C++ bridge, BeamNG.tech and ROS 2 must run on the same machine and the same operating system. Windows Subsystem for Linux (WSL) is strongly discouraged because of significant performance limitations.
Installation (pre-built binaries)
Pre-built binaries are provided so you do not have to compile the integration yourself:
Download the latest build from the releases page.
Extract the archive to a directory of your choice.
Copy the plugin into your BeamNG.tech installation:
Windows: copy the
.dllfile into theBin64directory.Linux: copy the
.sofile into theBinLinuxdirectory.
Running BeamNG.tech with the C++ bridge
To use BeamNG.tech with the C++ ROS 2 integration you need to source both your ROS 2 environment and the bundled ROS 2 extension, then start the simulator:
Source your ROS 2 distribution as described in its documentation.
Source the bundled extension by running
install/local_setup.*:Windows:
install\local_setup.ps1orinstall\local_setup.batLinux:
install/local_setup.sh,install/local_setup.bash,install/local_setup.zshorinstall/local_setup.ps1
Start BeamNG.tech with the sandbox disabled:
Bin64\BeamNG.drive.x64.exe -disable-sandbox
Warning
Without the -disable-sandbox flag, the C++ ROS 2 integration will not
work correctly.
Enabling the ROS2 Editor
Once BeamNG.tech is running with ROS 2, the integration is controlled from the World Editor:
Load a map and a vehicle.
Open the World Editor (default key:
F11).Open the Set Editor:
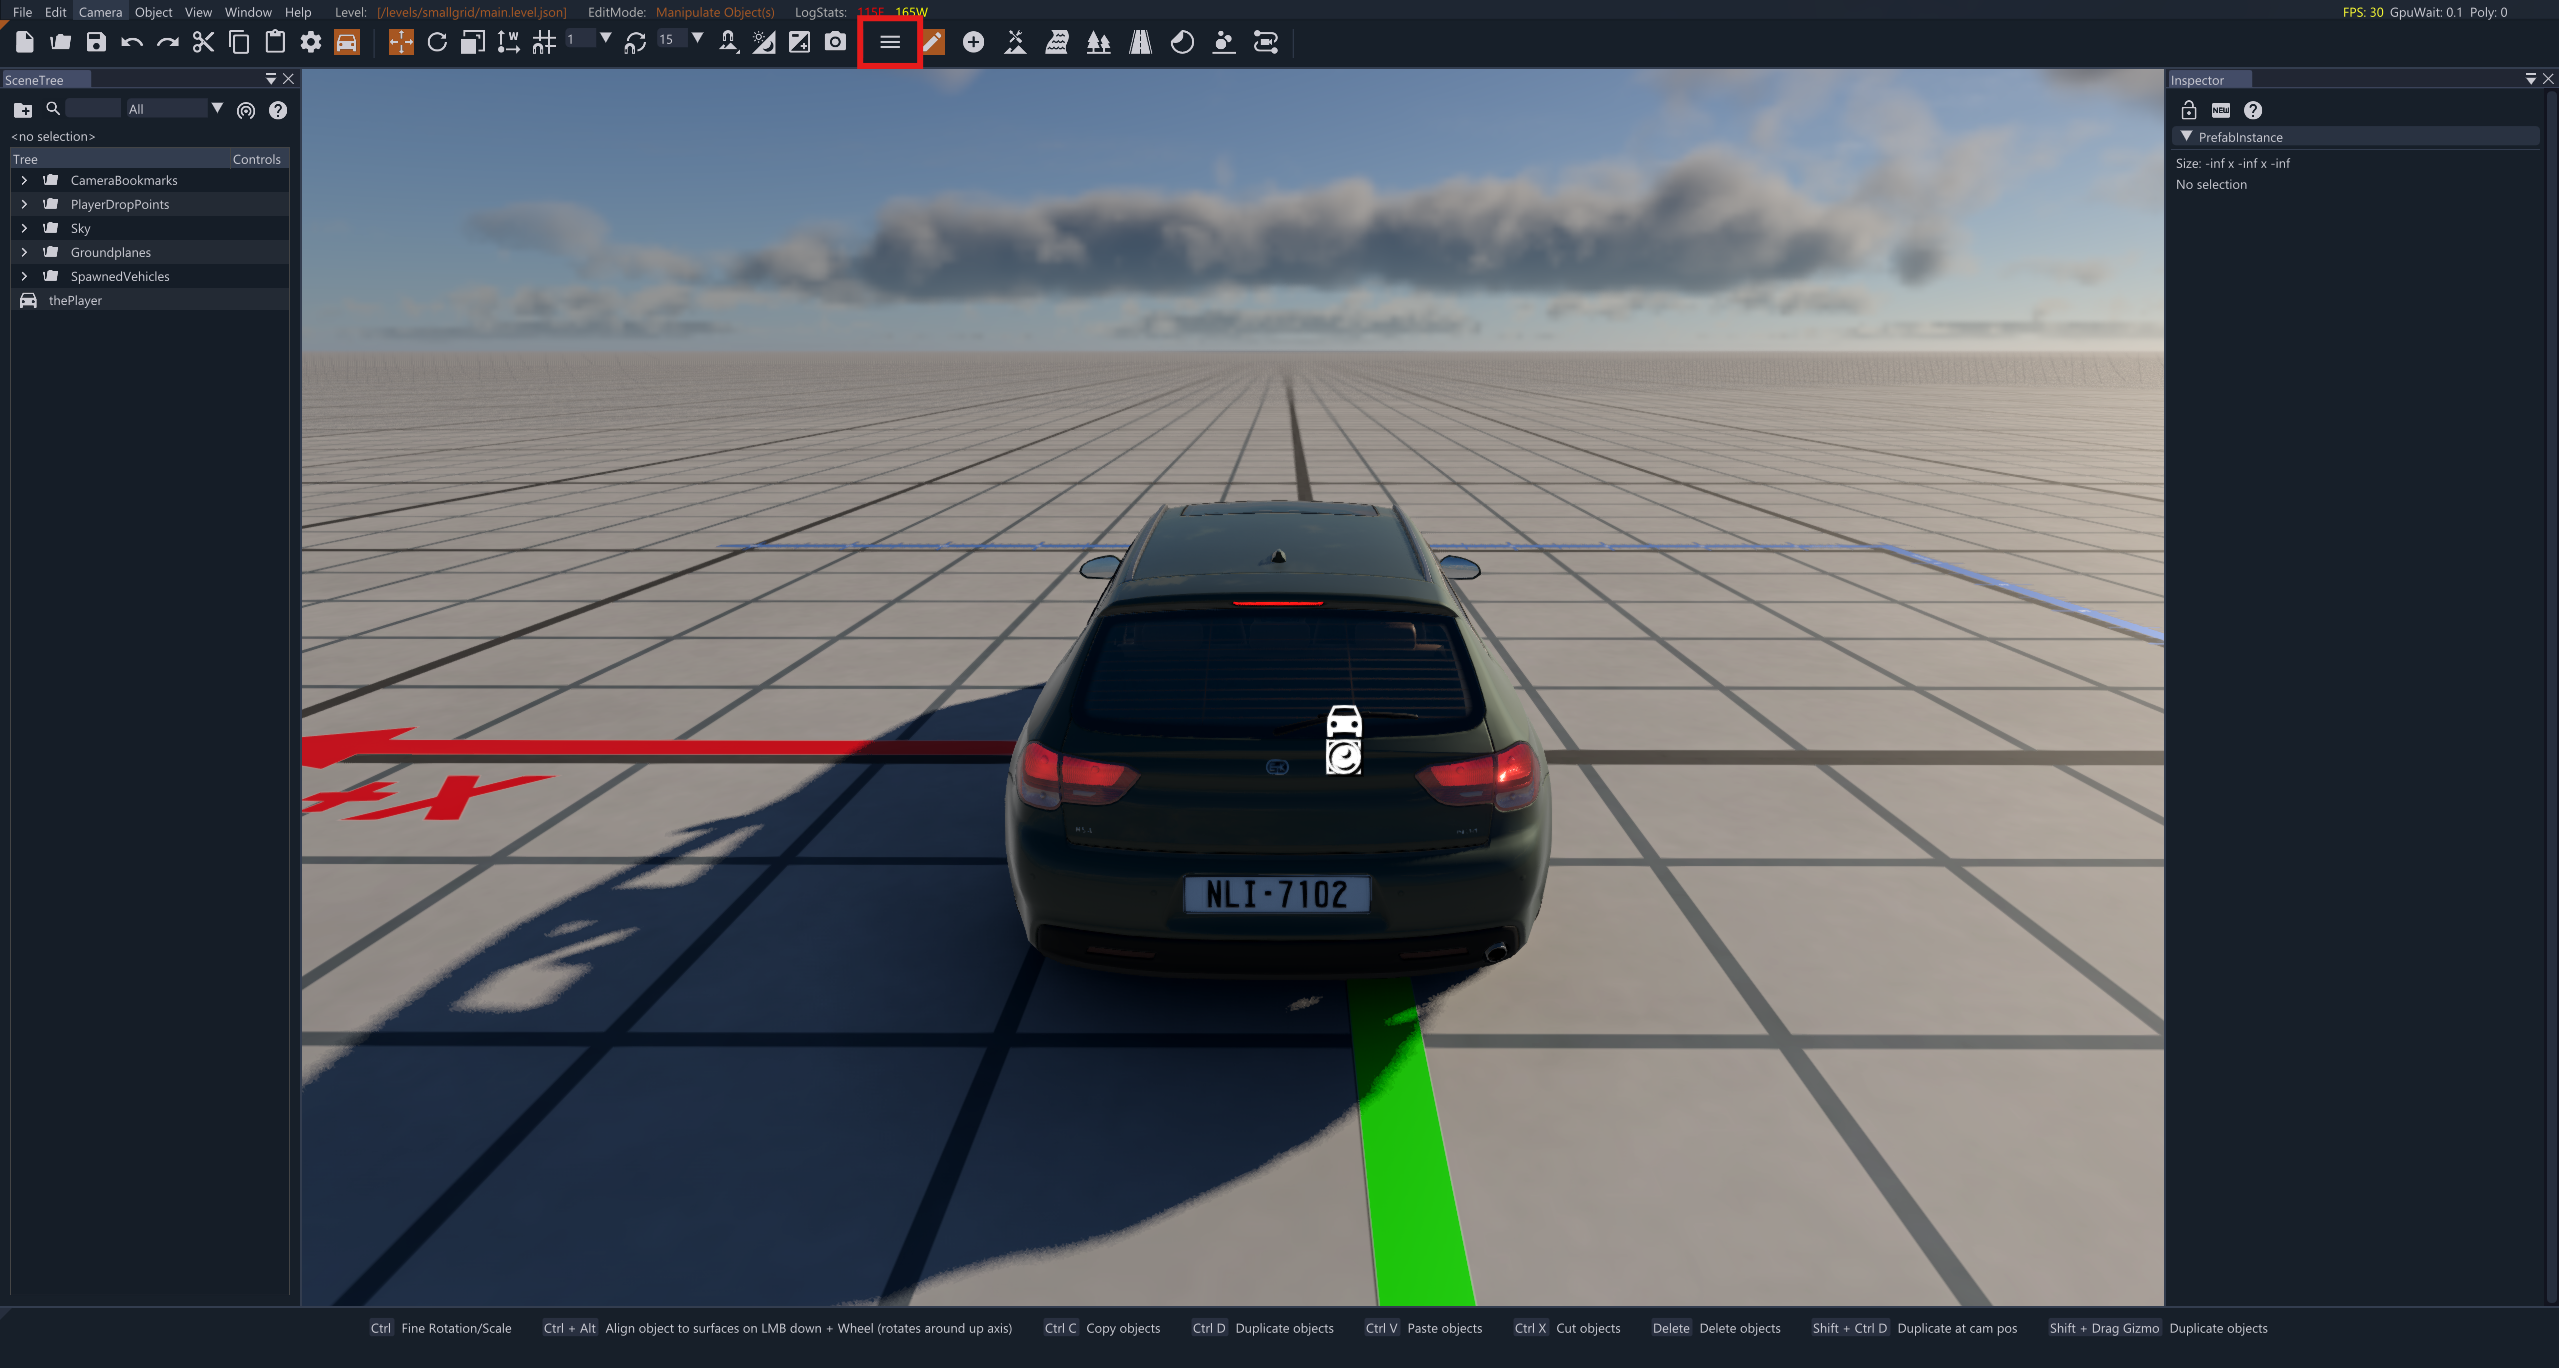
Go to Edit Sets.
Add the ROS2 Editor to the selected set:
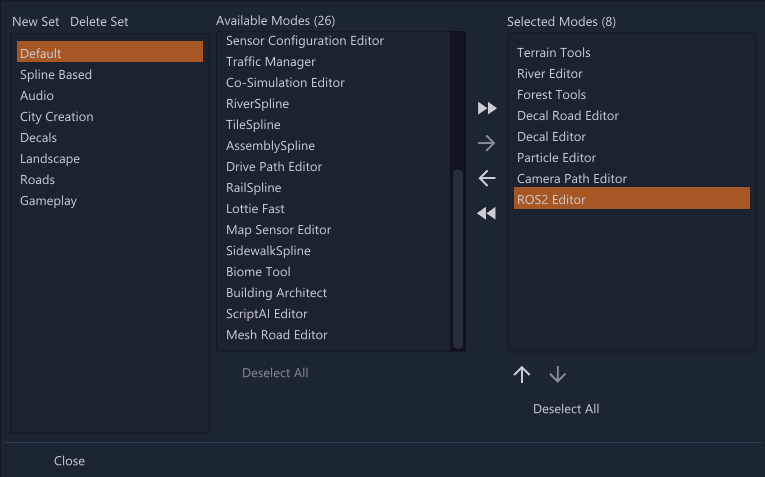
Using the ROS2 Editor
With the editor enabled, you can open it from the toolbar using its icon:

The ROS2 Editor window is organized into five sections:
Library selection (top). Choose which
.dll/.sofile to use. This is useful when you want to run different ROS 2 distributions with BeamNG.tech on the same machine.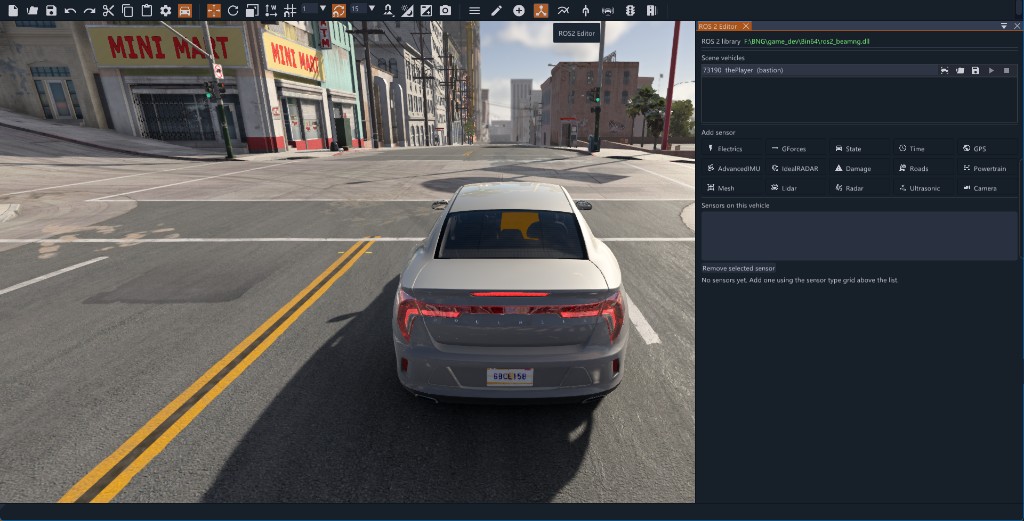
Important
Different ROS 2 distributions are usually not inter-compatible; see Compatibility for the supported combinations.
Vehicle list. Lists every vehicle in the simulation; each node name is the vehicle’s simulation id. Per-vehicle buttons let you:
center the camera on the vehicle,
load a configuration file for the vehicle,
save the vehicle’s current configuration,
start (or restart) the ROS 2 node for the vehicle,
stop the ROS 2 node for the vehicle.
A vehicle line is highlighted in green while its node is running.
Available sensors. A grid of sensors that can be attached to the selected vehicle. Click a sensor to add it.
Note
Changes to the sensor configuration are only applied after the vehicle node is restarted.
Attached sensors. The list of sensors currently attached to the vehicle. Select one to edit its parameters in the section below.
Sensor parameters (bottom). Edit the parameters of the selected sensor. For sensors that have a physical position or rotation on the vehicle, you can also use the World Editor gizmos to adjust them.
Note
Changes to sensor parameters are only applied after the vehicle node is restarted.
Compatibility
BeamNG.tech and ROS 2 must run on the same machine and the same operating system. The C++ integration is compatible with the following ROS 2 distributions and operating systems:
ROS 2 Distribution |
Windows 10 / 11 |
Ubuntu 22.04 |
Ubuntu 24.04 |
Ubuntu 26.04 |
|---|---|---|---|---|
Humble Hawksbill |
Yes |
Yes |
No |
No |
Jazzy Jalisco |
Yes |
Not officially supported |
Yes |
No |
Lyrical Luth |
Yes |
No |
Not officially supported |
Yes |
Important
We strongly discourage the use of Windows Subsystem for Linux (WSL) for the BeamNG ROS 2 integration due to significant performance limitations. Other operating systems may work, but are not officially supported.
Compiling from source
Although pre-built binaries are provided, you can also compile the C++ integration yourself.
Windows
Prerequisites
Visual Studio 2019 x64 Native Tools Command Prompt for VS 2019 with CMake and Python installed.
A ROS 2 environment (see Compatibility).
Steps
Clone the repository and check out the
cppbranch:git clone https://github.com/BeamNG/beamng-ros2-integration.git cd beamng-ros2-integration git checkout cpp
Delete the
build,installandlogfolders if they exist.Start a Visual Studio 2019 x64 Native Tools Command Prompt for VS 2019.
Source your ROS 2 environment.
From the repository root, build the packages:
colcon build --merge-install --packages-select beamng_msgs beamng_ros2
cd build/beamng_ros2
cmake --build . --config Release
Copy the
.dllfile frombuild\beamng_ros2\Releaseinto theBin64directory of your BeamNG.tech installation.
Linux
Prerequisites
Install the required build tools (Ubuntu one-liner):
apt-get install -y --no-install-recommends locales build-essential cmake git python3-colcon-common-extensions
Steps
Clone the repository and check out the
cppbranch:git clone https://github.com/BeamNG/beamng-ros2-integration.git cd beamng-ros2-integration git checkout cpp
Delete the
build,installandlogfolders if they exist.From the repository root, build the packages:
colcon build --merge-install --packages-select beamng_msgs beamng_ros2
cd build/beamng_ros2
cmake --build . --config Release
Copy the
.sofile frombuild/beamng_ros2/Releaseinto theBinLinuxdirectory of your BeamNG.tech installation.
Known issues
The ultrasonic sensor currently suffers from a crash caused by a Vulkan issue.