Bus Routes
This article gives the steps to create bus lines, a route for the bus, which is composed of a number of bus stops.
Files and Folders setup
-
Create two new folders in the level you want to modify:
- scenarios
- bus lines
For example, if you are modifying the “smallgrid” level, create the folders in
..\levels\smallgrid\
-
Inside the scenarios folder, create a new folder and name it “bus”.
Inside the bus folder, you would need to create a
bus_level.jsonfile. The content of the files should be as follows:
[
    {
        "name": "bus_level",
        "description": "bus_level",
        "authors": "Your Name",
        "introType": "none",
        "difficulty": "22",
        "date": 1494325025,
        "levelObjects": {
            "tod" : {
                "time" : 0.11,
                "play" : false
            }
        },
        "vehicles": {
            "scenario_player0": {
                "playerUsable": true,
                "startFocus": true
            },
            "*": {"playerUsable": false}
        },
        "radiusMultiplierAI": 2,
        "extensions": ["busdriver"],
        "busdriver": {
            "routeID": "1",
            "variance": "a"
        },
        "statistics":
        {
            "disableEndUI": true
        }
    }
]
- Modify the first two variables,
"name"and"description"by replacing the level part with the name of your level, for instance, use bus_utah.json if you are modifying the level “Utah”. Remember that this naming rule is not strict. In this example the"bus\_grid.json"would be used for level smallgrid. - The
"busdriver"object should contain the default route that the should be played, hence modify the"routeID"and"variance"accordingly.
- Create a simple text file in your buslines folder, with content similar to the template shown below.
Save and name it levelName.buslines.json. Ensure that the .json filename is unique.
{
    "version": 1,
    "routes":[
        {"routeID":"1",
            "variance":"a",
            "direction":"Rexoni Diner",
            "routeColor": "#3b9c00",
            "vehicle" : {
                "model": "citybus",
                "config": "base"
            },
            "tasklist":[
                "tmpl_bs_07",
                "tmpl_bs_13",
                "tmpl_bs_02",
                "tmpl_bs_23",
                "tmpl_bs_26",
            ],
            "spawnLocation": {
                "pos": {"x": -613.572,"y": 199.223,"z": 113.173},
                "rotAngAxisF": {"x": 0,"y": 0,"z": 1,"w": 224.173}
            },
            "requiredWaypoints":{
                "wcu_bs_29":{
                    "wp":["wcu_cp_agave"],
                    "failmsg":"You got too far-off the route" },
                "wcu_bs_27":{
                    "wp":["wcu_cp_hwy"],
                    "failmsg":"You got too far-off the route" }
            },
            "navhelp":{
                "wcu_bs_13":["wpTown_16","Bridge36_3","Bridge36_1"],
                "wcu_bs_26":["bs_raceTrack_1","Bridge4_B1","Bridge4_A1","Bridge4_A2","countryside_road_1","countryside_road_2"],
                "wcu_bs_29":["Junction_mountain_A","Bridge1_B"],
                "wcu_bs_27":["countryside_road_3","Bridge2_A1","Bridge2_A2","Bridge2_A3","Bridge17_A","Bridge17_B","Bridge17_E"],
                "wcu_bs_28":["countryside_road_4"],
            },
            "previews":[
                "01_RexDiner.png"
            ]
        },
        {"routeID":"2",
            "variance":"a",
            "direction":"Khaki Bay",
            "routeColor": "#fff200",
            "tasklist":[
                "tmpl_bs_04",
                "tmpl_bs_01",
                "tmpl_bs_05_b",
                "tmpl_bs_14_b",
                "tmpl_bs_19_b",
                "tmpl_bs_25_b",
                "tmpl_bs_24_b",
                "tmpl_bs_27_b",
                "tmpl_bs_21",
                "tmpl_bs_17"
            ],
            "vehicle" : {
                "model": "citybus",
                "config": "base"
            },
            "spawnLocation": {
                "pos": {"x": -337.572,"y": 605.564,"z": 75.0979},
                "rotAngAxisF": {"x": 0,"y": 0,"z": 1,"w": 135.337}
            },
            "requiredWaypoints":{
                "wcu_bs_27":{
                    "wp":["wcu_cp_hrzn"],
                    "failmsg":"You got too far-off the route" }
            },
            "navhelp":{
                "wcu_bs_21":["Bridge17b_A"],
                "wcu_bs_17":["tennis_1","tennis_2"],
            },
            "previews":[
                "02_KhahkiBay.png"
            ]
        },
    ]
}
JSON Guidelines
A few guidelines to creating your levelName.buslines.json document may
come in handy at this point.
The .json file is made up of a json object that contains 2 variables:
The “version” is a number that represents the version of bus lines
file. The “routes” is an array of json objects, with each object
defining a bus route. Now each bus route object contains:
routesIDmust be of string type, although it is actually a number e.g."routeID":"101"directionideally every route has two directions: one from A to B and another from B to A. This variable is used for display purposes. As a result, it is good to use naming conventions that can be easily recognized.varianceis a string that describes a specific variant of the route. This is needed and used internally when a route ID has more than one variant.routeColoris a string representing route Color in html hexadecimalvehicleis the vehicle to use. Keepmodelas citybus andconfigas basetasklistis a json array of strings (no space in between), which represents the triggers for your bus stops.requiredWaypointsis an optional json object that indicates compulsory points the vehicle must go through, and failure message if the vehicle does not go through them. Each element of the required way point object is also an object that contains 2 variables: an array containing the string-id of the way point that must be passed, and failure message that is displayed when the way point is not passed.spawnLocationis a json object containing 2 objects:"pos"androtAngAxisF, which represent the starting position and orientation of the vehicle. The rotation object could be either of two types:rot: a quaternion representation of rotation (given by LUA)rotAngAxisF: “angle and axis” representation of rotation used in the editor. Thex, y, zdenote the axis of rotation and w , the angle in degrees. This type is recommended because it's easy to use.
navhelpwhich is an optional json object that contains arrays named after the ids of the stops that require navigation help. These arrays contain waypoints (strings), through which the navigation arrow would pass.
-
Rename and modify the variables and values in the
levelName.buslines.jsondocument, as desired and as directed in the previous step. -
Save the file.
Spawnpoints
-
Load the game and go to
Play > Bus Routes > Select Map. Then, select the map to be modified (where the new folders were created) and choose a direction (e.g. “Rexoni Diner”). Don’t worry if the vehicle spawns mid-air or underground, the next steps are going to adjust the spawnpoint. -
Press Shift+C to toggle Free Camera. Navigate through the map (using navigation keys W A S D) till you choose and reach the desired location for starting the trip. Try to move the view as close to the ground as possible.
-
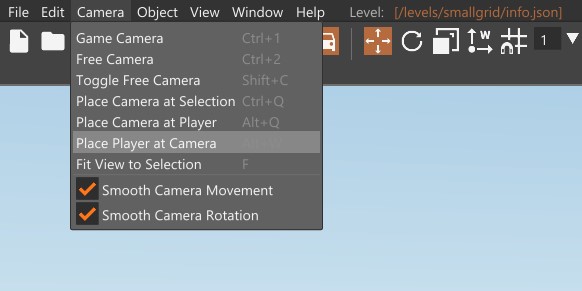
Press F11 to open the World Editor.
-
Click the Camera tab, and click Place Player at Camera.
-
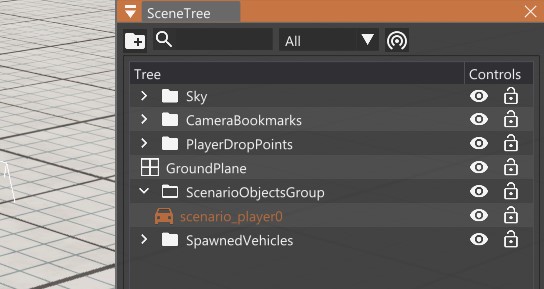
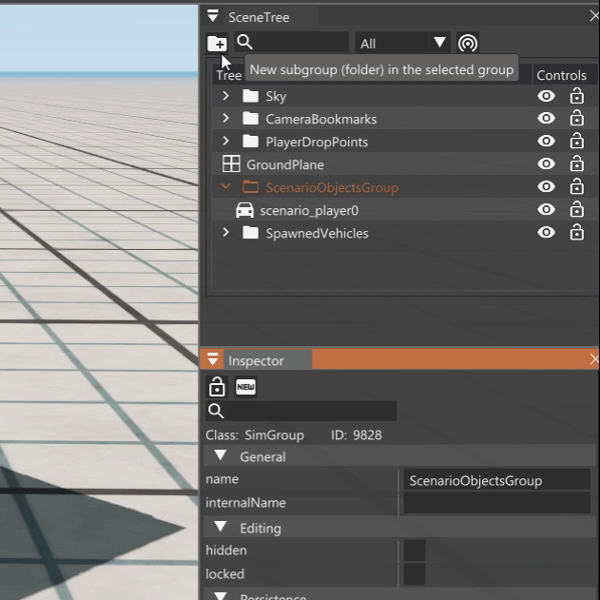
Click on the vehicle to display the vehicle marker. If the marker is not showing, go to the Scene Tree editor’s tool (if not there, add it from the Window tab).
Scroll down to the end to the
ScenarioObjectsGroupfolder. In this folder, select thescenario\_player0, and this should select your vehicle and display its marker.
- You can set your position and rotation by typing the values directly in the Transform tab of the Inspector editor’s tool or by respectively using the Translate and Rotate editor tools.
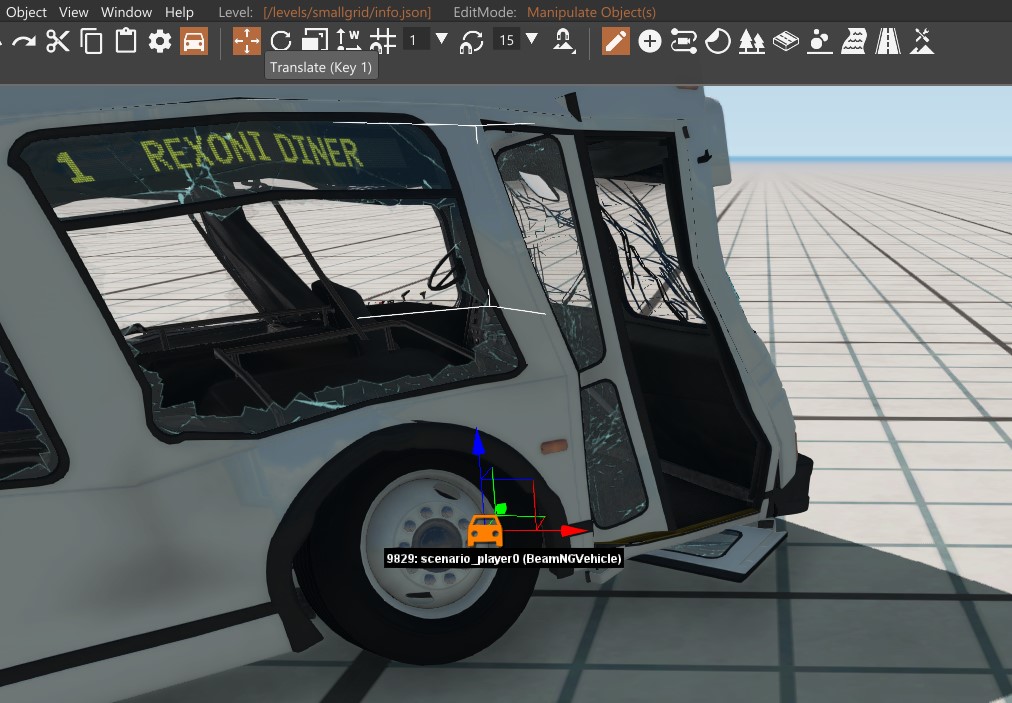
-
Once you are satisfied with your desired starting position and orientation, copy these values from the Inspector’s transform tab to
spawnLocationin yourlevelName.buslines.jsonfile. -
Save the file.
Bus stops
- In the Scene Tree click the
ScenarioObjectsGroupfolder and then the New folder icon in the top-left of the Scene Tree window.
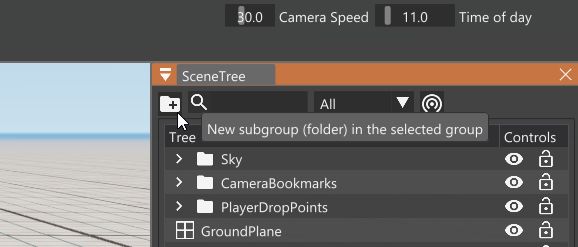
Name the new folder busstops and open the folder.
-
In the game, press Shift+C to toggle Free Camera and return to the vehicle’s camera. Then navigate through the map till you reach the desired location for your bus stop.
-
In the World Editor Toolbar:
- Click the Add Object button
- Click the BeamNG icon in the toolbar that appears below the main one
- Click the LUA Trigger icon
- Click anywhere in the 3D view
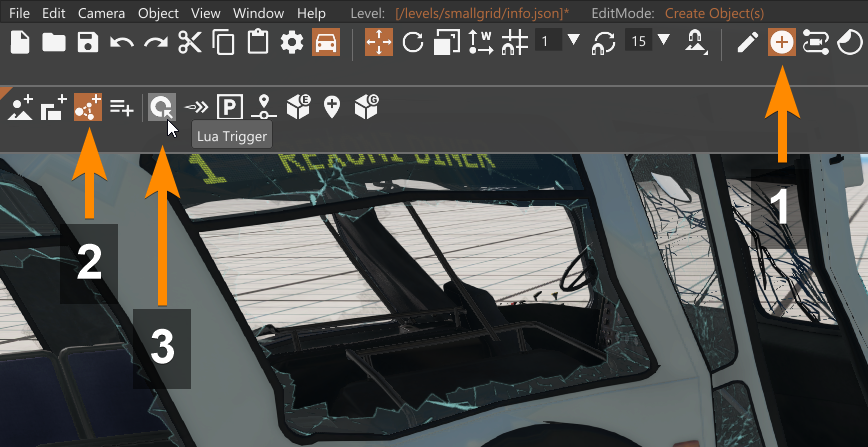
This creates a LUA trigger where you clicked in the 3D view, and the object will also appear in the Scene Tree list.

-
Modify the position, rotation and scale of the box trigger as described in
step 11.In the scale of the trigger, make the “x” value accommodate the width of the vehicle and make the “y” value accommodate the length of the vehicle.
- When the desired size and location is achieved, go to the Inspector
window of the World Editor. Copy the trigger identifier from your
tasklist in the
levelName.buslines.jsonfile (e.g tmpl_bs_07) and paste it by the name option in the Inspector panel.
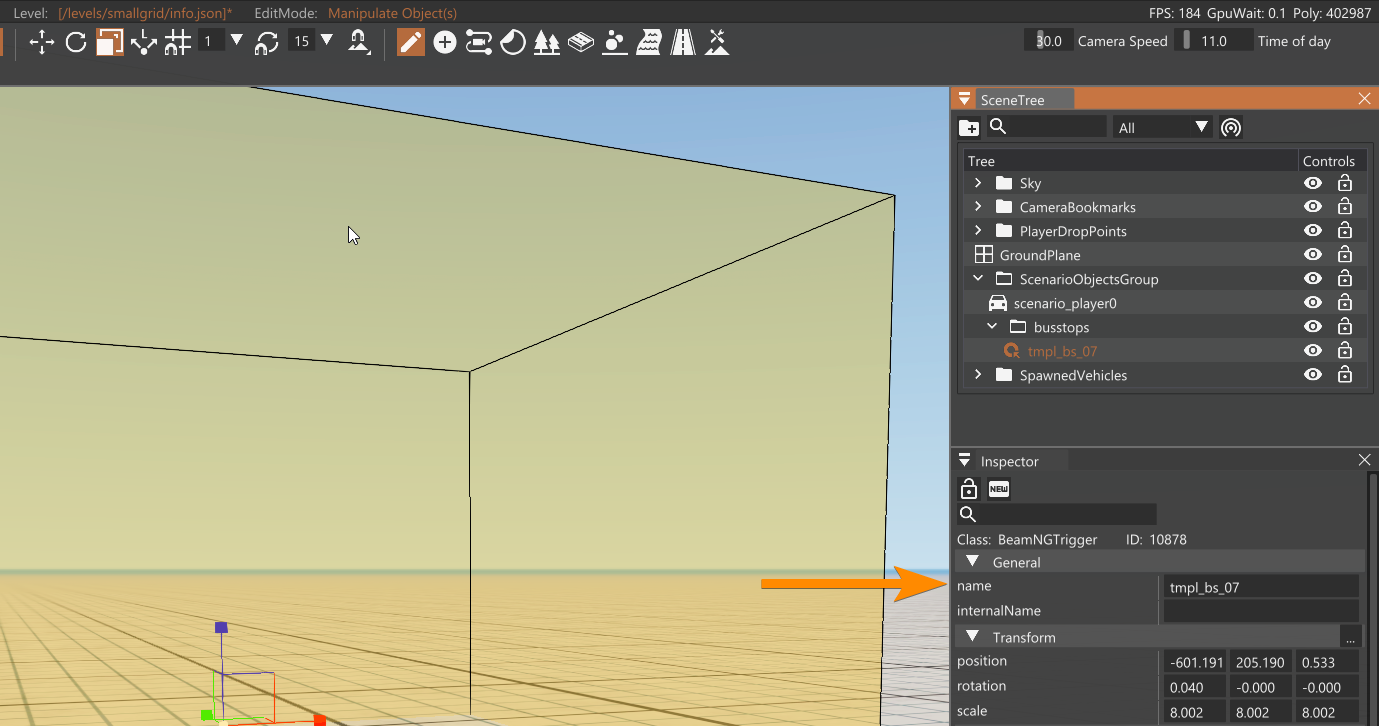
Remember that this identifier must be a single string with no space
within it, as indicated in step 3. It is recommended to keep the name short.
- With the trigger selected, go in the Inspector change the following in the Trigger section:
TriggerType > BoxTriggerMode > ContainsTriggerTestType > Bounding boxTickPeriod > 1000

- When this is done, scroll down the Inspector window to the Dynamic Fields section

- Insert
typeand click Add, then insertbusstop
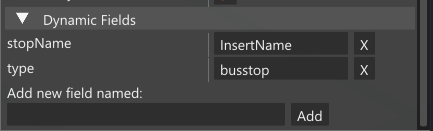
-
Add another entity to the Dynamic Fields named
stopNameand insert the actual name of the bus stop, which would be displayed in the game (e.g. Fleet Street) -
Repeat
steps 15 to 22for each bus stop you want to create. -
Saving requires additional details
Was this article helpful?
