Props
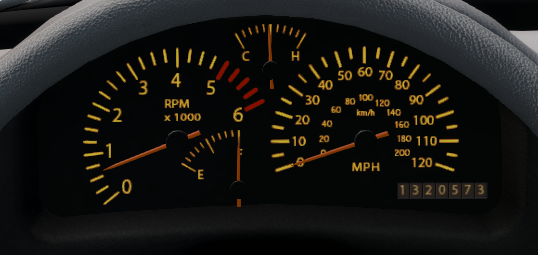
Props are meshes that don’t flex, but can be animated. They are very useful for things like steering wheels, shifters, gauge needles, pedals, or other parts that are better animated than simulated. They can also be used to create spotlights that are tied to the glowMap/electrics system to make working lights.
By default, meshes will be positioned where they are in your modelling software, but they’ll need to be rotated into position using the base rotation argument. See modelling guidelines for more information
Prop axis reference
Each prop uses it’s own reference system made out of 3 nodes. This allows the prop to move when those nodes, allowing the props to move in crashes or for applications like moveable lights.
The nodes chosen for the idRef, idX and idY arguments should form a right angle triangle, similarly to refnodes . Those nodes will form the X and Y axis of the prop’s coordinate system. The Z axis will be created based on those.
For an example, the Pigeon’s dashboard props use the nodes “dsh2”,“dsh2r”,“dsh3” as it’s ref, x and y nodes respectively, with dsh2 being located in the center of the dash, dsh2r to it’s right, and dsh3 underneath.
This means that positive values on the Y axis will move the props down, and on the Z axis the props will be moved backwards.
All movements in translation will be done using that coordinate system, and not using the vehicle’s coordinate system as with nodes and other offsets. Rotation is done around each axis of the mesh’ coordinate system, with the center of rotation is the prop’s origin, as described in the modeling guidelines
Functions and limits
Prop movement is defined with a function using one of the vehicle’s electrics , along with rotation and translation values.
The rotation and translation values define by how many degrees the prop will rotate and by how many meters it will move each time the function goes up by one. So for example if a temperature gauge had the follow parameter for rotation, it would rotate by 1 degree around the x axis for every degree temperature change.
{"x":5, "y":0, "z":0}
Rotation angle can be calculated by dividing the used range of the electric by the angle between the minimum and maximum positions.
Min and max values are used to cap the movement of the prop. For example to simulate the “pegs” found on the gauges of many cars, which keeps the needle from moving beyond a certain range. They are defined as values of the function, and not as angle or translation.
The offset value works in a similar way to the min and max, adding a static factor to the gauge. This is used to compensate for a 0 point which is not located at the needle’s initial position.
The multiplier does exactly what it says on the tin, but it is rarely used, as rotation and translation values are modified instead.
If we use the D-Series tachometer as an example.
 It has a sweep of 180 degrees, with a range going of 6000rpm, giving us a rotation function of: 180 / 6000 = 0.03 degrees/rpm. We are using a negative value, because it goes in the clockwise direction.
As we don’t want the gauge to go above 6000rpm, the max would be set to 6000, and the min to 0. For a temperature gauge the min and max could be values like 60 and 120. For the offset, in this case with an offset of 0 the needle points to 4000, meaning the offset should be -4000 for the needle to land on the correct value. If the needle isn’t aligned with the dashboard’s plane, the baseRotation parameter will be used to rotate the prop and it’s rotation axis.
(...)"baseRotation",           "rotation",                 "translation",       "min", "max", "offset", "multiplier"
(...){"x":160 "y":180, "z":0}, {"x":0, "y":0, "z":-0.03}, {"x":0, "y":0, "z":0}, 0,     6000, -4000,     1
Lights
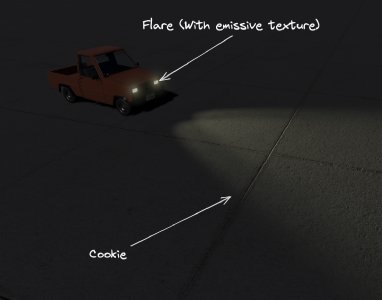
Lights in beamNG consist of two main elements. The flare, which could be defined as a ball of light at the emitter, and represents the light bulb itself.
The second part is the “cookie”, which represent the light reflected on surfaces by the light’s “beam”.
Lights are often used in combination with glow maps and emissive textures, so the entire light appears lit.
Lights will turn on as soon as their function’s value is greater than 0, and can be associated to deform and break groups to disable them when the physical light gets damaged.
Lights can transition progressively between the on and off state via linear scale if custom values defined in the electrics section are used as the function value. There are special arguments used to modify the transition effect:
(...){"lightScaling":{"brightnessMinInput":0, "brightnessMaxInput":1, "flareScaleMinInput":0.6, "flareScaleMaxInput":1, "lightColorOffsetRed":0,"lightColorOffsetGreen":60, "lightColorOffsetBlue":80}}
However, these don’t have to be defined usually, as the default values already produce a convincing effect.
Required arguments
See the electrics page for more information.
For lights, the light will turn on as long as the function is greater than 0.
If you want your prop to not be animated, use “nop” for a function that always return 0.
Defined in degrees of rotation for each change of 1 of the function.
Uses the intrinsic Euler -X -Z -Y rotation system.
Optional arguments
Overwrites the Location parameters in modelling software.
Relative to the defined axis reference system. {“x”:0, “y”:0, “z”:0} will put the prop in the location of the idRef node.
Overwrites the Location parameters in modelling software.
Relative to the Jbeam/world coordinates. {“x”:0, “y”:0, “z”:0} will put the prop in the position 0, 0, 0 according to the coordinates of the modelling software.
x, y, z degrees on XYZ axis, around the center point px, py, pzOptional arguments (lights only)
These will only work when “mesh” is set to “SPOTLIGHT” or “POINTLIGHT”.
In an RGBA format.
"lightColor":{"r":255, "g":255, "b":150, "a":255},
"lightAttenuation":{"x":0, "y":1, "z":1}
Commonly used values:
- “vehicleDefaultLightflare”
- “vehicleBrakeLightFlare”
- “vehicleHeadLightFlare”
- “vehicleReverseLightFlare”
Other valid values:
- “BNG_LightFlare_1”
- “BNG_SpokeFlare_1”
- “BNG_Sunflare_1”
- “BNG_Sunflare_2”
- “BNG_Sunflare_3”
- “LightningLightAnim”
Commonly used values:
- “/art/special/BNG_light_cookie_headlight.dds”
- “/art/special/BNG_light_cookie_lightbar.dds”
- “/art/special/BNG_light_cookie_underglow.dds”
Any other grayscale image will work, where white is 100% visible and black is 100% invisible.
Example usage:
(...){"lightScaling":{"brightnessMinInput":0, "brightnessMaxInput":1, "flareScaleMinInput":0.6, "flareScaleMaxInput":1, "lightColorOffsetRed":0,"lightColorOffsetGreen":60, "lightColorOffsetBlue":80}}
The arguments are described below. All of the transitions use linear scale. These are to be used together with glowMap transitions. Usually, default values don’t have to be changed. In that case you can make the dictionary empty:
(...){"lightScaling":{}}
LightScaling arguments
Simple Examples
A set of two gauge needles.
"props": [
    ["func", "mesh", "idRef:", "idX:", "idY:", "baseRotation", "rotation", "translation", "min", "max", "offset", "multiplier"]
    //needles
    ["wheelspeed", "needle_speedo", "f7r","f7l","f8r", {"x":5, "y":0, "z":0},
    {"x":0, "y":0, "z":-4}, {"x":0, "y":0, "z":0}, 0, 54, -27, 1],

    ["rpm", "needle_tacho", "f7r","f7l","f8r", {"x":5, "y":0, "z":0},
    {"x":0, "y":0, "z":-0.038}, {"x":0, "y":0, "z":0}, 0, 6000, -2900, 1],
],
A steering wheel prop
"props": [
    ["func", "mesh", "idRef:", "idX:", "idY:", "baseRotation", "rotation", "translation", "min", "max", "offset", "multiplier"]
    //steering wheel
    ["steering", "steer_04a", "f1l","f1r","f6l", {"x":-78, "y":0, "z":180}, {"x":0, "y":0, "z":1}, {"x":0, "y":0, "z":0},
    -1000, 1000, 0, 1, {"baseTranslation":{"x":-0.070,"y":0.605,"z":-0.56}, "breakGroup":"steeringWheelBreak"}],
 ],
Advanced Examples
A set of various interior props for pedals and others driver controls.
"props": [
    ["func", "mesh", "idRef:", "idX:", "idY:", "baseRotation", "rotation", "translation", "min", "max", "offset", "multiplier"]
    //pedals
    ["brake", "pedal_brake", "b1l","b1r","b5l", {"x":0, "y":0, "z":180},
    {"x":-25, "y":0, "z":0}, {"x":0.0, "y":0, "z":0}, 0, 1, 0, 1],

    ["throttle", "pedal_gas", "b1l","b1r","b5l", {"x":0, "y":0, "z":180},
    {"x":-25, "y":0, "z":0}, {"x":0.0, "y":0, "z":0}, 0, 1, 0, 1],

    ["parkingbrake", "pedal_parkingbrake", "b1l","b1r","b5l", {"x":0, "y":0, "z":180},
    {"x":-25, "y":0, "z":0}, {"x":0.0, "y":0, "z":0}, 0, 1, 0, 1],
    //turn signal stalk
    ["turnsignal", "signalstalk", "dsh","dshl","dsh2", {"x":27 "y":180, "z":175},
    {"x":0, "y":-15, "z":-2}, {"x":0, "y":0, "z":0}, -1, 1, -1, 1],
],
A single headlight with both a low and high beam.
"props": [
    ["func", "mesh", "idRef:", "idX:", "idY:", "baseRotation", "rotation", "translation", "min", "max", "offset", "multiplier"]
    {
        "lightInnerAngle":0,
        "lightOuterAngle":120,
        "lightColor":{"r":255, "g":255, "b":170, "a":255},
        "lightAttenuation":{"x":0, "y":1, "z":1},
        "lightCastShadows":true,
        "flareName":"vehicleHeadLightFlare",
        "cookieName":"art/special/BNG_light_cookie_headlight.dds"
        "texSize":512,
        "shadowSoftness":0.5,
    },
    //low beams angled right slightly to avoid blinding oncoming traffic
    ["lowbeam", "SPOTLIGHT", "fa2rr", "fa2r", "fa1rr", {"x":180, "y":0, "z":10}, {"x":0, "y":0, "z":0}, {"x":0, "y":0, "z":0},
    0, 0, 0, 1, {"baseTranslation":{"x":0.3, "y":0.75, "z":0.3},
    "lightRange":50,"lightBrightness":0.3,"lightOuterAngle":95,"flareScale":0.07,"deformGroup":"headlightglass_R_break"}],
    //high beams
    ["highbeam", "SPOTLIGHT", "fa2rr", "fa2r", "fa1rr", {"x":180, "y":0, "z":10}, {"x":0, "y":0, "z":0}, {"x":0, "y":0, "z":0},
    0, 0, 0, 1, {"baseTranslation":{"x":0.3, "y":0.3, "z":0.3},
    "lightRange":80,"lightBrightness":0.6,"lightOuterAngle":80,"flareScale":0.09,"deformGroup":"headlightglass_R_break"}],
],
Was this article helpful?


