Human Machine Interface
Overview
The simulation provides a Human Machine Interface (HMI) suitable for ADAS. This HMI is compatible with two vehicle models, the ETK K (as vehicle selection: ETK K-series/adas_experiment) and the the ETK 800 (as vehicle selection: ETK 800-series, then Vehicle Configuration/Parts, where search for and select ‘Interior ADAS’). The HMI includes the symbols of Adaptive Cruise Control (ACC), parking assistance, lane keeping assistance (LKA), lane departure warning system (LDWS) and forward collision warning system (FCWS), along with options such as to display a vehicle symbol and the speed of a target vehicle. More precisely, the HMI signals include :
- electrics.values.adas_acc_active
- electrics.values.adas_acc_off
- electrics.values.adas_acc_ready
- electrics.values.cruiseControlTarget
- electrics.values.adas_fcws
- electrics.values.adas_ldws
- electrics.values.adas_lka
- electrics.values.adas_acc_active
- electrics.values.adas_acc_ready
- electrics.values.adas_acc_off
- electrics.values.parkassist
- electrics.values.adas_screen_car
- electrics.values.adas_screen_distance1
- electrics.values.adas_screen_distance2
- electrics.values.adas_screen_blink_line_L
- electrics.values.adas_screen_blink_line_R
The symbols we implemented are according to ISO standards, i.e., ISO 7000-2682 for LDWS, ISO 7000-3180 for LKA, ISO 7000-2580 for ACC, ISO 7000-2681 for FCWS and ISO 7000-3027 for parking assist. All signals here are booleans with the only non boolean to be the cruiseControlTarget; it is a float for the speed of the target vehicle.
Usage
When the user launches the simulation with the suitable vehicle, they can launch the console by pressing '.
With the vehicle selected one can assign the following commands and then press ’execute’ to see the display. Pressing Ctrl+C allows for closer look at the dashboard.
For example, a commands is electrics.values.adas_acc_active=1 which displays the symbol of ACC on the dashboard, with green color as active state. Or, electrics.values.adas_screen_distance1=1 to display the symbol of distance between the ego vehicle and the target vehicle.
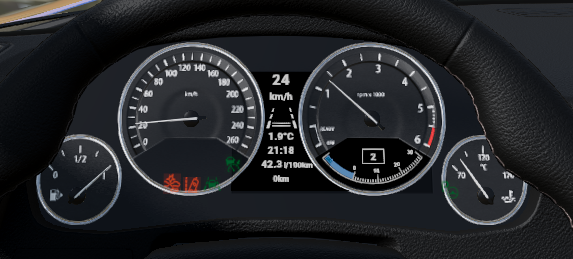 Example of the dashbord when activating HMI
Other way to use these HMI symbols is to trigger them via the
Simulink interface with BeamNG
, to get them displayed on the dashboard after a Simulink model sends suitable activation signals to BeamNG. To this end, the custom user signals at Lua side can include receiving a decodedMessageFromSimulink[XX] signal. This would lead to activate the HMI symbol, for instance with electrics.values.adas_lka = 1, at the Lua controller for the Simulink model.
Was this article helpful?
