The part/slot system
One of the things that allows BeamNG car modifications is the system of components and slots.
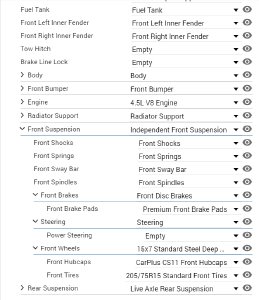
If you’ve used the part selector before, you know that there are multiple components, often with multiple options, which are split across levels, with some parts options being available or not depending on what you’ve chosen as the previous part
How slots and components are defined
Everything related to what you can see in the parts selector is defined in the jbeam for each component. Here’s a small example :
"autobello_suspension_F": {             //Internal name of the component
    "information":{
        "authors":"BeamNG",             //Name in the part selectior
        "name":"Trailing Link Front Suspension",
        "value":400,
    },
    "slotType":"autobello_suspension_F",//Slot Type
    "slots":[                           //Slots
        ["type", "default", "description"],
        ["autobello_brake_F","autobello_brake_F", "Front Brakes"],
        ["wheel_F_4","steelwheel_11b_13x5_F", "Front Wheels"],
        ["autobello_spring_F","autobello_spring_F", "Front Springs"],
        ["autobello_steering","autobello_steering", "Steering"],
    ],
},
Each part has an internal name, defined by the very first line of a part’s jbeam. This name will be used by the game to refer to that part, it is however not seen by the user. It is important for this name to be unique, in order to avoid issues like parts overriding each other.
The information section shows some basic information on that component, including the name that will be shown in the parts selector.
Each part also has a slotType , which identifies where in the vehicle it fits.
The slot type allows you to have multiple parts with this specific slot type that would act as alternatives, with every part with an identical “slot type” appearing as different options of the same part in the part selector.
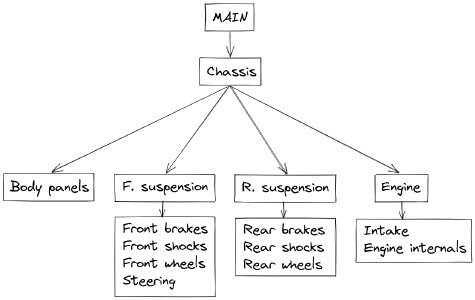
One unique slot type is “main”, which refers to the base component of the vehicle. This identifies the component as being the “root” part of the vehicle and will be the first component loaded by the game. There can only be one part per car with that slot type.
The slots section defines which components are the “children” of that component based on their slotType. If we follow with the example of our front suspension, you would find things like the front brakes, wheels, shocks, steering, etc.
The end result is a parts selection tree, with the “main” part at the top, and multiple layers of “children” components.
How configurations work
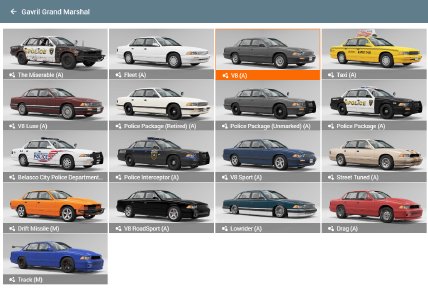
One thing you have probably noticed when playing the game is that each car has preset configurations, with multiple trim levels, offroad and racing versions, etc.
The way those work is fairly simple, using what are called “configuration files”. Here’s a small example of what you can find if you open a config file.
{
"parts":{
  "coupe_enginemounts":"coupe_enginemounts_heavy",
  "coupe_oilpan_I4":"coupe_oilpan_I4_race",
  "coupe_engine_ecu":"coupe_engine_ecu_race",
  "coupe_engine_internals":"coupe_engine_internals_stage2",
  "coupe_taillight_L":"coupe_taillight_L",
  "paint_design":"coupe_skin_nomi",
  ...
}
"vars":{
  "$trackoffset_R":0.02,
  "$trackoffset_F":0.025,
  "$lsdpreload_R":125,
  ...
},
Configuration files are essentially a json table that contains list of the various slots, along with the component that should be used in each slot. If a slot is not present in the configuration file, the default component will be used.
The configuration files also define the values that will be used for the various variables .
Along with configuration files, you will also often see an info file, which describes the various information that will be shown for that variant in the car selector, along with a thumbnail.
Advanced example: Using the same Jbeam component for multiple parts
With a clever use of some advanced Jbeam mechanisms, such as Slot Variables and Functions , it is possible to make 2 different Jbeam components defined by the same code, and select them at the same time. In order to do this, a string slot variable is required in the parent slots, like so:
"slots": [
    ["type", "default", "description"],
    ["reusable_part_slot1", "", "Slot 1", {"nodeMove":{"x": 2,"y":0,"z":0}, "variables":{"$prefix":"a"}}],
    ["reusable_part_slot2", "", "Slot 2", {"nodeMove":{"x":-2,"y":0,"z":0}, "variables":{"$prefix":"b"}}],
],
Then in the reusable part itself, slotType should be a table which fits both of the presented types, and each unique string for the part such as group name and node name needs to be concatenated with the variable string, for example:
"reusable_part": {
    "information":{
        "authors":"BeamNG",
        "name":"Reusable Part",
    },
    "slotType" : ["reusable_part_slot1", "reusable_part_slot2"],
    "nodes": [
        ["id", "posX", "posY", "posZ"],
        {"nodeWeight":1.0},
        {"collision":true},
        {"selfCollision":true},
        {"group":"$=$prefix..'_group'"},

        ["$=$prefix..'1'", 1,-1, 0],
        ["$=$prefix..'2'",-1,-1, 0],
        ["$=$prefix..'3'",-1, 1, 0],
        ["$=$prefix..'4'", 1, 1, 0],
        ["$=$prefix..'5'", 0, 0, 2],

        {"group":""},
    ],
    "beams": [
        ["id1:", "id2:"],
        {"beamPrecompression":1, "beamType":"|NORMAL", "beamLongBound":1, "beamShortBound":1},

        {"beamSpring":461000,"beamDamp":140},
        {"beamDeform":40000,"beamStrength":100000},

        ["$=$prefix..'1'", "$=$prefix..'2'"],
        ["$=$prefix..'1'", "$=$prefix..'3'"],
        ["$=$prefix..'1'", "$=$prefix..'4'"],
        ["$=$prefix..'2'", "$=$prefix..'3'"],
        ["$=$prefix..'2'", "$=$prefix..'4'"],
        ["$=$prefix..'3'", "$=$prefix..'4'"],

        ["$=$prefix..'1'", "$=$prefix..'5'"],
        ["$=$prefix..'2'", "$=$prefix..'5'"],
        ["$=$prefix..'3'", "$=$prefix..'5'"],
        ["$=$prefix..'4'", "$=$prefix..'5'"],
    ],
    "triangles": [
        ["id1:","id2:","id3:"],

        ["$=$prefix..'1'", "$=$prefix..'2'", "$=$prefix..'3'"],
        ["$=$prefix..'3'", "$=$prefix..'4'", "$=$prefix..'1'"],

        ["$=$prefix..'1'", "$=$prefix..'5'", "$=$prefix..'2'"],
        ["$=$prefix..'2'", "$=$prefix..'5'", "$=$prefix..'3'"],
        ["$=$prefix..'3'", "$=$prefix..'5'", "$=$prefix..'4'"],
        ["$=$prefix..'4'", "$=$prefix..'5'", "$=$prefix..'1'"],
    ],
},
You can also define additional Boolean Slot Variables and use them together with the Disable Modifier to toggle different rows of the Jbeam file depending on the slotType.
Was this article helpful?


