Material Examples
Here are a few examples of materials to help you create materials for your own projects.
In all cases, don’t be shy to use vanilla content as reference, and to re-use vanilla textures and materials when applicable. There is a selection of predefined materials in the game’s common folder for things like grilles, generic lights, etc.
Keep in mind that it’s impossible to go through all the possible materials you might want to make, however these examples should help you get started. Don’t hesitate to play around with the material editor which can be accessed using the F11 menu, this can be a great way to see live the effects of different settings.
Whenever you are creating materials, it is recommended to use png files along with the name scheme described in the Texture Cooker page. Once you are done editing the textures, and making sure that everything looks the way you want, please copy over the dds files and remove the png files from your mods folder. This step will help keep loading times to a minimum, as the game will otherwise need to convert the textures to dds every time a user first uses your mod.
There are 2 ways to edit materials: Either manually with a text editor ( Visual Studio Code recommended for json syntax highlighting), or with the in-game Material Editor. The editor can be accessed by opening the World Editor (F11 key by default) and then going to the Window tab and clicking on Material Editor. The editor offers a dynamic preview system and more human-readable options that get automatically translated to Json code when the material is saved. The result will be saved in your Userfolder, in the folder of the vehicle this material belongs to.
Header
Let’s start with the parameters that will always be used.
You can start by creating a new file called main.materials.json, putting in a pair of curly brackets and pasting this inside:
"vivace_main": {
  "name": "vivace_main",
  "mapTo": "vivace",
  "class": "Material",
  "Stages": [
      {},
      {},
      {},
      {}
  ],
  "dynamicCubemap": true,
  "materialTag0": "beamng",
  "materialTag1": "vehicle",
  "version": 1.5
},
This is what these options look like in the Material Editor:
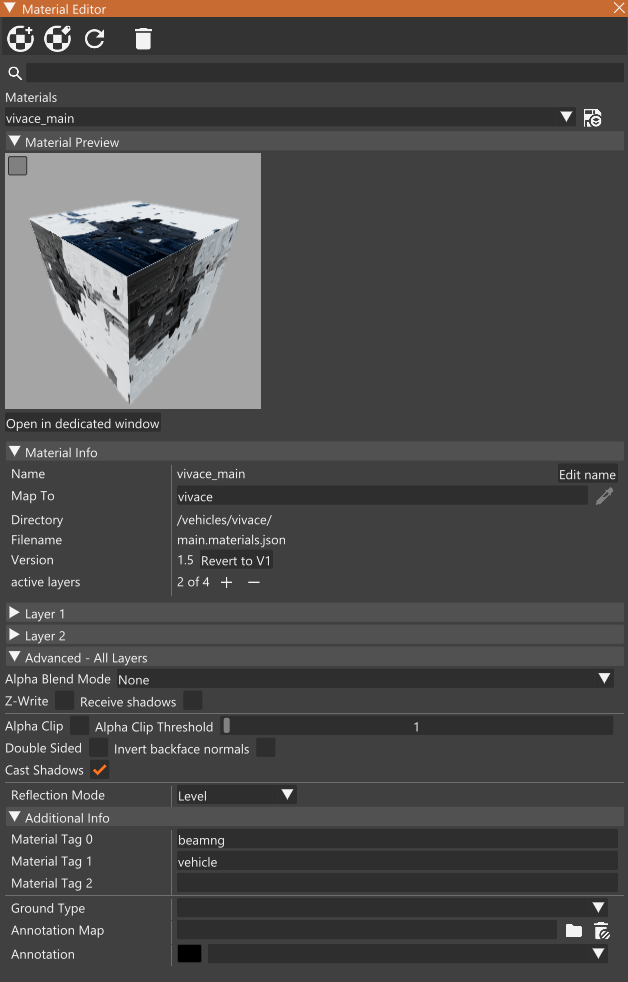
The first line, along with the name, should be unique for that material. Editing it in the Material Editor will require reloading the game, so you should best do it manually before going into the editor.
MapTo identifies what material within Blender this material applies to. For clarity, it is usually the same as the material name, with the exception of the vehicle’s main material which has the _main suffix in the name but not in mapTo.
Class should be left as is.
Stages is where you’ll be putting the information about the different textures used, and what will appear under Layers in the editor.
Dynamic cubemap means that this material will use dynamic reflections. This is usually left on. In the Material Editor, this is controlled by the Reflection Mode.
Material tags can be left as-is.
Version 1.5 means that this material is a PBR material. Do not revert it in the World Editor as you can the information about the textures that were not supported in older versions.
Main vehicle material
The main material of any car should be mostly colorable, to allow the player to change the color of the car’s paint.
On vanilla vehicles, this material also often includes some mechanical components, which are not colorable. The split between colorable and non-colorable sections is done using 2 layers. The first layer having all the non-colorable parts of the material, and the second layer having all the colorable parts.
The “activeLayers” parameter indicates how many of your declared layers will be used, it should be set to the number of layers your material has if it’s more than 1, otherwise it should be removed, which will default its value to 1.
If you are making skins, keep in mind that most vanilla vehicles have 2 different UV maps on their body. The first one is mirrored, and used for most components of the material, and helps save UV space for smaller details. The second one is not mirrored and only includes the body surfaces. This is the UV map you’ll usually be using when making skins.
If you are making materials for your own car, and every surface of your main material is colorable, you can use the content of the second layer as your first layer. Just make sure to remove the “activeLayers” parameter.
  "vivace_main": {
    "name": "vivace_main",
    "mapTo": "vivace",
    "class": "Material",
    "persistentId": "c149d182-981e-4864-8d0d-6449b0372ece",
    "Stages": [
      {
        "ambientOcclusionMap": "/vehicles/vivace/vivace_main_ao.data.png",
        "baseColorMap": "/vehicles/vivace/vivace_main_b.color.png",
        "metallicMap": "/vehicles/vivace/vivace_main_m.data.png",
        "metallicFactor": 1,
        "normalMap": "vehicles/vivace/vivace_n.dds",
        "roughnessMap": "/vehicles/vivace/vivace_main_r.data.png",
        "useAnisotropic": true
      },
      {
        "ambientOcclusionMap": "/vehicles/vivace/vivace_main_ao.data.png",
        "instanceDiffuse": true,
        "useAnisotropic": true,
        "colorPaletteMapUseUV": 1,
        "clearCoatFactor": 1,
        "clearCoatRoughnessFactor": 1,
        "metallicFactor": 1,
        "clearCoatMap": "/vehicles/vivace/vivace_main_cc.data.png",
        "normalMap": "/vehicles/vivace/vivace_n.dds",
        "opacityMap": "/vehicles/vivace/vivace_main_c.data.png",
        "colorPaletteMap": "/vehicles/common/nullcolormaskR.dds"
      },
      {},
      {}
    ],
    "activeLayers": 2,
    "dynamicCubemap": true,
    "materialTag0": "beamng",
    "materialTag1": "vehicle",
    "order_simset": 0,
    "version": 1.5
  },
PersistentId
PersistentId is a constant data block ID in the game engine, the whole line should be deleted when modifying a material manually. When using the Material Editor, it will generate a new ID automatically and add this line for you.
First layer
The first layer is pretty the same as a standard material. See that section for more information.
Second layer
The second layer is a good example of a fully colorable material.
{
  "ambientOcclusionMap": "/vehicles/vivace/vivace_main_ao.data.png",
  "instanceDiffuse": true,
  "useAnisotropic": true,
  "colorPaletteMapUseUV": 1,
  "clearCoatFactor": 1,
  "clearCoatRoughnessFactor": 1,
  "metallicFactor": 1,
  "clearCoatMap": "/vehicles/vivace/vivace_main_cc.data.png",
  "normalMap": "/vehicles/vivace/vivace_n.dds",
  "opacityMap": "/vehicles/vivace/vivace_main_c.data.png",
  "colorPaletteMap": "/vehicles/common/nullcolormaskR.dds",
}
In the Material Editor, this layer is divided between basic and advanced properties.
Note that due to the DDS file compression, grayscale textures have the green and blue channels removed and appear red for optimization purposes, and similarly normal maps lack the blue channel and appear yellow. When working on png files, you should not remove those channels manually, it will be done by the Texture Cooker.
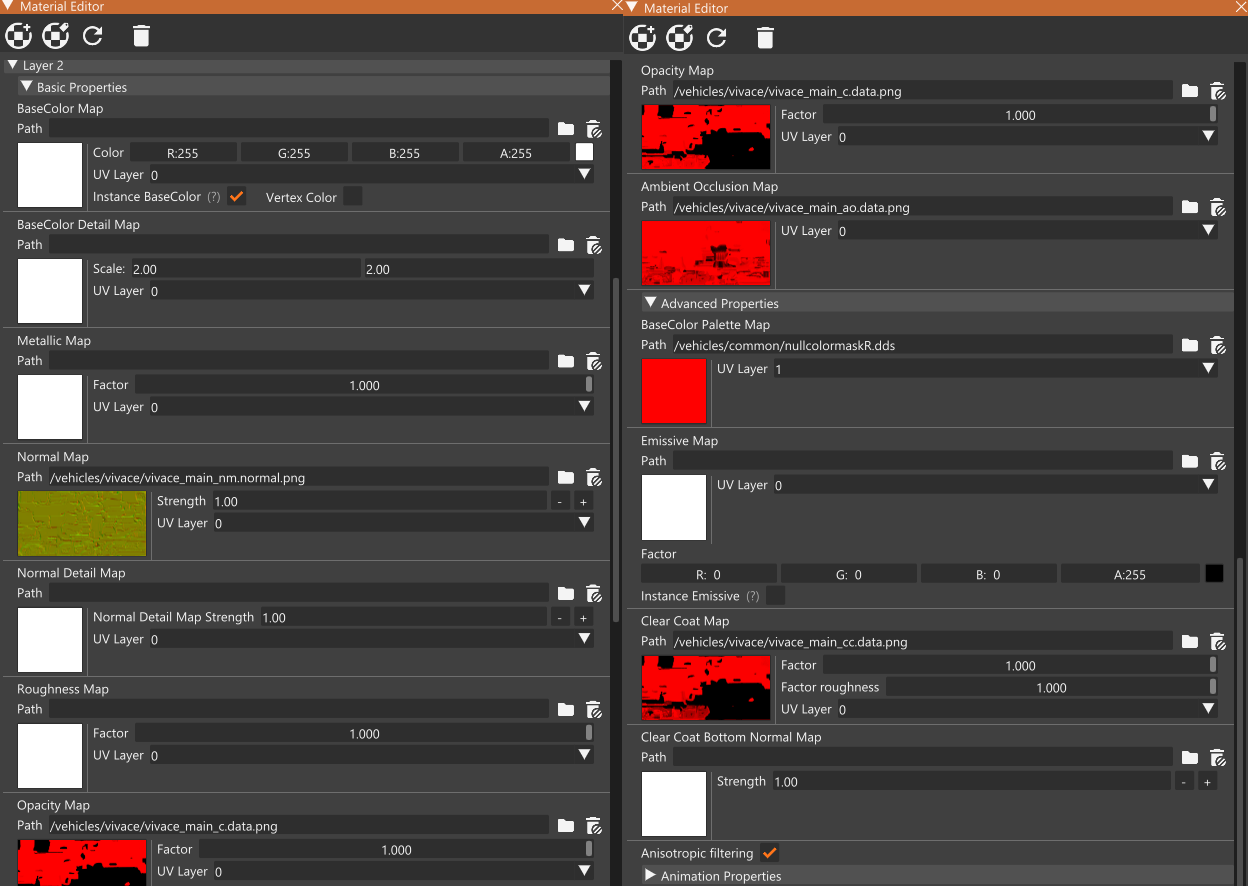
ambientOcclusionMap : This is just a black and white ambient occlusion map. It’s going to be the same as the first layer.
instanceDiffuse : Also known as “Instance BaseColor” in the material editor, this means that this material will be affected by the color selector.
useAnisotropic : When set to true, this layer will use anisotropic filtering. This is usually left as is for most materials.
colorPaletteMapUseUV : A setting of 1 means this texture gets mapped to the second, unmirrored UV map. It is a very common thing for skins, and here it is useful if you want the paint to be two-tone by default. In the editor it’s controlled via picker list.
clearCoatFactor : Multiplies the color values on the clearCoatMap. When set to 1, the player can use the clear coat slider in the vehicle paint tab, setting it to 0 makes the slider unusable. Inbetween values will result in the slider being partially effective. Should never be set higher than 1. In the Material Editor controlled via the Factor slider next to the clear coat map.
clearCoatRoughnessFactor : Works analogically to the clearCoatFactor, but in relation to clear coat roughness. Since a clear coat roughness map is not defined in this case, a full white texture will be chosen by default, which makes this value acts as a coefficient of the clear coat roughness. In the Material Editor controlled via the Factor Roughness slider next to the clear coat map.
metallicFactor : Works the same as above, but for the metallic effect. It is important to set it to 1 in the material, as the default value is 0, resulting in the metallic paint slider being unusable.
clearCoatMap: A grayscale map that controls which parts of the texture can receive the clear coat paint effect. You should mark all the outside paintable parts of the car white, other paintable parts various shades of gray depending how much maximum clear coat you want them to have, and the rest black. Do not use this outside of the vehicle paint as it is performance intensive.
normalMap : The normal map of the body. As it contains no specific info, this can be left the same as on the first layer.
opacityMap : A grayscale, mostly just black and white map that controls which parts of the textures used on this layer will be visible and which not. In this case it essentially decides which parts of the car will be colorable. You should mark those parts full white and the other ones full black. In rare cases when you want a smooth transition you can mark some parts various shades of gray too.
colorPaletteMap : Decides which color palette will be used for which colorable part of the vehicle. Red is the first palette, green second and blue third. For the majority of cases, you will want this map to be full red (so leave the one you have by default), but in case you want a factory two-tone option to be default without having to select a skin, you can mark parts of it full green. Keep in mind that this uses the second unmirrored UV map.
Other materials
Single color material
Single color material, while not the best looking, can still get the job done if you’re a beginner, and can be defined in a very basic way using modifiers.
Keep in mind that those materials will look somewhat flat, however they are an easy way to add some color to a first project.
A similar logic can be used for some specific options of other material examples, when an even color or roughness map is fine for the application.
"example_single_color_material" : {
  "name" : "example_single_color_material",
  "mapTo" : "example_single_color_material",
  "class" : "Material",
  "persistentId" : "7d9f2774-c0f3-4440-ba16-de7086669244",
  "Stages" : [
    {
      "baseColorFactor" : [ 0.11, 0.16, 0.20, 2.0 ],
      "roughnessFactor": 0.4,
      "useAnisotropic": true
    },
    {},
    {},
    {}
  ],
  "activeLayers": 1,
  "dynamicCubemap": true,
  "materialTag0": "beamng",
  "materialTag1": "vehicle",
  "order_simset": 0,
  "version": 1.5
},
baseColorFactor : multiplies the value in the baseColorMap by a set of numbers, one for each RGBA channel. Controlled by the Color values next to the base color map in Material Editor. Since in this case there is no baseColorMap, it defaults to plain white, and the numbers act as RGBA values themselves, each one defining a coefficient of its channel.
roughnessFactor : Multiplies the color values on the roughnessMap. Since we are not defining a roughnessMap, the default is full white, so this number acts as a roughness coefficient. The same way you can use the metallicMap, clearCoatMap and clearCoatRoughnessMap. They are all controlled by Factor sliders in the editor.
Standard material
Standard materials include anything which is opaque and non-colorable. Those materials are made using a single layer, and use textures for all or most of the textures maps. The first layer of the car’s body is also done in a very similar way.
"vivace_mechanical": {
  "name": "vivace_mechanical",
  "mapTo": "vivace_mechanical",
  "class": "Material",
  "Stages": [
    {
      "ambientOcclusionMap": "/vehicles/vivace/vivace_mechanical_ao.data.png",
      "baseColorMap": "/vehicles/vivace/vivace_mechanical_b.color.png",
      "metallicFactor": 1,
      "metallicMap": "/vehicles/vivace/vivace_mechanical_m.data.png",
      "normalMap": "vehicles/vivace/vivace_mechanical_nm.normal.png",
      "roughnessMap": "/vehicles/vivace/vivace_mechanical_r.data.png",
      "useAnisotropic": true
    },
    {},
    {},
    {}
  ],
  "dynamicCubemap": true,
  "materialTag0": "beamng",
  "materialTag1": "vehicle",
  "order_simset": 0,
  "version": 1.5
},
Here is what the layer of the above material looks like in Material Editor:
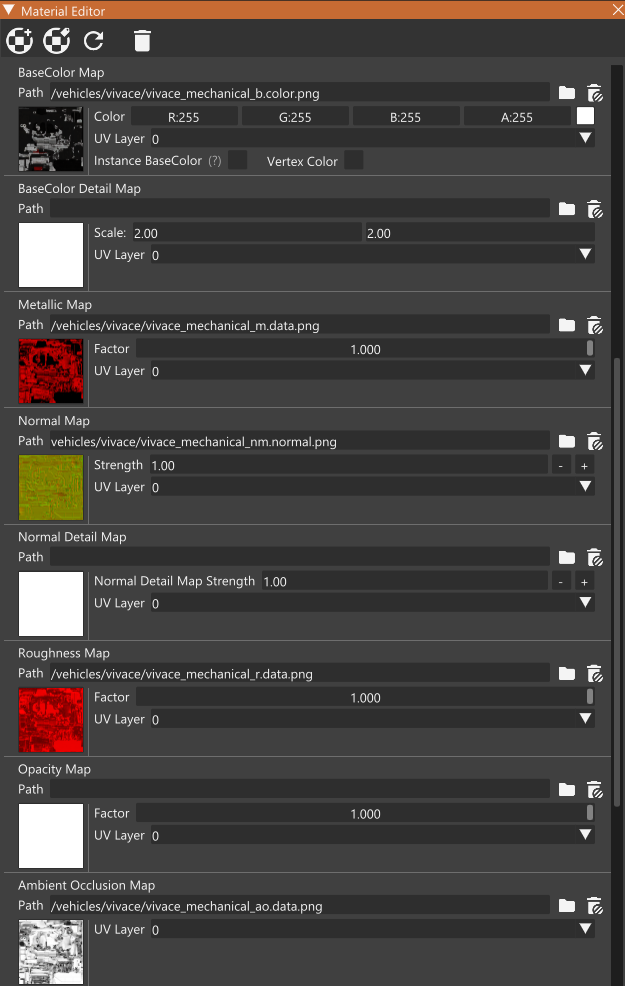
ambientOcclusionMap : The same as on a colorable material, it is a grayscale texture which controls the ambient occlusion of the material.
baseColorMap : Commonly referred to as ‘Albedo’ in literature, this map simply dictates the colors of the object. Keep in mind that you should not include any shadows, so it’s not possible to use an unedited picture of a real life vehicle part here.
metallicFactor : Multiplies the brightness values set by the metallicMap. It is important to set it to 1 when using a metallicMap, because the default value is 0, which nullifies the map.
metallicMap : A black and white map that decides which parts of the object will react to light like a metallic surface. You should not use shades of grey on it in most cases as a surface can’t be partially metallic under normal circumstances.
roughnessMap : A grayscale map that dictates the degree to which parts of the surface scatter light.
useAnisotropic : When set to true, this layer will use anisotropic filtering. This is usually left as is for most materials.
Transparent materials
Transparent materials are mostly used for things like glass and light lenses. They have some unique properties that are not present on normal materials.
"etkc_glass": {
  "name": "etkc_glass",
  "mapTo": "etkc_glass",
  "class": "Material",
  "Stages": [
    {
      "ambientOcclusionMap": "/vehicles/etkc/etkc_glass_ao.data.png",
      "baseColorMap": "vehicles/etkc/etkc_glass_b.color.png",
      "metallicFactor": 1,
      "metallicMap": "/vehicles/etkc/etkc_glass_m.data.png",
      "normalMap": "/vehicles/etkc/etkc_glass_nm.normal.png",
      "opacityMap": "/vehicles/etkc/etkc_glass_o.data.png",
      "pixelSpecular": true,
      "roughnessFactor": 1,
      "roughnessMap": "/vehicles/etkc/etkc_glass_r.data.png"
    },
    {},
    {},
    {}
  ],
  "alphaRef": 0,
  "castShadows": false,
  "dynamicCubemap": true,
  "materialTag0": "beamng",
  "materialTag1": "vehicle",
  "translucent": true,
  "translucentBlendOp": "PreMulAlpha",
  "translucentRecvShadows": true,
  "version": 1.5
},
These properties are under the “Advanced - All Layers” tab in the Material Editor.
![]()
alphaRef : Also known as the Alpha Clip Threshold. Decides when to render objects that are covered by other transparent objects. Should be left at 0 for vehicle glass.
castShadows : Decides whether the object should cast shadows on other objects, should be set to false for transparent materials.
translucent: Decides whether the material will be see-through. If set to true, the areas not covered by full white by the opacity maps of this material will be fully or partially transparent depending on the combined brightness of the pixels of the opacityMaps. In simple terms, the darker something is on our opacityMap, the more see-through it will be.
translucentBlendOp : Also known as “Alpha Blend Mode”, it decides how multiple see-through objects will be rendered on top of each other. The best value to use for vehicle glass is “PreMulAlpha”.
translucentRecvShadows : If set to true, the transparent objects will receive shadows from other objects despite not casting their own shadows.
pixelSpecular and order_simset should be left as is.
What a lot of modders forget about is that the inner side of the glass should have a different material than the outer side, which disables the reflections. This is because a vehicle cannot reflect parts of itself, so the inner side of the glass would reflect the road and surroundings instead. This can be done by getting rid of the roughnessMap, which will default it to full white, disabling the reflections.
"etkc_glass_int": {
  "name": "etkc_glass_int",
  "mapTo": "etkc_glass_int",
  "class": "Material",
  "persistentId": "00181ae3-4f76-4c7b-947f-5e78687b5f3f",
  "Stages": [
    {
      "ambientOcclusionMap": "/vehicles/etkc/etkc_glass_ao.data.png",
      "baseColorMap": "vehicles/etkc/etkc_glass_b.color.png",
      "metallicFactor": 1,
      "metallicMap": "/vehicles/etkc/etkc_glass_m.data.png",
      "normalMap": "/vehicles/etkc/etkc_glass_nm.normal.png",
      "opacityMap": "/vehicles/etkc/etkc_glass_o.data.png",
      "pixelSpecular": true
    },
    {},
    {},
    {}
  ],
  "alphaRef": 210,
  "alphaTest": true,
  "castShadows": false,
  "dynamicCubemap": true,
  "materialTag0": "beamng",
  "materialTag1": "vehicle",
  "translucent": true,
  "translucentBlendOp": "None",
  "translucentRecvShadows": true,
  "version": 1.5
},
![]()
The inner glass does not need to have an alpha blend mode. The alphaRef value should be higher than of the outer glass. There should also be an alphaTest parameter present, which enables the alpha clip rendering system.
Transparent parts of a vehicle such as glass often feature a secondary material to be used when broken. The second material is built in a similar way but has a few unique properties.
"etkc_glass_dmg": {
  "name": "etkc_glass_dmg",
  "mapTo": "etkc_glass_dmg",
  "class": "Material",
  "persistentId": "4b35d61e-684d-43f6-bbfa-7ce1551d1024",
  "Stages": [
    {
      "ambientOcclusionMap": "/vehicles/etkc/etkc_glass_ao.data.png",
      "baseColorMap": "vehicles/etkc/etkc_glass_dmg_b.color.png",
      "metallicFactor": 1,
      "metallicMap": "/vehicles/etkc/etkc_glass_dmg_m.data.png",
      "normalMap": "/vehicles/etkc/etkc_glass_dmg_nm.normal.png",
      "opacityMap": "/vehicles/etkc/etkc_glass_dmg_o.data.png",
      "pixelSpecular": true,
      "roughnessFactor": 0.310000002
    },
    {},
    {},
    {}
  ],
  "alphaRef": 4,
  "alphaTest": true,
  "castShadows": false,
  "dynamicCubemap": true,
  "materialTag0": "beamng",
  "materialTag1": "vehicle",
  "translucent": true,
  "translucentBlendOp": "PreMulAlpha",
  "translucentRecvShadows": true,
  "version": 1.5
},
![]()
The base color, normal and opacity map should include a large hole in the middle of the glass, colored full black in the opacityMap, and cracks on the visible part of it made with the normalMap.
The alphaRef value should be higher than of the intact glass. There should also be an alphaTest parameter present, which enables the alpha clip rendering system.
Emissive materials
Emissive materials are used for things like lights and gauges, to allow them to look lit when the lights are turned on. The turned off and broken variants of them should instead use standard materials.
"bastion_lights_on": {
  "name": "bastion_lights_on",
  "mapTo": "bastion_lights_on",
  "class": "Material",
  "persistentId":"5e194b74-4312-436d-8815-0fb83c22bd20",
  "Stages": [
    {
    "ambientOcclusionMap": "/vehicles/bastion/bastion_lights_ao.data.png",
      "baseColorMap": "/vehicles/bastion/bastion_lights_b.color.png",
      "emissiveFactor": [
        5.0980401,
        5.0980401,
        5.0980401
      ],
      "emissiveMap": "/vehicles/bastion/bastion_lights_g.color.png",
      "metallicFactor": 1,
      "metallicMap": "/vehicles/bastion/bastion_lights_m.data.png",
      "normalMap": "vehicles/bastion/bastion_lights_nm.normal.png",
      "pixelSpecular": true,
      "roughnessMap": "/vehicles/bastion/bastion_lights_r.data.png"
    },
    {},
    {},
    {}
  ],
  "dynamicCubemap": true,
  "materialTag0": "beamng",
  "materialTag1": "vehicle",
  "version": 1.5
},
In the Material Editor, you can find these settings in advanced properties of the layer you are working on.
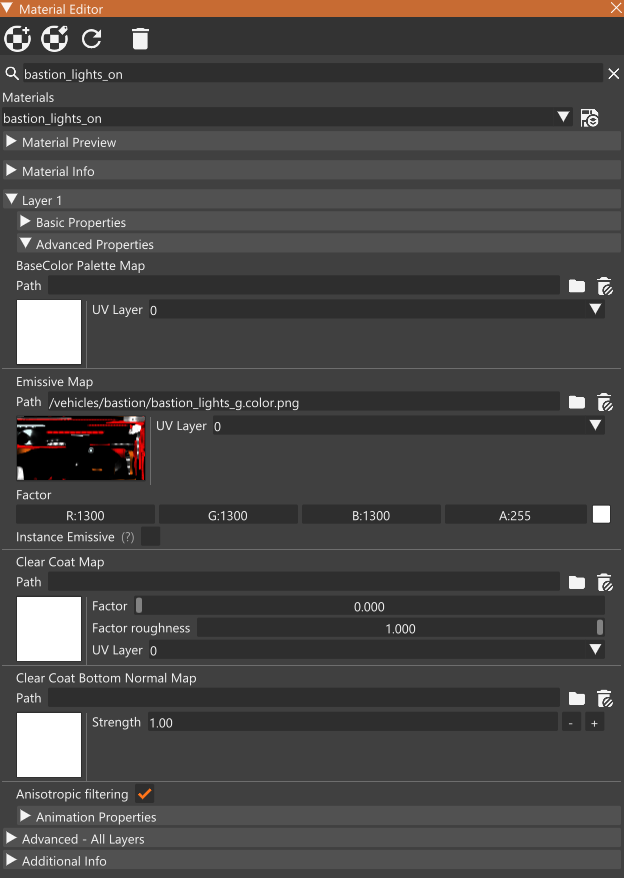
emissiveFactor : A table of RGB factors that multiply the values in the emissiveMap. Values higher than 1 will add additional energy to the glowing material, which in some cases will produce a blinding effect known as Bloom. Bloom appears when energy surpasses a default threshold value, using large numbers will not produce more bloom but will instead make it easier to pass the threshold, which can make the material look unrealistic in some lighting conditions. in the Material Editor these are the Factor values next to the emissive map in RGB format.
emissiveMap : Controls the color of light emitted by parts of the material. Full black means no emission. This can use BC6H textures, allowing you to use RGB values higher than 255. Your texture will then contain the energy values for individual pixels, which can produce a better effect than using emissiveFactor.
Vehicle lights will often have 2 enabled states, on and on_intense. The latter should have a slightly higher emissiveFactor so that it glows brighter.
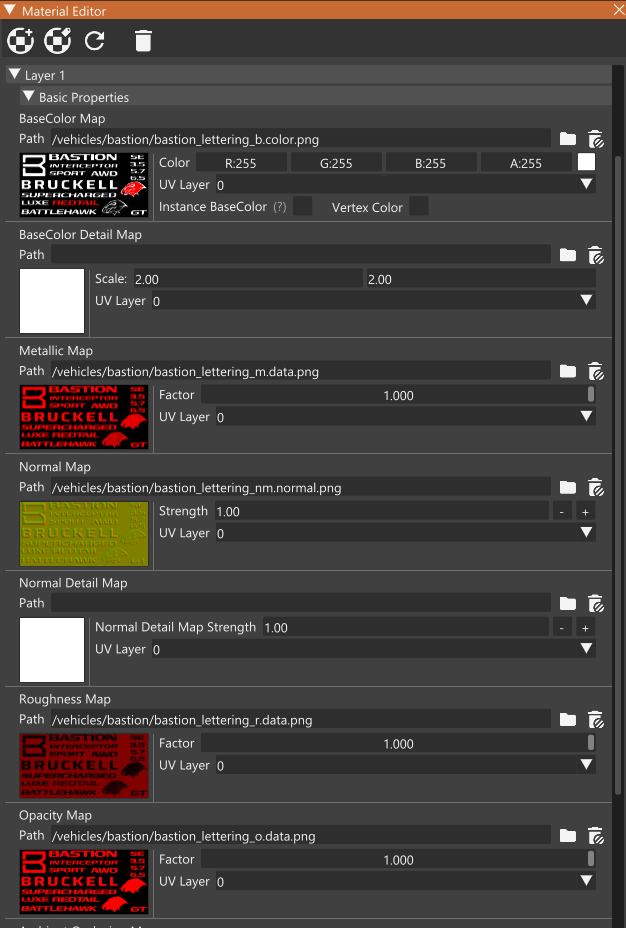
Decals
Decals refers to very simple meshes with a partly transparent background. They are commonly used for things like badges, allowing to easily add and remove badges without needing too much geometry.
They are made using a single layer. Keep in mind that it is preferable to have all the decal variants on a single texture, and UV map each of the to the correct area, to help simplify the material definition.
"bastion_lettering": {
  "name": "bastion_lettering",
  "mapTo": "bastion_lettering",
  "class": "Material",
  "persistentId": "4bb0aad6-cd6b-4710-9621-c20357f42de9",
  "Stages": [
    {
      "ambientOcclusionMap": "/vehicles/bastion/bastion_lettering_ao.data.png",
      "baseColorMap": "/vehicles/bastion/bastion_lettering_b.color.png",
      "metallicFactor": 1,
      "metallicMap": "/vehicles/bastion/bastion_lettering_m.data.png",
      "normalMap": "/vehicles/bastion/bastion_lettering_nm.normal.png",
      "opacityMap": "/vehicles/bastion/bastion_lettering_o.data.png",
      "roughnessMap": "/vehicles/bastion/bastion_lettering_r.data.png"
    },
    {},
    {},
    {}
  ],
  "alphaRef": 195,
  "alphaTest": true,
  "dynamicCubemap": true,
  "materialTag0": "beamng",
  "materialTag1": "vehicle",
  "translucentBlendOp": "None",
  "translucentRecvShadows": true,
  "version": 1.5
},
Dummy materials
Dummy materials are ’empty’ material definitions that are used for materials that have glowMaps assigned to them. Since the glowMap dictates materials that will replace this one at all times, the main one does not need to have any textures assigned to it, and is usually kept as simple as possible in order to lower the file size of your materials file (it can make a significant difference if your glowMap section features lots of materials).
"bastion_chmsl": {
  "name": "bastion_chmsl",
  "mapTo": "bastion_chmsl",
  "class": "Material",
  "Stages": [{}, {}, {}, {}]
},
Dynamic texture materials
Dynamic texture materials allow the creation of dynamic vehicle liveries in career mode. This material should be exactly the same as the base material that is getting painted, except the names should have a “.skin.dynamicTextures” postfix, and the textures that you want to be modified dynamically should be replaced with references to dynamic textures, for example:
{
   "moonhawk.skin.dynamicTextures" : {
    "name" : "moonhawk.skin.dynamicTextures",
    "mapTo" : "moonhawk.skin.dynamicTextures",
    "class" : "Material",
    "persistentId" : "18752d24-5e7a-4164-92f8-7fc2311e19b5",
    "Stages": [
      {
        "ambientOcclusionMap": "/vehicles/moonhawk/moonhawk_main_ao.data.png",
        "baseColorMap": "/vehicles/moonhawk/moonhawk_main_b.color.png",
        "metallicMap": "/vehicles/moonhawk/moonhawk_main_m.data.png",
        "metallicFactor": 1,
        "roughnessFactor": 1,
        "normalMap": "vehicles/moonhawk/moonhawk_n.dds",
        "roughnessMap": "/vehicles/moonhawk/moonhawk_main_r.data.png",
        "useAnisotropic": true
      },
      {
        "ambientOcclusionMap": "/vehicles/moonhawk/moonhawk_main_ao.data.png",
        "useAnisotropic": true,
        "diffuseMapUseUV": 1,
        "colorPaletteMapUseUV": 1,
        "instanceDiffuse": true,
        "clearCoatFactor": 1,
        "clearCoatRoughnessFactor":1,
        "metallicMapUseUV": 1,
        "metallicFactor": 1,
        "clearCoatMap": "/vehicles/moonhawk/moonhawk_main_cc.data.png",
        "normalMap": "/vehicles/moonhawk/moonhawk_n.dds",
        "opacityMap": "/vehicles/moonhawk/moonhawk_main_alt_c.data.png",
        "baseColorMap": "@DynamicTextureBaseColor",
        "colorPaletteMap": "@DynamicTextureColorPalette"
      },
      {},
      {}
    ],
    "activeLayers": 2,
    "dynamicCubemap": true,
    "materialTag0": "beamng",
    "materialTag1": "vehicle",
    "order_simset": 0,
    "version": 1.5
  },
  "moonhawk_nosecone_alt.skin.dynamicTextures" : {
    "name" : "moonhawk_nosecone_alt.skin.dynamicTextures",
    "mapTo" : "moonhawk_nosecone_alt.skin.dynamicTextures",
    "class" : "Material",
    "persistentId" : "c65efec7-da6b-4fa1-bc18-37d819d89db9",
    "Stages": [
      {
        "ambientOcclusionMap": "/vehicles/moonhawk/moonhawk_nosecone_alt_ao.data.png",
        "baseColorMap": "/vehicles/moonhawk/moonhawk_nosecone_alt_b.color.png",
        "metallicFactor": 1,
        "metallicMap": "/vehicles/moonhawk/moonhawk_nosecone_alt_m.data.png",
        "normalMap": "vehicles/moonhawk/moonhawk_nosecone_alt_n.dds",
        "roughnessMap": "/vehicles/moonhawk/moonhawk_nosecone_alt_r.data.png",
        "useAnisotropic": true
      },
      {
        "baseColorMap": "@DynamicTextureBaseColor",
        "ambientOcclusionMap": "/vehicles/moonhawk/moonhawk_nosecone_alt_ao.data.png",
        "clearCoatFactor": 1,
        "clearCoatMap": "/vehicles/moonhawk/moonhawk_nosecone_alt_c.data.png",
        "clearCoatRoughnessFactor": 0.06,
        "colorPaletteMap": "@DynamicTextureColorPalette",
        "colorPaletteMapUseUV": 1,
        "diffuseMapUseUV": 1,
        "instanceDiffuse": true,
        "metallicFactor": 1,
        "metallicMap": "@DynamicTextureMetallic",
        "metallicMapUseUV": 1,
        "normalMap": "/vehicles/moonhawk/moonhawk_nosecone_alt_n.dds",
        "opacityMap": "/vehicles/moonhawk/moonhawk_nosecone_alt_c.data.png",
        "roughnessMap": "@DynamicTextureRoughness",
        "roughnessMapUseUV": 1,
        "useAnisotropic": true
      },
      {},
      {}
    ],
    "activeLayers": 2,
    "dynamicCubemap": true,
    "materialTag0": "beamng",
    "materialTag1": "vehicle",
    "order_simset": 0,
    "version": 1.5
  }
}
Was this article helpful?
