Interface
Tool window layout
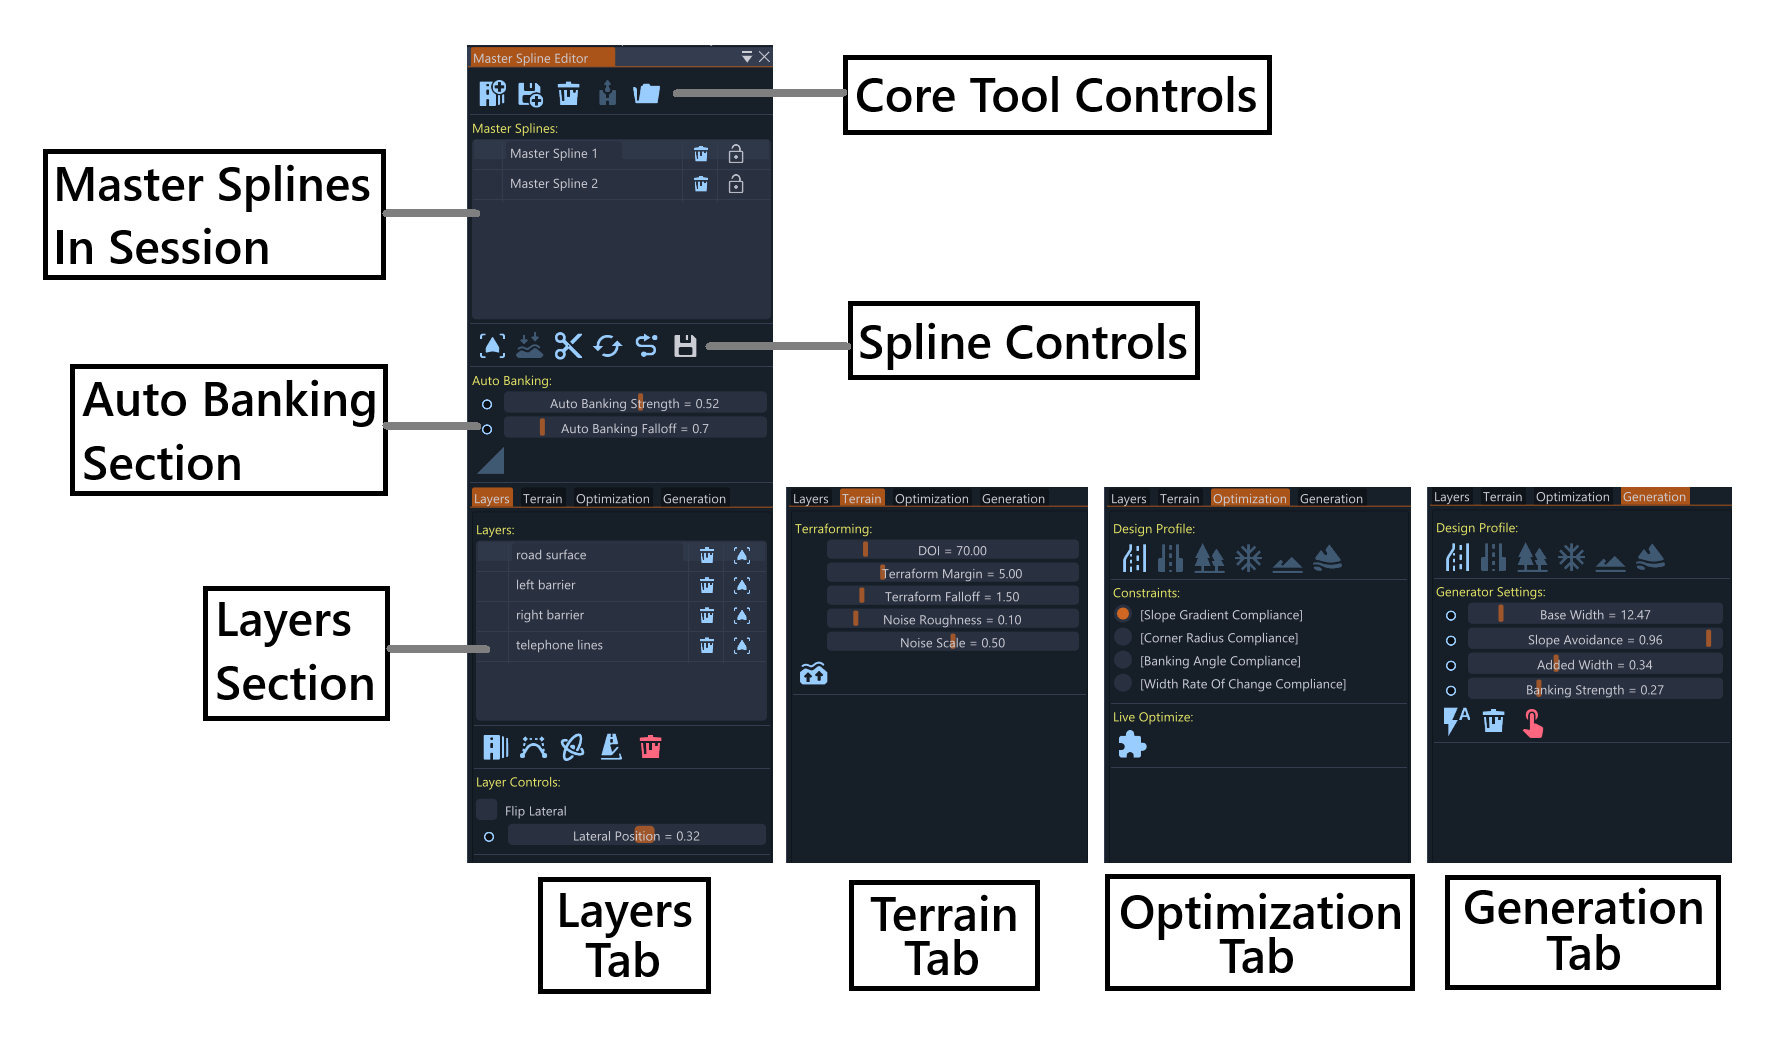
Main Tool Controls Section
The top row contains core operations:
- Add New Master Spline: Creates a new master spline in the scene. The mouse cursor changes to purple, allowing the user to click on the map to place nodes and draw the master path
- Import Master Splines from PNG Mask: Loads splines from exported PNG mask files. Useful for importing previously created master layouts or sharing master designs between sessions
- Remove All Master Spline: Clears all master splines from the session. This action cannot be undone
- Toggle Spline Lock On/Off: Switches between free and rigid translation (lock spline) modes. Free mode allows normal movement, while locked mode prevents accidental spline modifications
- Export Master Splines in Session to PNG Mask: Exports the current session to a PNG mask file, useful for sharing master layouts or backing up work
Master Splines Section
Spline List
- Session Management: Lists all master splines in the current session
- Individual Controls: Each spline row contains:
- Editable Name Field: Text field for the spline identifier
- Remove Spline Button: Deletes the spline
- Enable/Disable Toggle: Controls whether the spline is active or not
Spline Operations Section
These buttons operate on the selected spline (highlighted in the list):
- Go to Master Spline: Moves the camera to focus on the selected spline, useful for navigating to distant master paths
- Conform to Terrain Toggle: Enables/disables terrain conformity for the spline. When enabled, the spline automatically follows ground contours
- Split Spline: Divides the spline at the selected node, creating two separate master splines
- Flip Spline: Reverses the spline direction (back to front), which also flips the orientation of linked layers
- Simplify Spline: Reduces node count while preserving spline shape, useful for cleaning up complex master paths
- Export Selected Master Spline to GLTF Format: Exports the spline to GLTF format, including all linked layers and their properties
Auto Banking Section
Controls for automatic banking adjustment based on spline curvature:
- Auto Banking On/Off Toggle: Enables or disables automatic banking. When enabled, the system automatically adjusts banking angles based on curve radius
- Auto Banking Strength Slider: Controls the intensity of banking from 0 (no banking) to 1 (maximum banking). Higher values create more aggressive banking for tight curves
- Auto Banking Falloff Slider: Controls how quickly banking decreases with distance from curves. Lower values create smoother banking transitions
Tab System
Four tabs organize advanced functionality:
Layers Tab
Layers List
Each layer row displays:
- Editable Layer Name Field: Text field for the layer identifier
- Remove Layer Button: Deletes the specific layer
- Go to Linked Spline Tool Button: Changes the World Editor mode to the linked tool (Mesh Spline, Road Spline, Assembly Spline, or Decal Spline)
Each layer represents a spline in one of the other spline tools, allowing the master spline to control multiple related splines simultaneously.
Layer Creation Buttons
- Add New Road Spline Layer: Creates a road spline (linked to the master spline), allowing the master to control road placement and design
- Add New Mesh Spline Layer: Creates a mesh spline (linked to the master spline), enabling the master to control mesh distribution along the path
- Add New Assembly Spline Layer: Creates an assembly spline (linked to the master spline), allowing the master to control complex assembly placement
- Add New Decal Road Layer: Creates a decal spline (linked to the master spline), enabling the master to control decal placement and distribution
- Remove All Layers Button: Clears all layers from the session (and removes all linked splines from the linked tools), providing a clean slate for new designs
Layer Controls
- Lateral Position Slider: Sets the layer’s cross sectional offset from the master spline centerline, allowing precise positioning of linked elements
- Flip Lateral Checkbox: Changes the layer direction from start-to-end to end-to-start, useful for creating mirrored or reversed layer arrangements
Terrain Tab
Advanced terrain modification capabilities:
Terraforming Controls
- Terraform Button: Executes the terraforming operation, modifying the surrounding terrain to match the master spline design
- DOI (Domain of Influence) Slider: How far terraforming affects the terrain (0-500 meters), controlling the overall terraforming area
- Terraform Margin Slider: Creates a flat area around the spline before falloff (1-20 meters), ensuring smooth terrain around the path
- Terraform Falloff Slider: How quickly terrain blends into surroundings (1-5), controlling the transition from modified to natural terrain
- Noise Roughness Slider: Amplitude of terrain variations (0-1), adding surface detail and natural-looking ground texture
- Noise Scale Slider: Frequency of terrain detail (0-1), controlling the size and density of surface variations
The terraforming system automatically adjusts surrounding terrain to match the master spline, creating realistic road networks which integrate with the landscape.
Optimization Tab
Design Profile Section
Six constraint profile buttons for road design standards:
- Highway: High-speed roads with gentle curves and minimal banking, designed for efficient long-distance travel
- Mountain Pass: Winding mountain roads with aggressive banking, optimized for challenging terrain navigation
- Major Rural Road: Country roads with moderate curves and banking, balancing safety with rural driving conditions
- Secondary Road: Local roads with tighter curves and more banking, designed for urban and suburban environments
- Unpaved Trail: Off-road paths with natural terrain following, optimized for recreational and utility access
- Off-Road: Extreme terrain navigation with minimal design constraints, allowing maximum flexibility for challenging environments
Constraints Radio Button
Four constraint options for road design optimization:
- Slope Constraints: Limits maximum road gradients, ensuring vehicles can safely navigate the terrain
- Corner Radius Constraints: Ensures curves meet minimum radius requirements, maintaining safe turning speeds
- Banking Constraints: Controls maximum banking angles, providing appropriate cornering support
- Width Constraints: Maintains consistent road width standards, ensuring proper vehicle clearance
Live Optimize Section
- Optimize Toggle Button: Enables real-time optimization of the spline based on selected design profile and constraints, automatically adjusting the path to meet engineering standards
Generation Tab
Design Profile Section
Same six constraint profile buttons as the Optimization tab, ensuring consistency between optimization and generation settings.
Generator Settings Section
Four sliders control path generation:
- Base Width Slider: Sets the fundamental width for generated paths, defining the basic road dimensions
- Slope Avoidance Slider: Controls how much the generator avoids steep terrain, prioritizing gentle gradients
- Added Width Slider: Additional width beyond the base width, which depends on corner radius, ensuring adequate clearance in curves
- Banking Strength Slider: Intensity of banking applied to generated curves, providing appropriate cornering support
Path Generation Controls
- Auto Generate Preview Path Button: Creates a preview path using the current settings, allowing the user to evaluate the generated design before committing
- Remove Preview Path Button: Clears the preview path (only visible when preview exists), removing the temporary design
- Convert Preview Path to Master Spline Button: Converts the preview into an actual master spline (only visible when preview exists), finalizing the generated design
The path generation system uses an A-Star/Dijkstra based algorithm to automatically create realistic roads which follow terrain while respecting the design constraints of the selected design profile.
Was this article helpful?
