Getting Started
This section will help you get started with the Road Architect by introducing some of its key features. Later sections will delve deeper into the more advanced capabilities of the tool.
Opening the Road Architect
The Road Architect can be accessed within the World Editor, which you can open by pressing the F11 key. The mode button for the Road Architect is located on the mode bar, which appears at the top of the screen if the default window configuration is used (see image below, where the icon is highlighted with a red box). Clicking this button opens the Tool Window, where you can access all the features of the Road Architect. The Tool Window and its features will be described in detail in a later section of this documentation.
 The Road Architect Mode Button
Creating a Simple Road
To begin, ensure the Roads tab is selected. You will see an empty Roads List window with several buttons below it.
To create a simple road, click the button labeled ‘Add a new spline road.’
The new road will now appear in the Roads List within the tool window.
For the best view, it is recommended to raise the camera higher, looking down at the map from above. This vantage point makes it easier to place roads accurately. The image below highlights two vantage points: the left image shows a poor camera position, where it’s difficult to judge the distance of the mouse cursor (highlighted in red) from this angle, while the right image shows an optimal position, allowing for better assessment of distances and angles.

As you move the mouse across the world map, you’ll notice that the cursor is highlighted, indicating that the tool is in Node Placing mode.
In this mode, pressing the left mouse button creates new nodes. As nodes are placed on the map, spheres appear on the map at each position, allowing you to quickly draw the road with just a few clicks. Precision is not necessary at this stage, as all node positions can be edited afterward. The image below shows the resulting road after each node has been placed.

When you hover over a node and left-click, the node will be selected. The color of the node’s sphere will change, and the selected node will also be highlighted in the Nodes List within the tool window. You can also select nodes directly from the Nodes List, which will change the corresponding node’s color on the map.
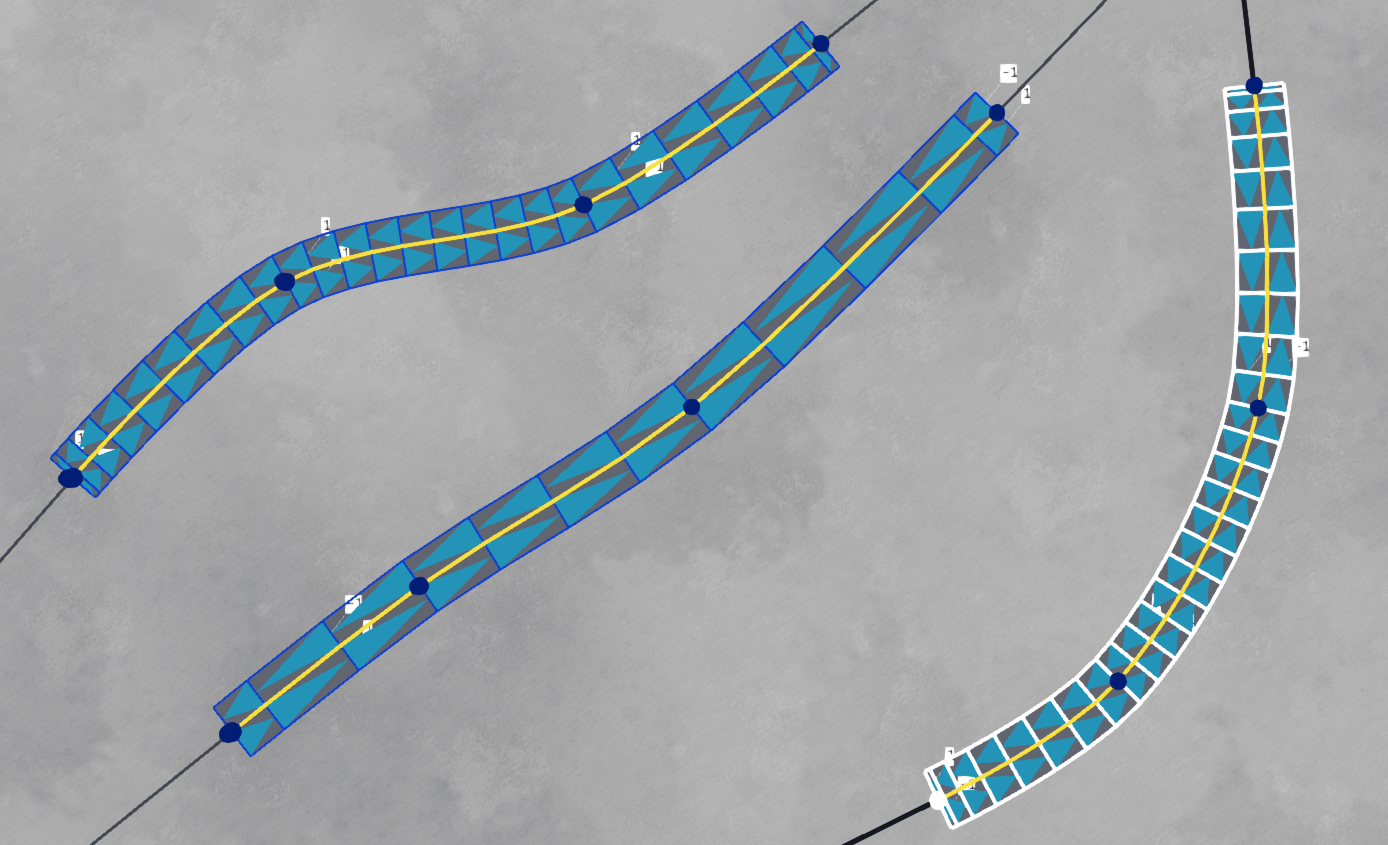
Using this approach, you can easily create multiple roads. The selected road will be highlighted with a white frame. Selecting a different road will also highlight it in the Roads List, and vice versa. The image below shows three roads, with the rightmost road selected and outlined in white.
Road editing is described in detail here .
Moving Roads
Roads can be moved in several ways. The simplest method is to hover the mouse over a road node, which will highlight the node. By holding down the left mouse button and dragging, you can move the node across the map. This method can be applied to any node, in order to position the road as desired. The sequence of images below shows a single road with one of its intermediate nodes highlighted in a red box. In each of the three images, this node has been moved to a different position.

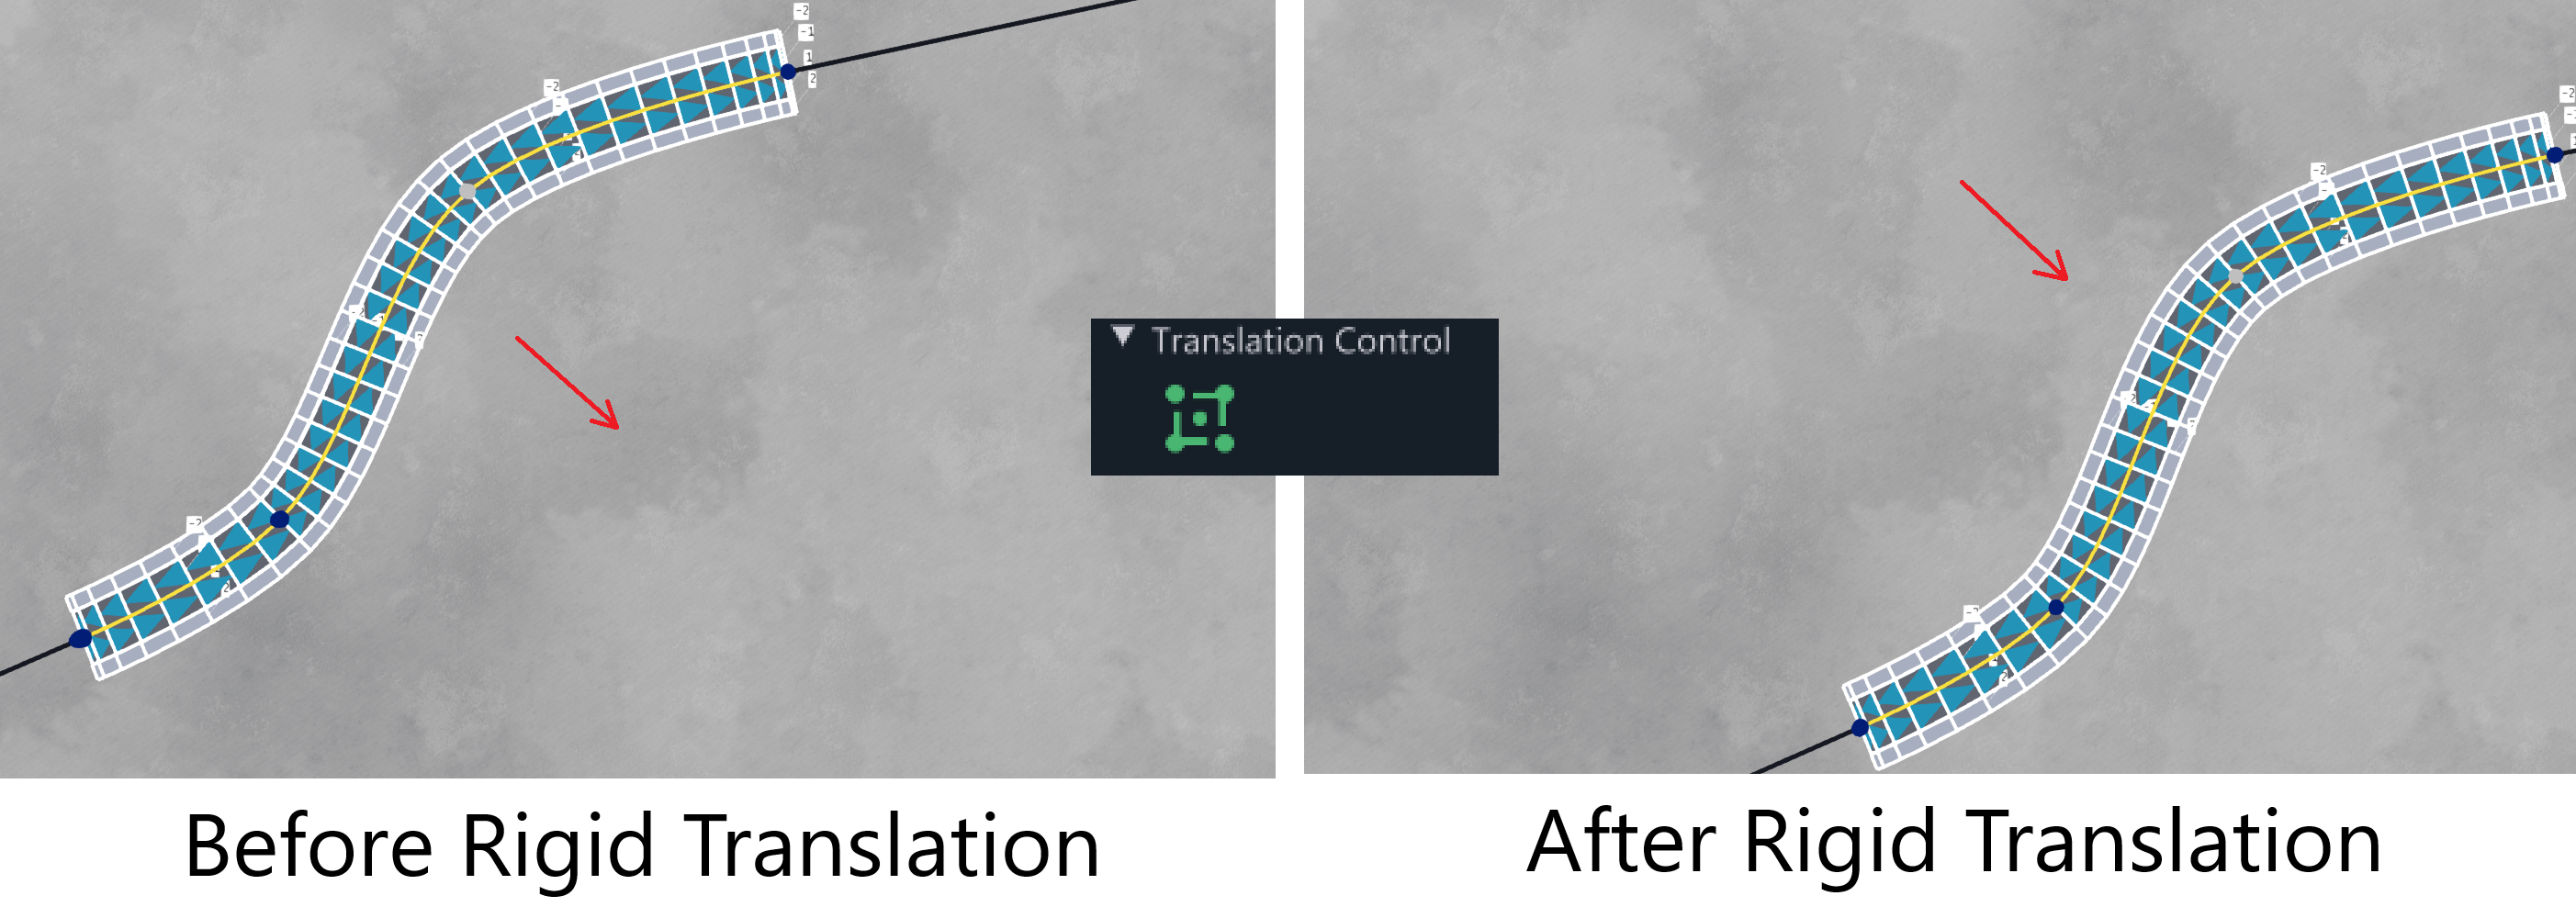
However, if you want to move the entire road at once, this method can be time-consuming. By switching the Rigid Translation toggle button on (found under the Translation Control header), you can move the entire road by dragging any of its nodes. The image below demonstrates a rigid translation, where every node in the road has been moved by the same vector.
Under the same header, you can adjust the Movement Field. This slider controls an invisible “force field” around the selected node and is only active when Rigid Translation is not in use. Sliding it to the right increases the radius of the field, measured in meters. When moving nodes within this field, neighboring nodes will also shift slightly, helping to preserve the angles between them. This feature allows for smoother adjustments to the road position, and experimenting with it will help you understand how it works. The sequence of images below shows a force field translation applied to the node highlighted by the red box. As the node is moved, the neighboring nodes also shift slightly, allowing the road to retain some smoothness as it is adjusted.

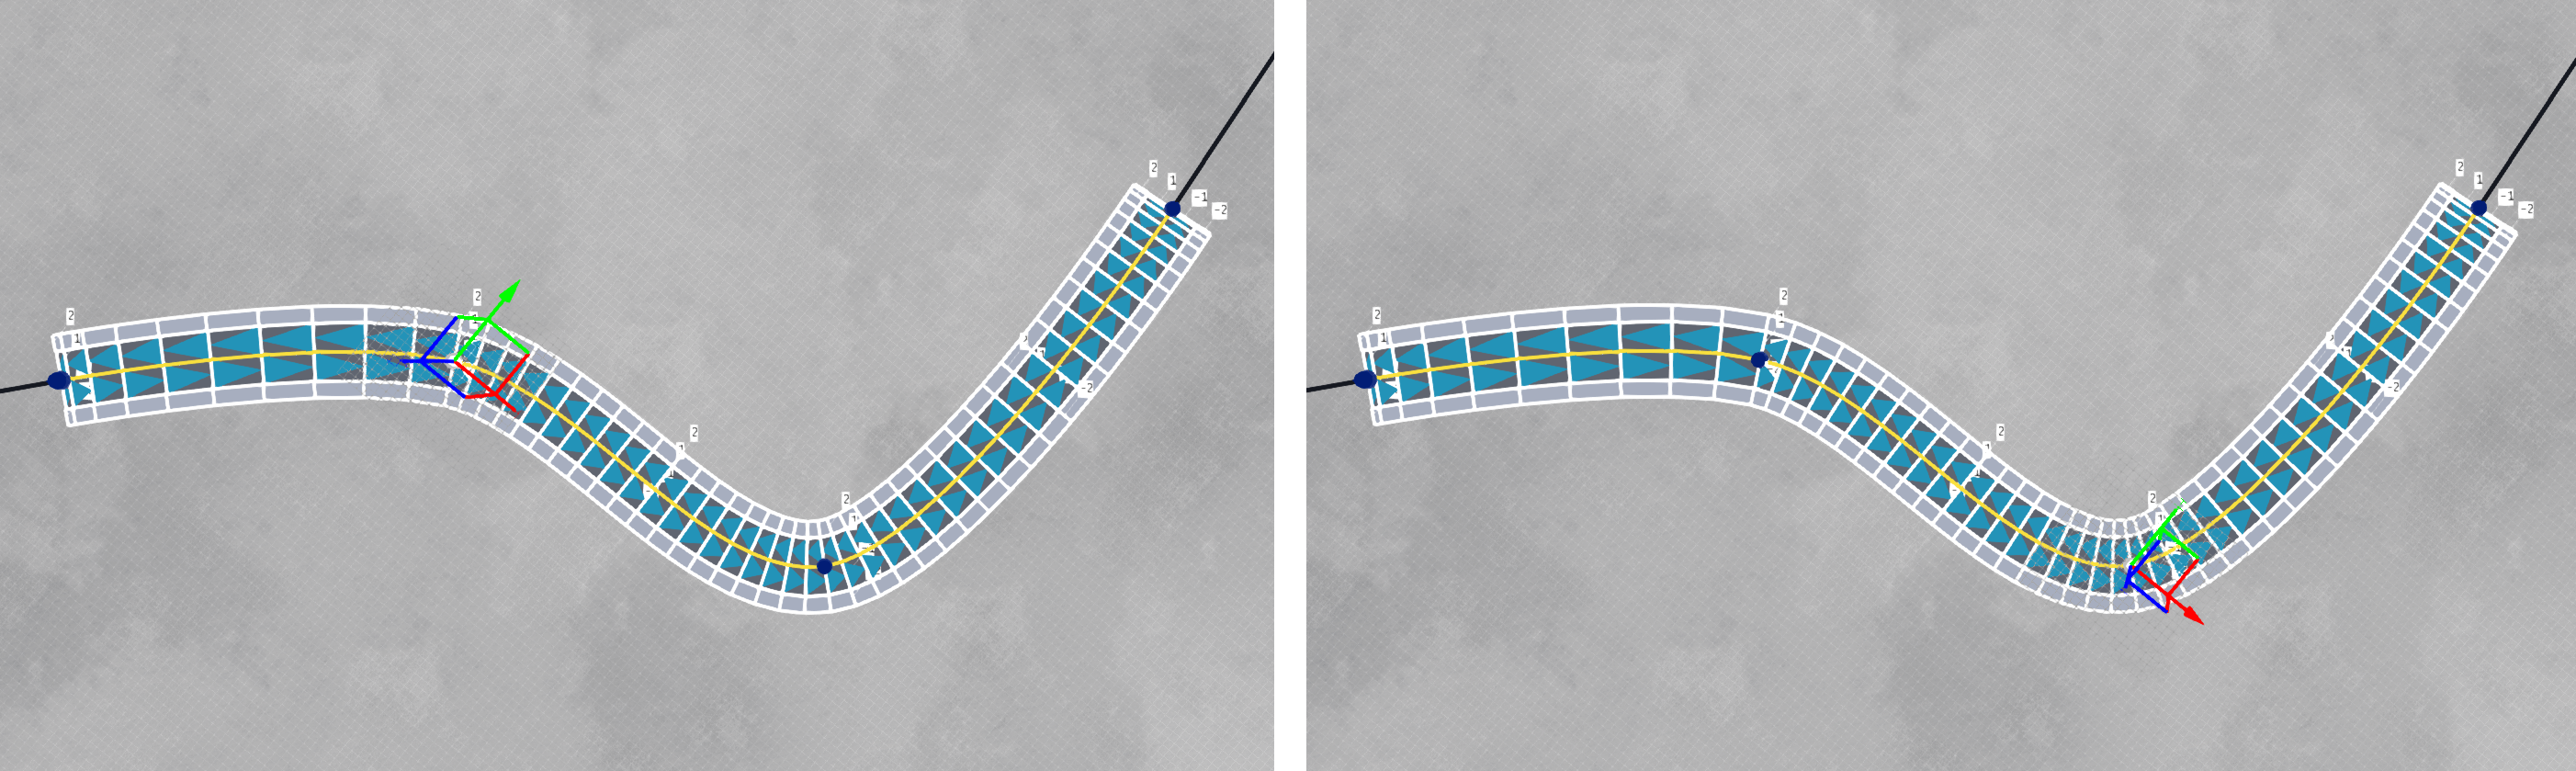
In addition to using the mouse, you can move nodes using the World Editor’s translation gimbal. To activate the gimbal, press the ALT key or click on the dedicated button at the top of the tool window. The ALT key (or button) toggles the gimbal on and off. The gimbal will appear at the selected node. Selecting another node will move the gimbal to that node. You can then hover over one of the gimbal’s axes or planes and drag along them. This method is useful for restricting movement to a specific axis and for adjusting the elevation of a node, which is not possible with just mouse dragging. When the gimbal is active, you cannot drag nodes with the mouse, but selecting nodes will move the gimbal to the selected node. The image below shows the gimbal at two separate node positions on a road.
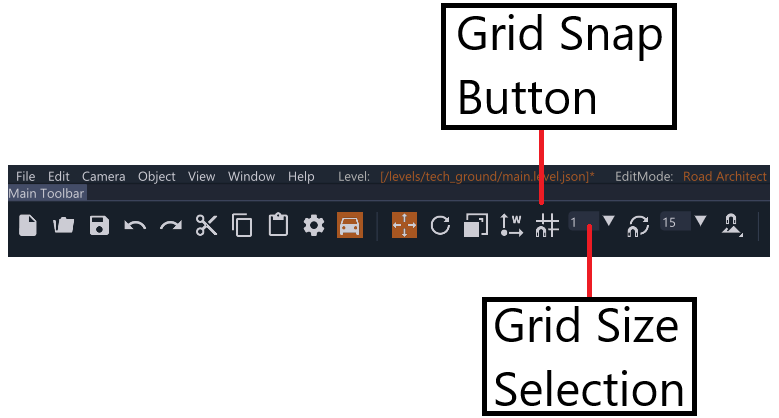
When using the gimbal, you can enable the World Editor’s grid, allowing road nodes to snap to grid points. The grid size is also adjustable. The image below highlights where the relevant controls are located to use this feature. Snapping to the grid is useful for aligning nodes or lining up separate roads with one another.
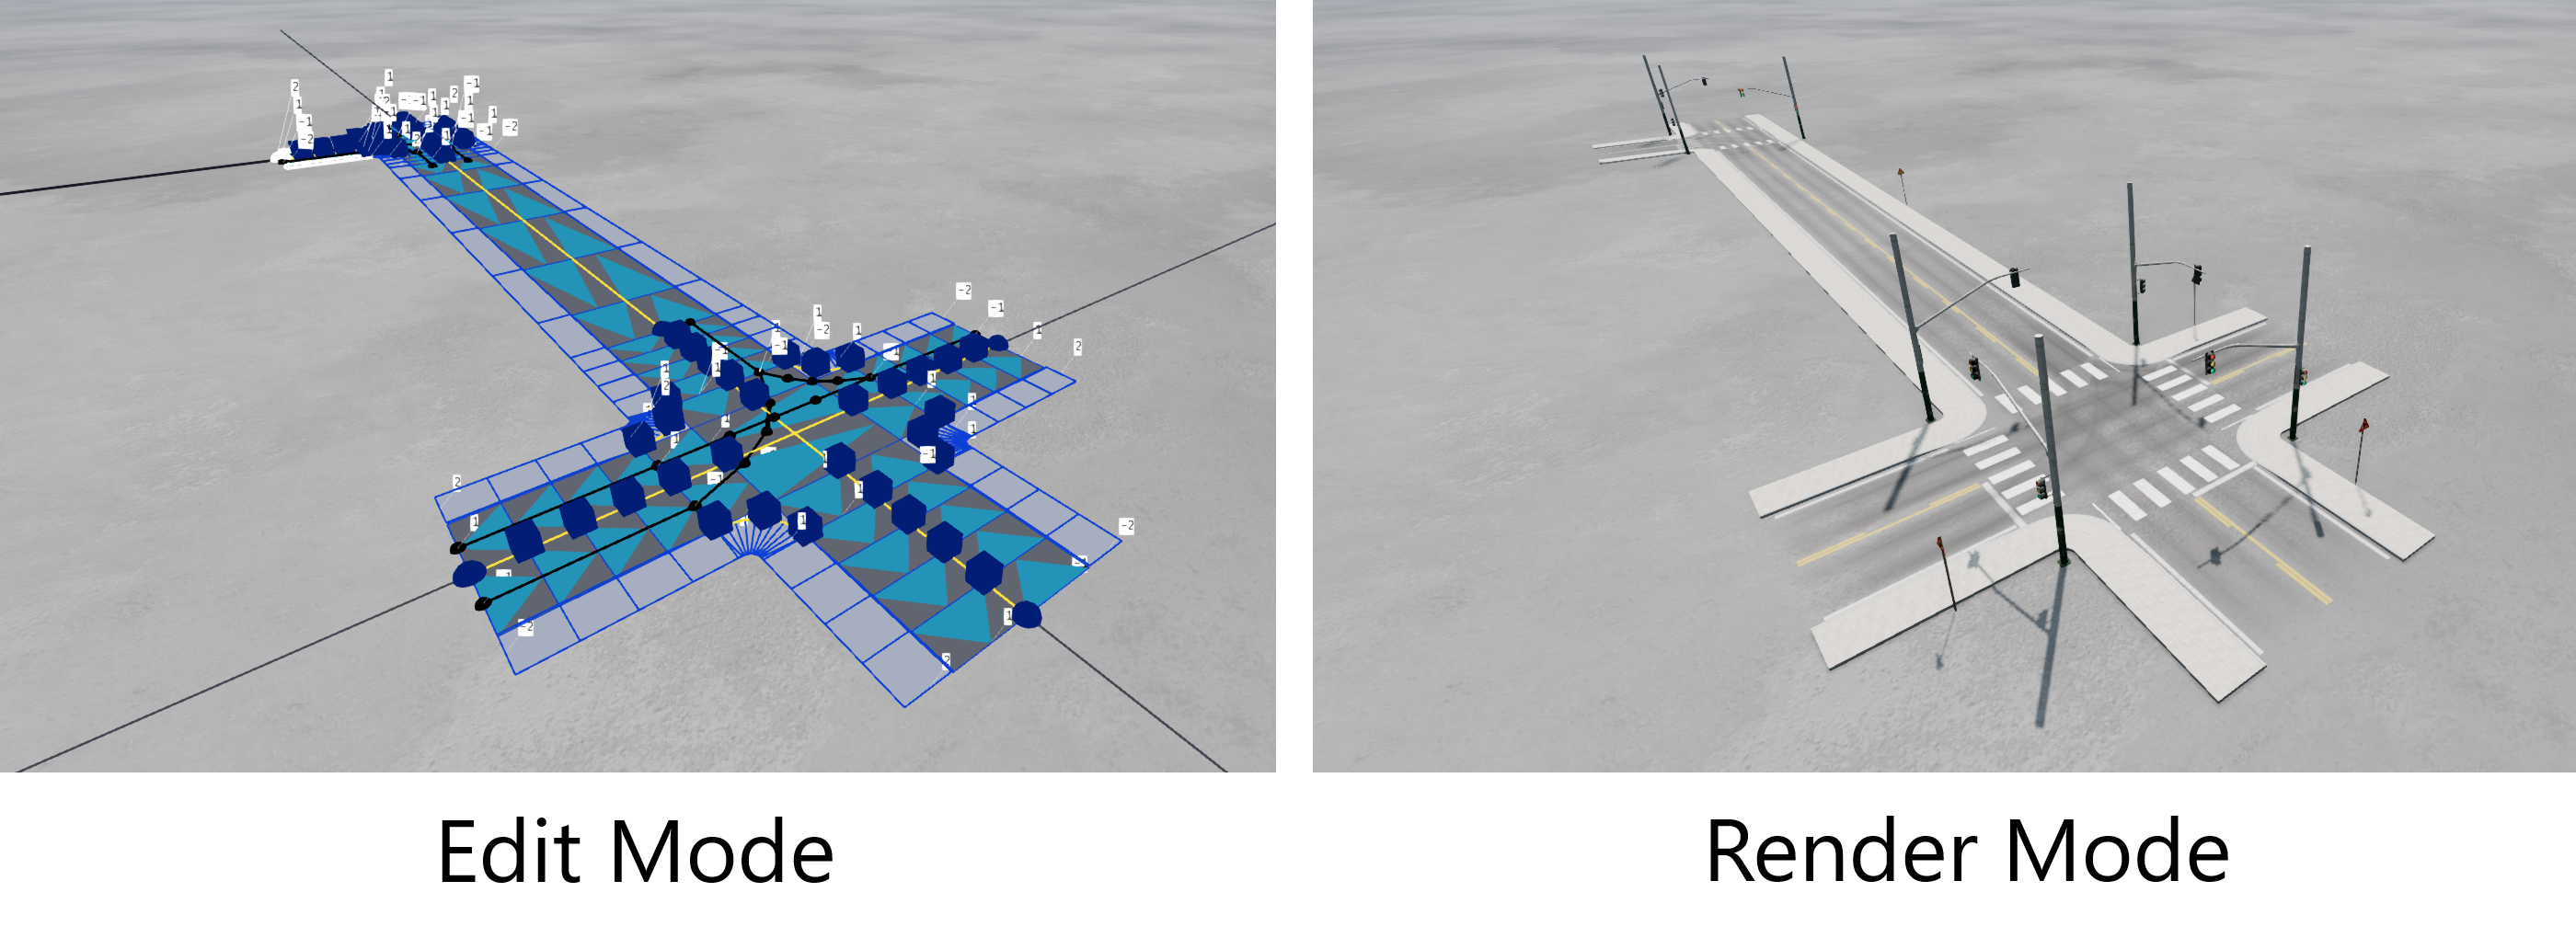
Edit/Render Modes
After placing a road, users can switch between Edit Mode and Render Mode using the dedicated toggle button at the top of the tool window. The tool starts in Edit Mode, so pressing the button for the first time switches the road to Render Mode.
In Render Mode, the finalized road appears on the map, replacing the edit visualization. At this point, the tool window becomes locked, temporarily preventing any further edits to the road. In this mode, users can exit the World Editor to drive on the road or engage in other interactions. The World Editor’s scene tree will display the road components, and users may want to familiarize themselves with how they are represented.
Pressing the button again will revert to Edit Mode, allowing users to continue editing the road, add more roads, and make other adjustments.
The image below illustrates the difference between the two modes: Edit Mode displays the road edit visualization without any final renderings, while Render Mode shows the finalized, drivable road network.
Changing Profile
When the user presses the Profile Template button, the tool switches to a new view, and the Profile Templates window opens. This view, called the Profile Audition View, allows the user to select new profiles for the selected road or create custom profiles. For now, we’ll choose another template profile from the list in the new window. The image below shows the tool in the Profile Audition View with a different profile template selected.
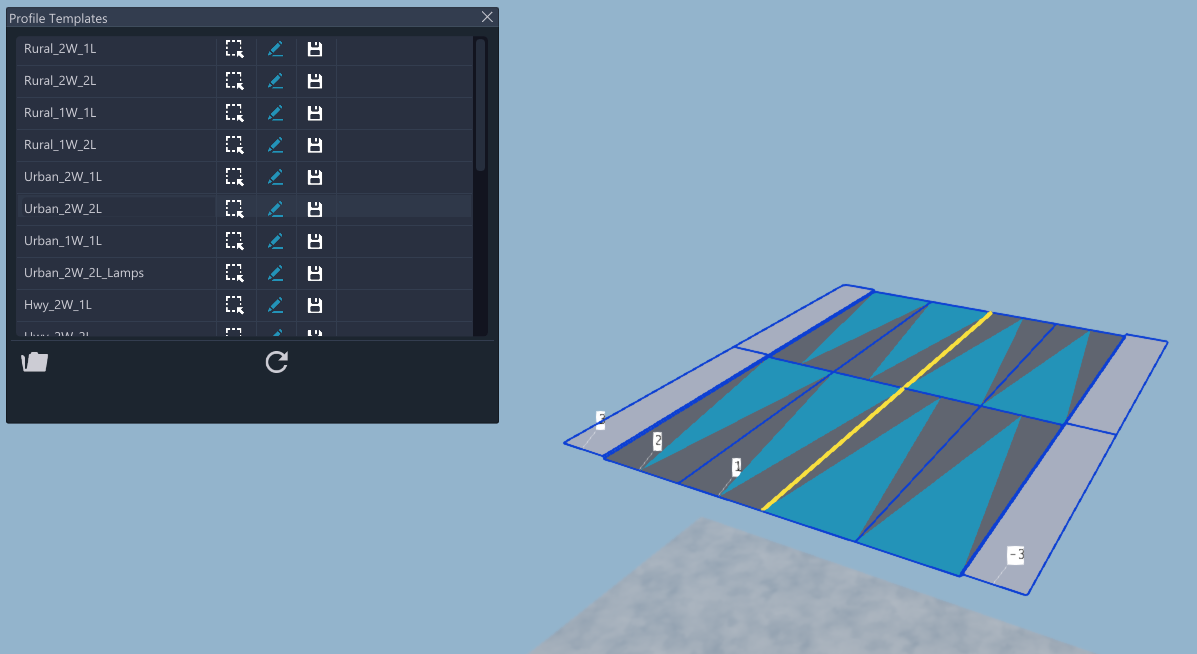
Clicking on the name of a template will audition it on screen, meaning that the profile visible on the screen will change to that of the selected template profile. The camera will rotate around the profile, giving the user a view from various angles to better visualize it in 3D. To apply the profile to the selected road, the user must press the select button next to the desired template.
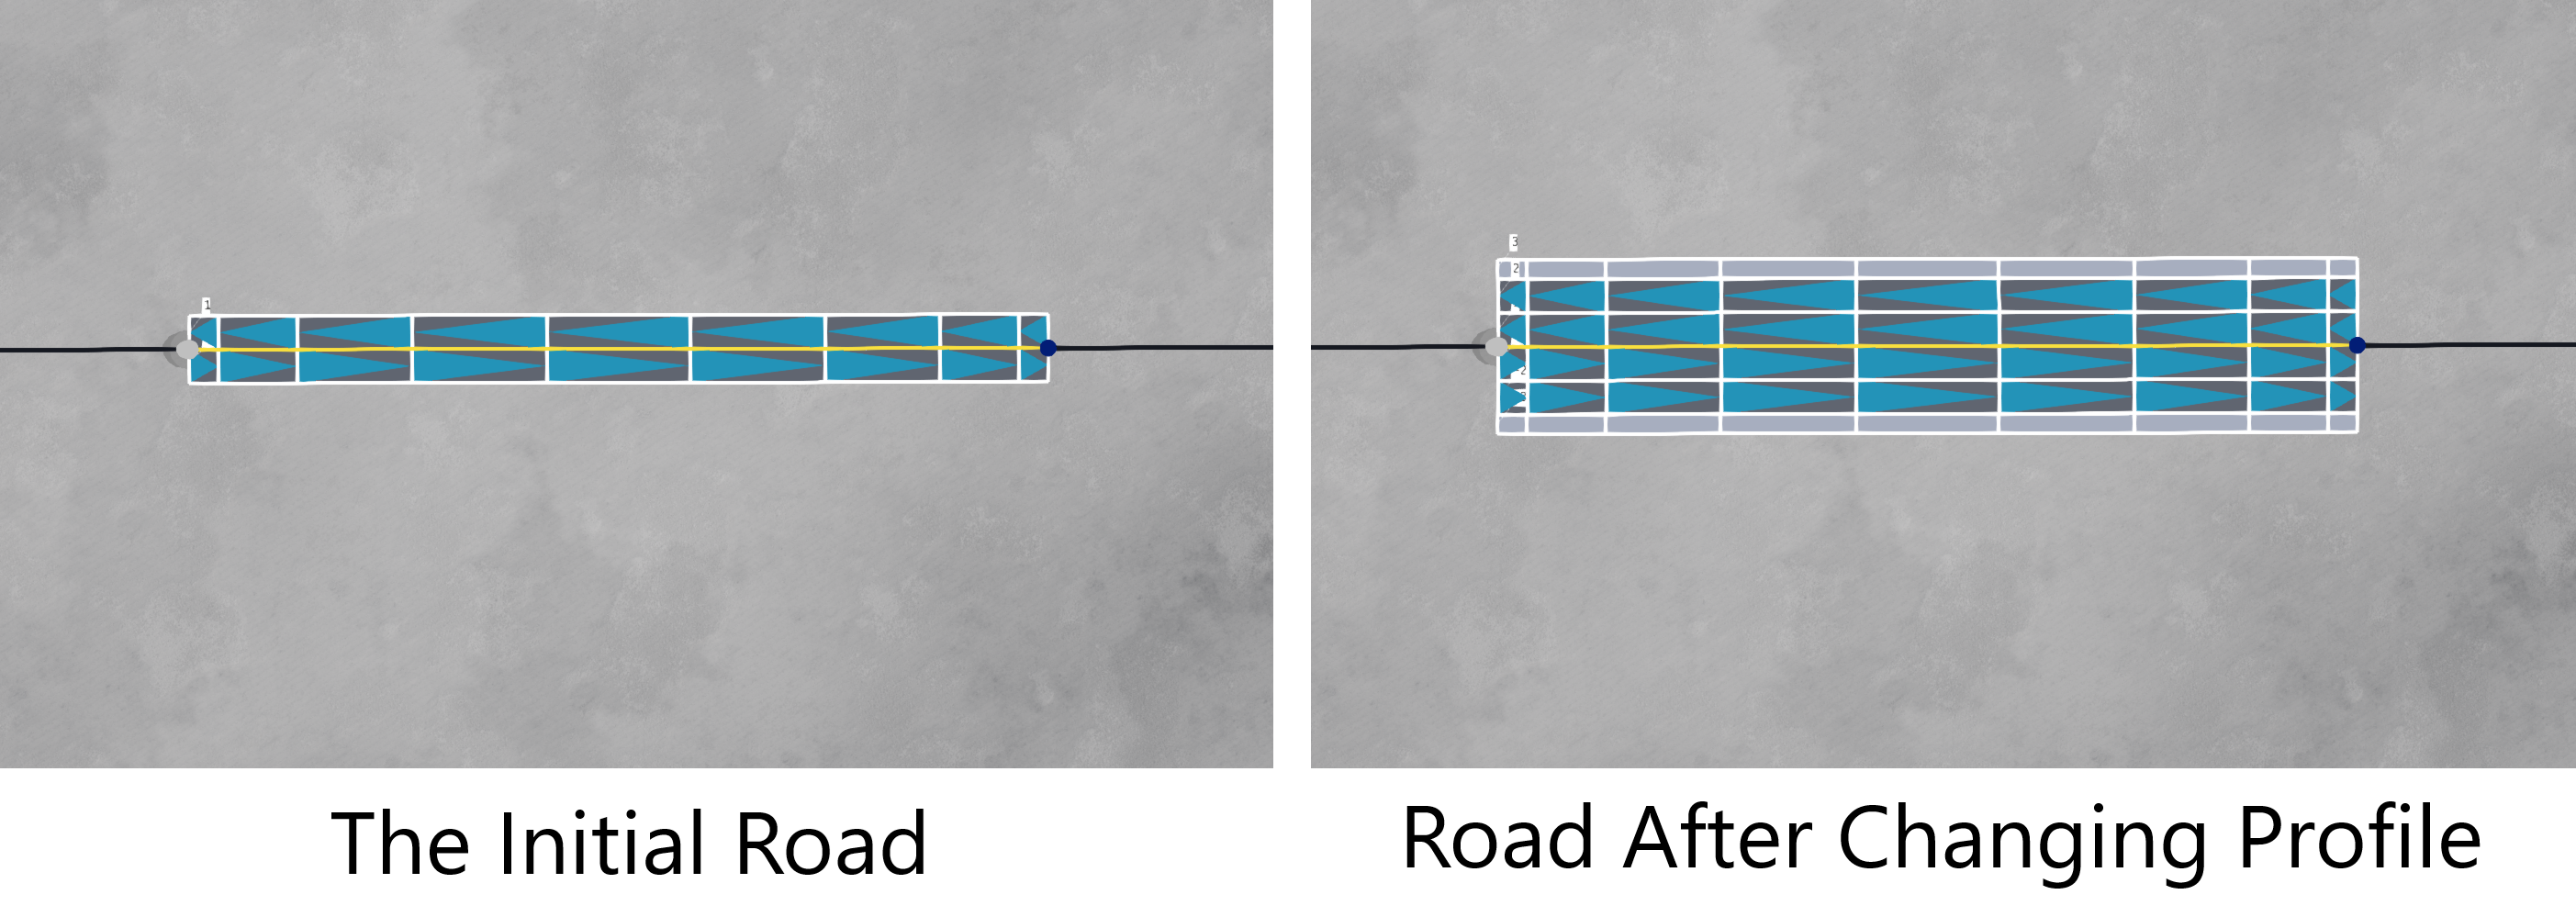
Once a new template profile is selected, the tool will return to the main view, and the selected road will be updated with the new profile. The user can then switch back to Render Mode to see how the new profile looks when finalized. The image below shows a before and after of the process of changing profiles.
Profiles are described in detail here .
Was this article helpful?
