Profile Editing
Each road in the tool has a Profile which defines its cross-sectional properties. This profile includes information for each lane, such as the number of left and right lanes, the lane type, and the default width for each lane.
Note: There is only one unique Profile per road. This means a road cannot start with, for example, two lanes and then expand to three lanes further along its length. However, roads can be split and joined using transition blocks, a special type of junction discussed later in the documentation.
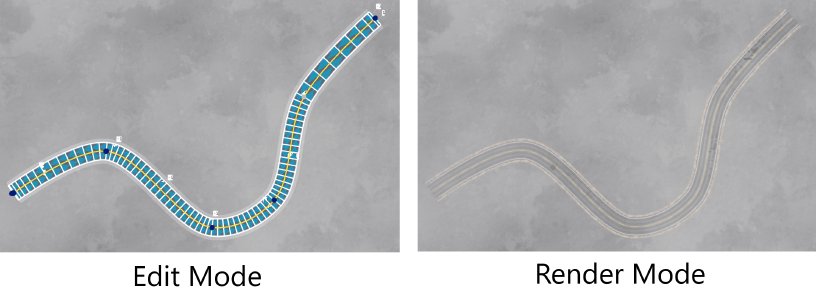
When a road is first created, the default Profile is a bi-directional urban road with one left lane and one right lane. The following is an example of a road created using the default profile template.
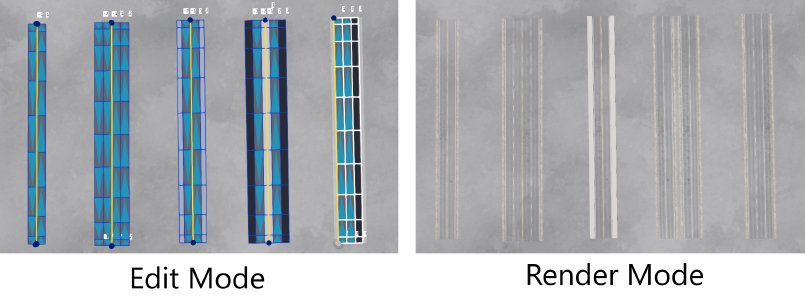
Many other templates are shipped with the tool. An example of some of these is shown in the image below.
Profile Templates Window
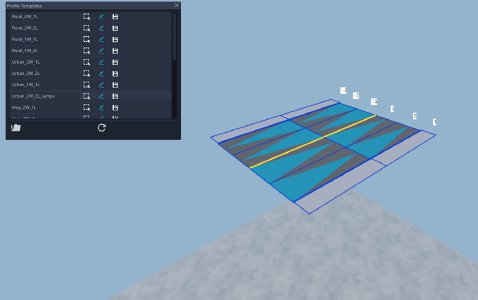
To change the profile of a road (either before or after it is drawn), the user can click on the Profile Template button found under the Nodes List. The Profile Templates Window will then appear, and the tool will switch to Template Audition Mode, where a small segment of the selected profile template is displayed at altitude, with the camera slowly rotating around it. This automatic rotation is designed to give the user a view of the road from various angles. The image below shows the Template Audition View.
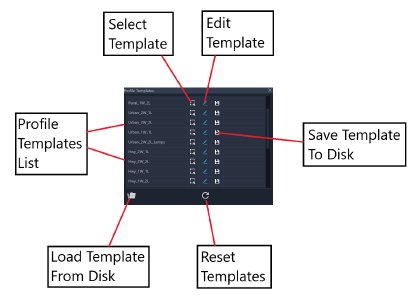
In the Profile Templates Window, the user can choose from a list of template profiles. A wide selection of standard profiles is available, including both bi-directional and one-way roads, as well as various classes (urban, highway, rural, dirt). The window is outlined in the following image.
Saving Templates: Any Profile can be saved by pressing the save button on the corresponding row, which opens a file dialog allowing the user to choose a save path. The file format used is .json.
Loading Templates: To load a Profile from disk, a dedicated button below the list allows this. A file dialog will open, and the user can select the desired .json file to load. The loaded profile will then appear at the bottom of the list and can be used as normal.
Reset: There is also a reset button below the list, which will restore the template profiles to their original shipped state.
Template Edit Window
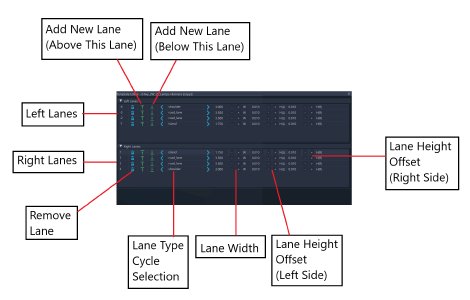
In the Profile Templates Window listbox, each profile row contains a button that opens the Template Edit Window. Here, the user can edit the number of lanes, set the lane type, and adjust the widths and relative height offsets for each lane. Changes made in this window will immediately update the example road in the audition view, allowing the user to see the effects in real-time.
The Template Edit Window contains two collapsible lists: the top list shows the left lanes (from outer to inner), and the bottom list shows the right lanes (from inner to outer). Each row represents a lane’s information. Lanes can be removed or new lanes added (either above or below the selected lane) using the corresponding buttons. This window is outlined in the following image.
The lane type can be selected by cycling through the available options. In the visualization, different lane types are color-coded to distinguish them from neighboring lanes. The available lane types are as follows:
road_lane: Represents a drivable road surface made of asphalt. This is the default lane type used in all classes of roads.
shoulder: Represents a hard shoulder lane, typically used on highways and located outside the road lanes.
sidewalk: Represents a sidewalk or pavement, including a curb. These are commonly found bordering road lanes on residential streets. Sidewalks can also be used in the center of the road to create a ‘sidewalk island,’ usually consisting of two adjacent sidewalk lanes—one with a left-facing curb and one with a right-facing curb.
island: Represents a gap between other road lanes, though it is still treated as a true lane in the profile. This type can be used as a ‘blank’ type since no visual content will appear. It is often used to separate the left and right sides of a road, such as a central reservation on a highway.
Class-Based Templates
We will look closer at some class-specific templates - one for Urban, and one for Highway. The user should familiarize themselves with the differences, since the rules relating to joining roads together will depend on certain profile conditions being present in the roads to be joined.
Urban Templates
The following image shows a typical template profile of the Urban class.
Here are some rules to follow when building urban template profiles:
-
Urban roads may have sidewalks and curbs, but this is not a requirement.
-
Urban roads should not contain any lane types other than ‘road_lane’ and ‘sidewalk’. This means no ‘shoulder’ or ‘island’ lanes should be present.
-
Urban roads should not have a central reservation or break in the road lanes - the innermost left road lane should be adjacent to the innermost right road lane.
-
Two-way Urban roads should be symmetric (ie the same number of left and right lanes), but this is a weaker requirement.
Highway Templates
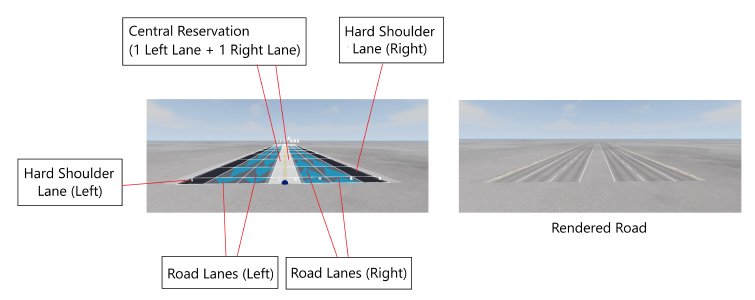
The following image shows a typical template profile of the Highway class.
Here are some rules to follow when building highway template profiles:
-
Highway roads should not contain sidewalks/curbs.
-
Highway roads should have a symmetric central reservation area of type ‘island’. By symmetric, this means that the innermost left and right lanes should be of ‘island’ type. There is no restriction of the width of these lanes, so they can have a width of zero.
-
Two-way Highway roads should be symmetric (ie the same number of left and right lanes), but this is a weaker requirement.
Was this article helpful?
