Interface
Tool window layout
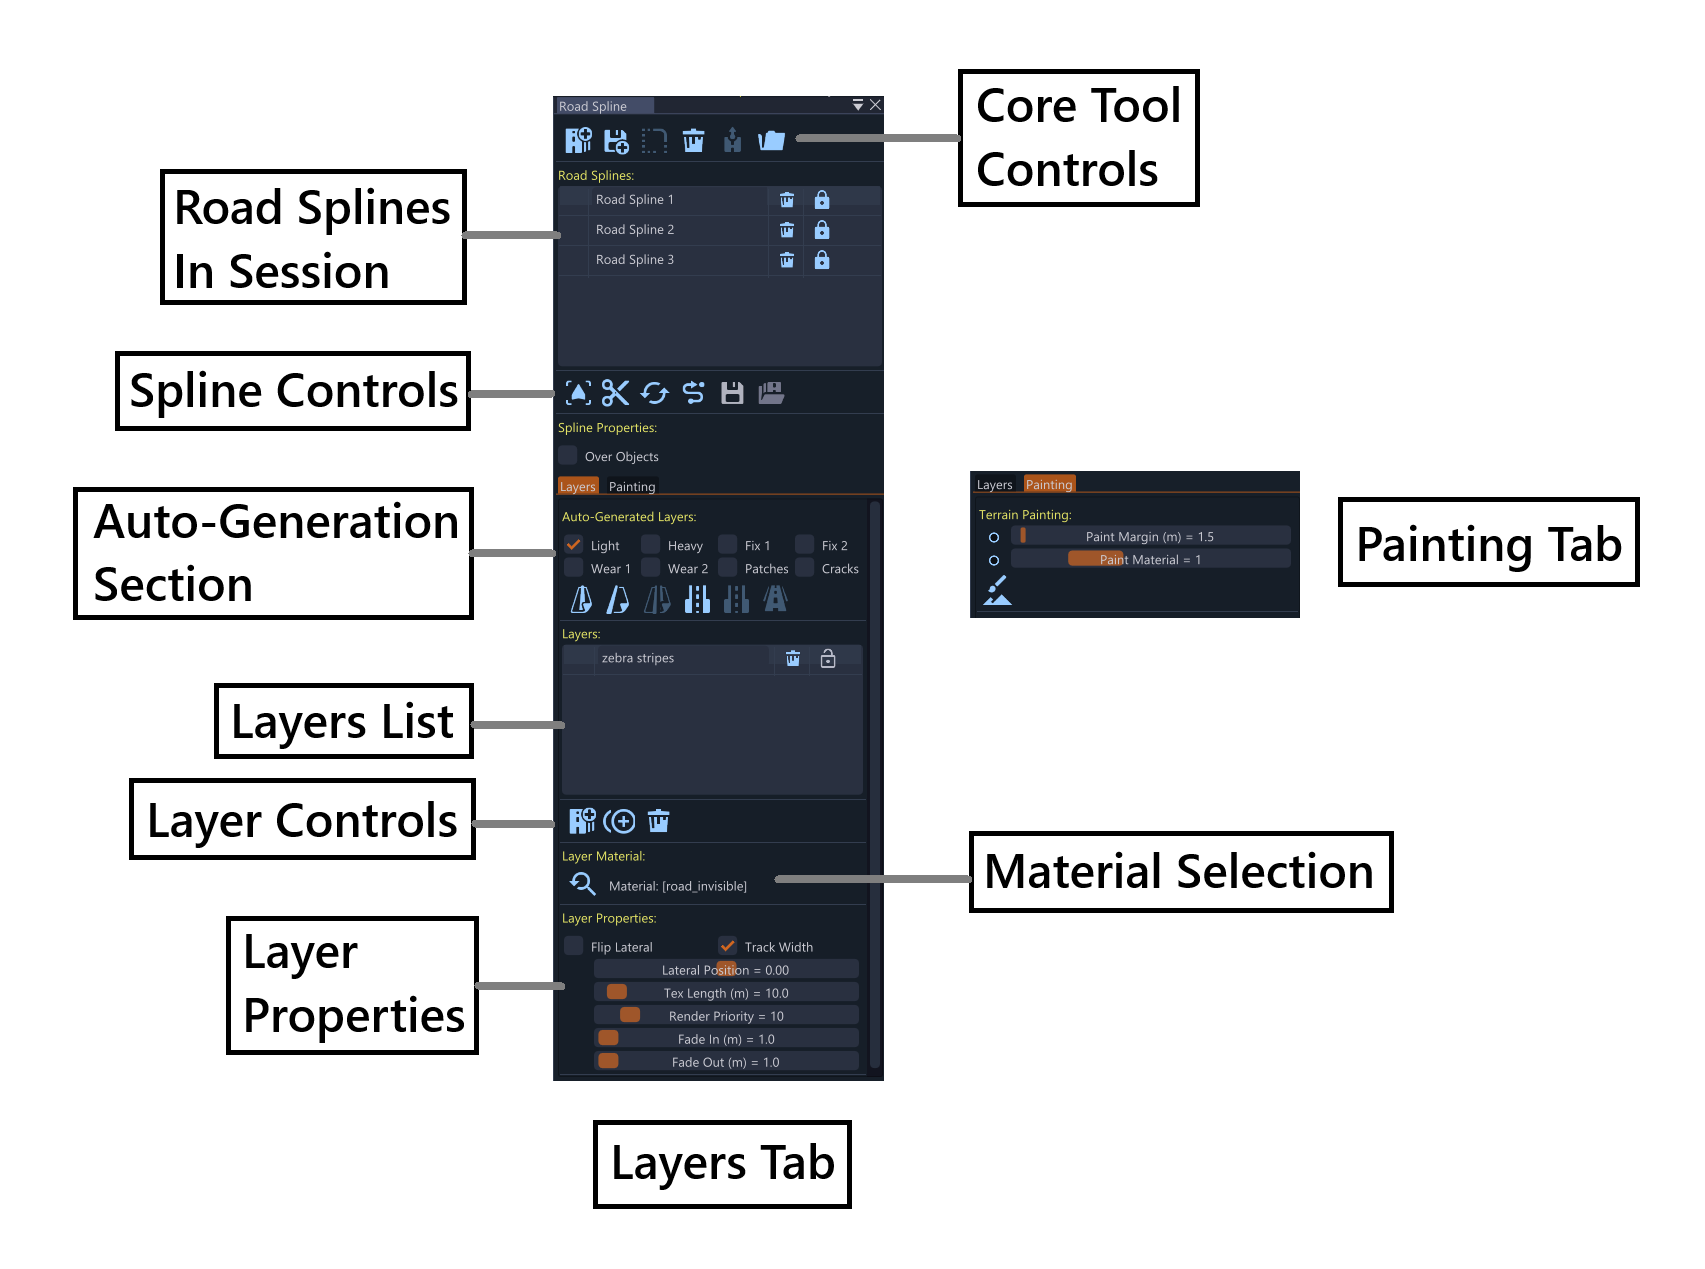
Main Tool Controls Section
The top row contains core operations:
- Add New Road Spline: Creates a new road spline in the scene. The mouse cursor changes to purple, allowing the user to click on the map to place nodes and draw the road path
- Import Road Splines from PNG Mask: Loads splines from exported PNG mask files. Useful for importing previously created road layouts or sharing road designs between sessions
- Import from Polygon: Creates splines from polygon selection areas. The user draws a polygon on the map to define the area where the road will be placed
- Remove All Road Splines: Clears all road splines from the session. This action cannot be undone
- Toggle Lock On/Off: Switches between free and rigid translation modes. Free mode allows normal movement, while rigid mode locks the spline for precise editing
- Export Road Splines to PNG Mask: Exports the current session to a PNG mask file, useful for sharing road layouts or backing up work
Road Splines Section
Spline List
- Session Management: Lists all road splines in the current session
- Individual Controls: Each spline row contains:
- Editable Road Spline Name: Text field for the spline identifier
- Remove Road Spline Button: Deletes the specific spline
- Enable/Disable Toggle: Controls whether the spline is active
Spline Operations Section
These buttons operate on the selected spline (highlighted in the list):
- Go to Road Spline: Moves the camera to focus on the selected spline, useful for navigating to distant road sections
- Split Road Spline: Divides the spline into two parts, at the selected node, creating two separate road splines
- Flip Road Spline: Reverses the spline direction (back to front), which also flips the road orientation and layer directions
- Simplify Spline: Reduces node count while preserving spline shape, useful for cleaning up complex road paths
- Save Profile: Exports the selected spline’s properties to disk (creates .json file), including layer settings, material assignments, and road properties
- Load Profile: Imports a profile from disk and applies it to the selected spline, restoring all layer, material, and road settings
Properties Section
Single checkbox controls road behavior:
- Over Objects: When enabled, decalroads (layers) can be laid on top of objects like static meshes. When disabled, decalroads always lay on the terrain heightmap regardless of object placement
Auto Generated Layers Section
Eight checkboxes for automatic road detailing layers:
Tire Tread Layers
- Light Tire Tread: Adds subtle tire wear patterns, creating realistic road wear from normal traffic
- Heavy Tire Tread: Adds pronounced tire wear patterns, simulating heavy vehicle traffic and aggressive driving
Surface Damage Layers
- Fix 1: Primary repair patch textures, representing major road repairs and maintenance
- Fix 2: Secondary repair patch textures, representing minor repairs and surface treatments
- Wear 1: Light surface wear patterns, showing gradual road deterioration from use
- Wear 2: Heavy surface wear patterns, showing significant road damage and aging
- Patches: Various patch and repair textures, creating a realistic mix of road conditions
- Cracks: Surface cracking and damage textures, representing structural road damage
These layers are hidden and auto-generated based on checkbox states, appearing automatically in the scene without manual layer management.
Auto Paint Lines
Six buttons for automatic road marking:
- Paint Centerline: Adds center dividing line, creating standard road separation
- Paint Edge Lines: Adds road edge boundary lines, defining the road boundaries
- Paint Lane Division Lines: Adds dashed lane separation lines, creating multi-lane road markings
- Use Edge Blend 1: Applies first edge blending texture, creating smooth transitions between road and terrain
- Use Edge Blend 2: Applies second edge blending texture, providing alternative edge treatment options
- Use Edge Blend 3: Applies third edge blending texture, offering additional edge styling choices
Layers Section
Layers List
Each layer row displays:
- Thumbnail Image: Material preview for the layer, helping to identify materials at a glance
- Editable Layer Name: Text field for the layer identifier
- Remove Layer Button: Deletes the specific layer
- Enable/Disable Toggle: Controls whether the layer is active
Layer Controls
Buttons for managing layers:
- Add New Layer: Creates a new layer in the list, allowing the user to build complex road surfaces
- Duplicate Layer: Copies the selected layer and adds it to the list, useful for creating similar layers with different properties
- Remove All Layers: Clears all layers from the session, providing a clean slate for new road designs
Layer Material Selection
- Material Selection Button: Opens the material selection window, allowing the user to browse and select different road materials
- Material Path Display: Shows the file path of the selected material for the layer, useful for tracking which materials are assigned
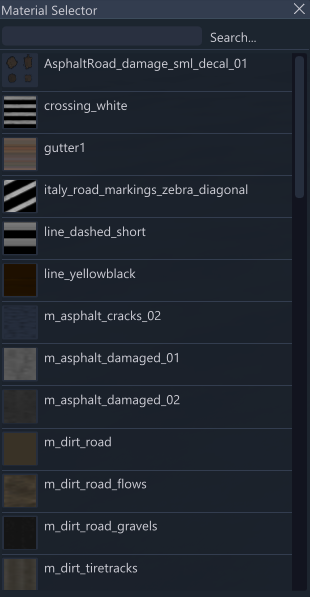
The Material Selection Window provides access to all available material assets for road layers:
Search and Navigation
- Search Bar: Find specific materials by name, useful for quickly locating particular road textures
- Browse Functions: Navigate through material collections, organized by category and type
Material Library
- File Format: All materials use standard material formats which are compatible with the road system
- Organized Collections: Browse through material categories and collections, making it easy to find appropriate road materials for different purposes
Layer Properties Section
Layer Behavior Controls
- Flip Lateral Checkbox: Flips the layer direction relative to the road spline centerline, also affects left/right orientation for directional materials
- Track Width Checkbox: When enabled, the layer uses the same width as the road spline. When disabled, the layer becomes a fixed-width layer with manual width control
Fixed Width Layer Properties
Fixed width layers (like paint lines) maintain consistent width across the entire spline regardless of road width variations.
Layer Positioning and Appearance
- Lateral Position Slider: Sets the layer’s horizontal position relative to the road centerline, allowing precise placement of road markings
- Tex Length Slider: Controls the texture length/repetition of the material, affecting how road textures repeat along the spline
- Render Priority Slider: Lower priority values appear on top in the scene rendering order, controlling layer visibility and layering
- Fade In Slider: Distance in meters for the layer to fade in from the start, creating smooth transitions
- Fade Out Slider: Distance in meters for the layer to fade out at the end, providing natural layer termination
Last modified:
September 15, 2025
Was this article helpful?
