Skin Tutorial
To make your own skins there are a few things that you will need :
- A skin template. All vanilla cars should have a png file with a name like “skin_UVs” in their folder. This file will be used as the reference for drawing your skin.
- A graphical editor. While you can use MS Paint to make skins, it’s heavily suggested that you learn to use a program that supports layers. GIMP and Paint.Net are very good free options.
- A template materials and jbeam file. For the materials you should start with the car’s main.materials.json file, found in the car’s zip file. For the jbeam file you can use this one
This tutorial includes examples for the 3 most common use cases when it comes to vehicle skins :
- Fully colorable skins, where the color of the entire skin can be adjusted using the color selector.
- Partially colorable skins, where most of the skin can be adjusted using the color selector, but some sections like badges and logos are a fixed color.
- Non colorable skins, which aren’t affected by the color selector.
Intro to the UV and layer systems.
A small particularity of most vanilla cars is that they have 2 different UV maps, and 2 separate layers on the main material.
The 2 layers consist of a base layer that has all elements of the vehicle, and a second layer with only the car’s painted areas, along with a opacity map.
When playing in the material editor, you should only edit the second layer, and leave the first layer as is.
As for the UV maps, each of the vanilla cars is set-up with 2. The first UV one, called UV map 0, is mirrored, and is designed to optimize the use of UV space for mechanical components, normal map details and others.
This is why all vanilla cars have a second UV map, referred to as UV map 1, which is not mirrored and is designed specifically for making paint schemes. You should always be using this UV map when making skins.
That UV map also has all the various option components mapped on top of each other, to make all option parts compatible with the various skins.
You can find the paint template for most vanilla cars inside of their zip file. It’s going to be a PNG file with a name that usually contains “skin UVs”
If you want to make skins for modded content, check if the mod’s creator has included a similar template in his files. Keep in mind that some mods haven’t been UV mapped in a way that allows for making skins. If the mod has included skins but no template, you can ask the mod’s creator if he can add one to the mod.
Creating the folder structure
The first step when making a skin, as with any mod, is to create a folder within the unpacked folder inside your mod folder.
The first folder should be the name of your mod, with a vehicles folder inside of it, then the car’s folder, then a subfolder inside.
The end result should look like this:

The car’s folder is the same as the name of the car’s zip file inside the content folder.
Once that is done, you can copy over the jbeam and material files into the newly created folder.
Setting up the jbeam file
After copying the jbeam file, make sure to rename it to a unique name so it doesn’t overwrite anything.
For the jbeam file, the changes you need to do are :
- Give the component a unique name
- Change the information parameters to your liking. The name will be what appears in the part selector.
- Change the globalSkin value to an other unique value, as this will also be used in the materials file.
{
"tutorialSkin": {
    "information":{
        "authors":"BeamNG",
        "name":"Tutorial Skin",
        "value":1000
    },
    "slotType" : "paint_design",
    "globalSkin" : "TutorialSkin"
  },
}
If you need to create multiple skins, you can copy the part multiple times, making sure that the name and globalSkin values are always unique. As with any jbeam, make sure that the brackets are correct. The file should always have a starting and ending bracket. Here is an example with multiple skins.
{
"tutorialSkin": {
    "information":{
        "authors":"BeamNG",
        "name":"Tutorial Skin",
        "value":1000
    },
    "slotType" : "paint_design",
    "globalSkin" : "TutorialSkin"
  },
"tutorialSkin2": {
    "information":{
        "authors":"BeamNG",
        "name":"Tutorial Skin 2",
        "value":1000
    },
    "slotType" : "paint_design",
    "globalSkin" : "TutorialSkin2"
  },
}
Setting up the json file
As with the jbeam file, the first step is to remove every single material except the one we will be using as our reference.
Keep an eye on the syntax of your file, especially brackets and commas. If you’re unsure, you can copy over the entire content of your materials file in this JSON checking tool.
Usually the material that you will be using as the reference point will be the material labelled as “main”. Here’s what the content of your file should look like.
{
  "vivace_main": {
    "name": "vivace_main",
    "mapTo": "vivace",
    "class": "Material",
    "persistentId": "c149d182-981e-4864-8d0d-6449b0372ece",
    "Stages": [
      {
        "ambientOcclusionMap": "/vehicles/vivace/vivace_main_ao.data.png",
        "baseColorMap": "/vehicles/vivace/vivace_main_b.color.png",
        "metallicMap": "/vehicles/vivace/vivace_main_m.data.png",
        "metallicFactor": 1,
        "normalMap": "vehicles/vivace/vivace_n.dds",
        "roughnessMap": "/vehicles/vivace/vivace_main_r.data.png",
        "useAnisotropic": true
      },
      {
        "ambientOcclusionMap": "/vehicles/vivace/vivace_main_ao.data.png",
        "instanceDiffuse": true,
        "useAnisotropic": true,
        "colorPaletteMapUseUV": 1,
        "clearCoatFactor": 1,
        "clearCoatRoughnessFactor": 1,
        "metallicFactor": 1,
        "clearCoatMap": "/vehicles/vivace/vivace_main_cc.data.png",
        "normalMap": "/vehicles/vivace/vivace_n.dds",
        "opacityMap": "/vehicles/vivace/vivace_main_c.data.png",
        "colorPaletteMap": "/vehicles/vivace/vivace_main_p.color.png"
      },
      {},
      {}
    ],
    "activeLayers": 2,
    "dynamicCubemap": true,
    "materialTag0": "beamng",
    "materialTag1": "vehicle",
    "order_simset": 0,
    "version": 1.5
  }
  }
If you want to make multiple skins, you can also create copies of that material within your file.
The first step is to modify the materials identifier, name and mapTo, adding “.skin.globalSkin” at the end, with globalSkin being the same value that you defined in the jbeam earlier.
The result should look like this for all of your materials.
"vivace.skin.TutorialSkin" : {
"name" : "vivace.skin.TutorialSkin",
"mapTo" : "vivace.skin.TutorialSkin",
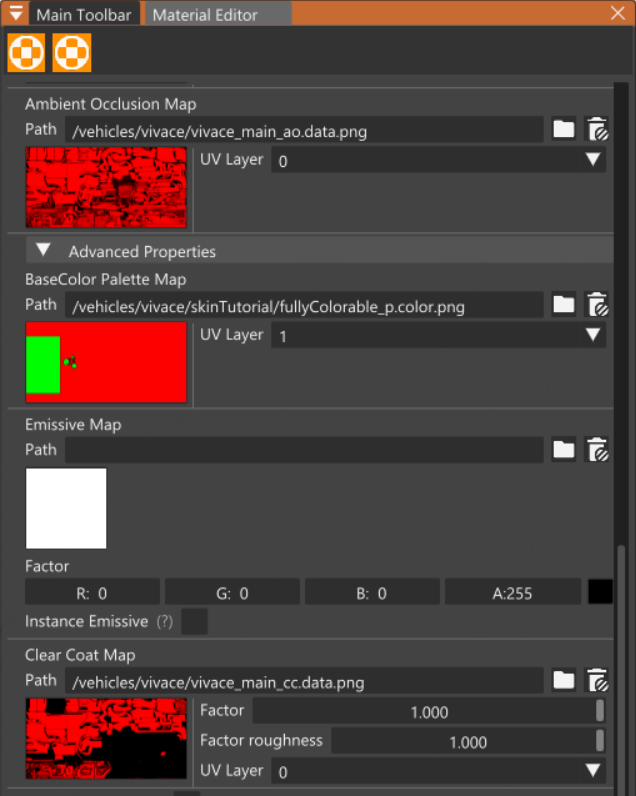
Most of the rest of the other parameters will be left as-is, since we only want to change the color of the body shell, and nothing else. Those changes will be done using the in-game material editor.
The material editor
The material editor will be used for all other changes required for your skins to work, as it is much more user friendly than editing the JSON manually.
To edit skins in the material editor, it must first be applied to the car, meaning you must select your skin part in the parts selector first.
You can then access the material editor can be accessed within the editor, which is accessed with F11
Then go in “Windows”->“Material Editor”. You should see a new window with a list of materials. Click on the car in the world editor to get the list of materials that apply to it.
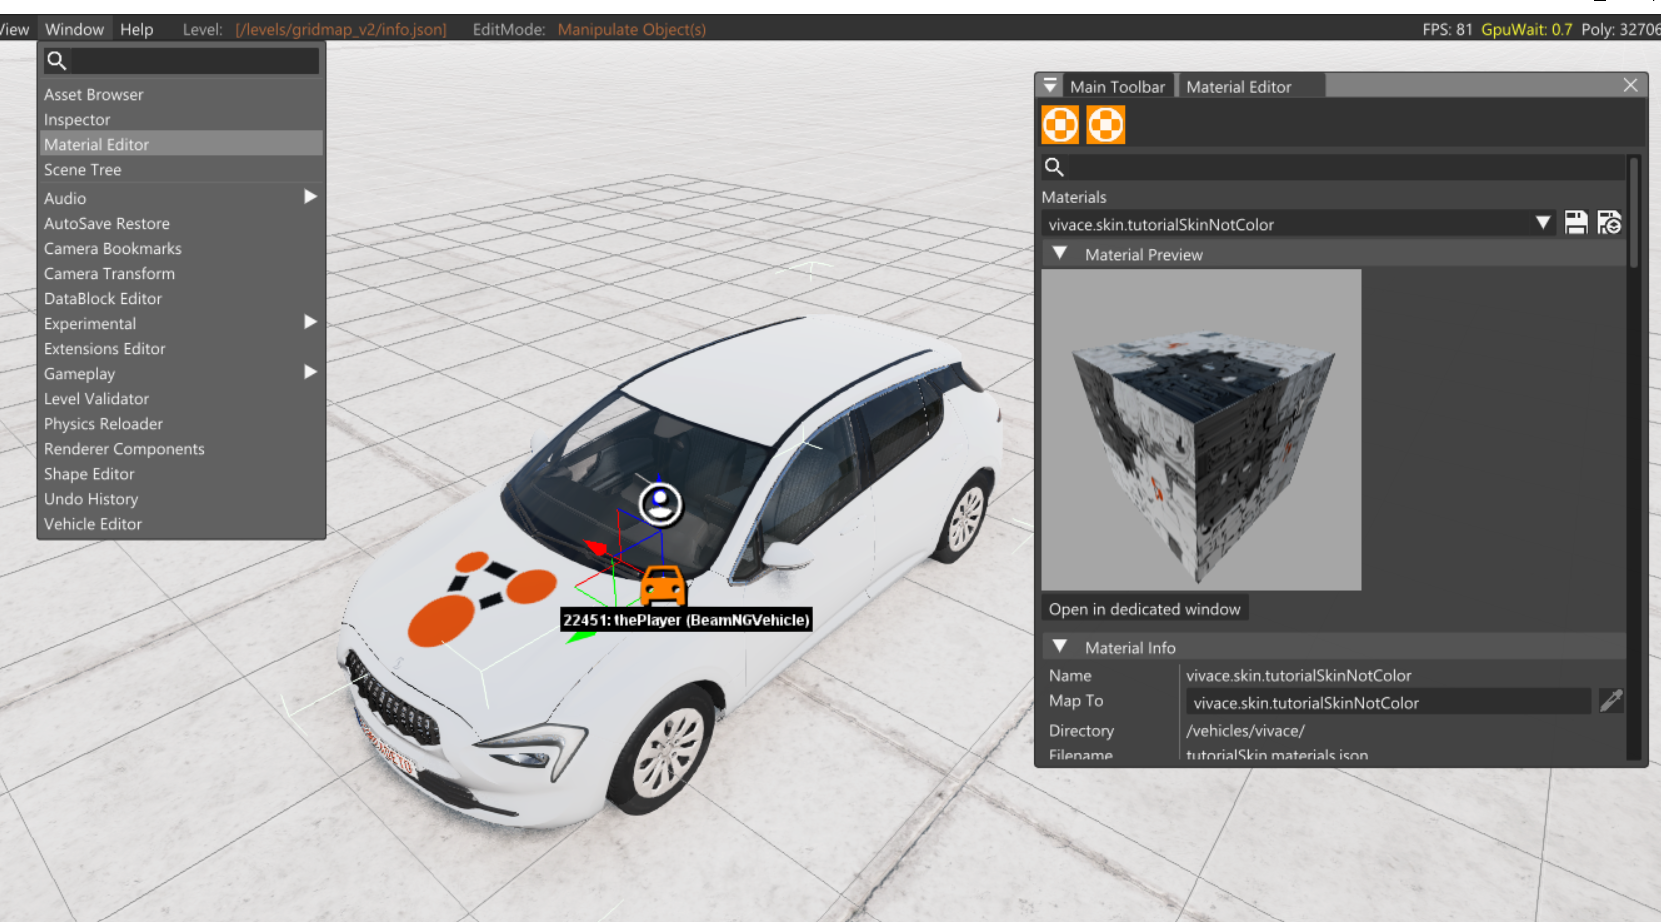
You can then select your skin’s material in the list to see it’s properties. If the material doesn’t appear, check the syntax of your materials file and then restart the game.
When you save the file, it should appear inside the /vehicles/VEHICLENAME/ folder.
The texture cooker
The texture cooker is a tool that converts .png files into the appropriate .dds files.
As not all software (especially free software) is compatible with some of the newer types of .dds file compression, this workflow is heavily recommended, and is what this tutorial is based around.
For more information, you can check out the texture cooker page.
The most important aspect when using the texture cooker is proper texture naming.
In our case we’ll only be creating full color images, which have to end with .color.png
So for example : “CustomRacingSkin.color.png”
Fully colorable skin
Fully colorable skins are the most common and the simplest. They work by defining a new colorPalette, using the different color channels to create a livery.
Each slider in the color selector corresponds to an RGB channel in the color palette map, with Red being mapped to the first slider, Green to the second, and Blue to the last. This means that each pixel will get recolored based on it’s color.
This is an example of a typical color palette map for a skin that is entirely colorable.

Channels can also be mixed, to help with aliasing on edges, or to create interesting patterns like this fade.
The texture should have a name that ends in .color.png, so the texture cooker recognizes them as colored textures.
As for the materials, the only thing that needs to be changed is the path to the color palette map on the second layer :
Using the previously defined textures, the in-game result should look like this.
Colorable skins with uncolorable sections
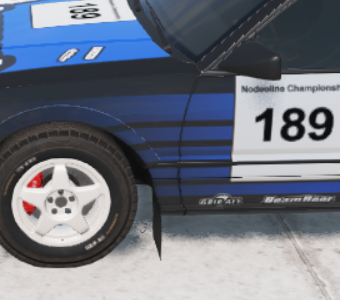
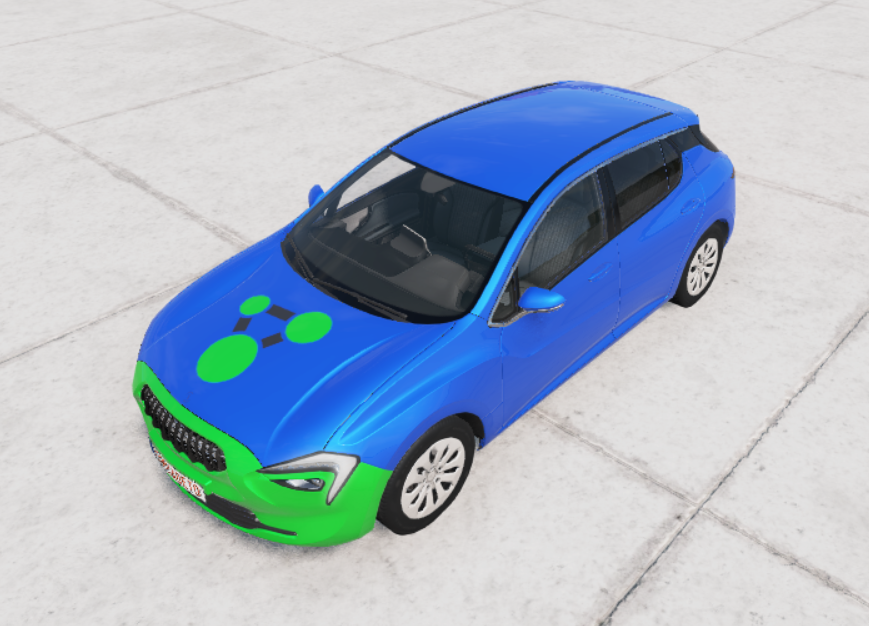
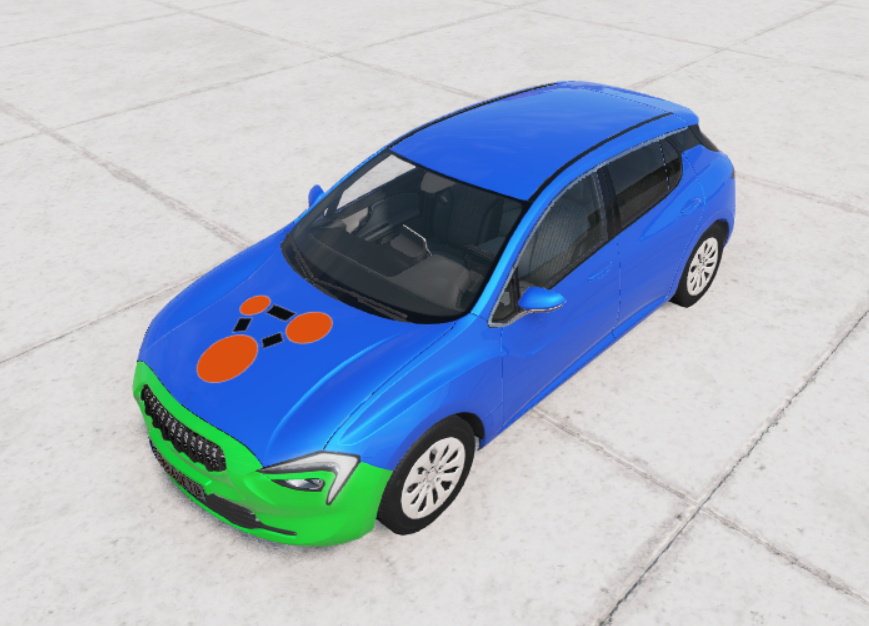
These skins are common for things like racing liveries, where most of the skin is colorable with the exception of sponsor logos and race numbers.
They make use of both a colorPalette and a baseColorMap. The colorPalette map is made mostly the same way as before, with the exception of the areas which are not colorable, which should be transparent
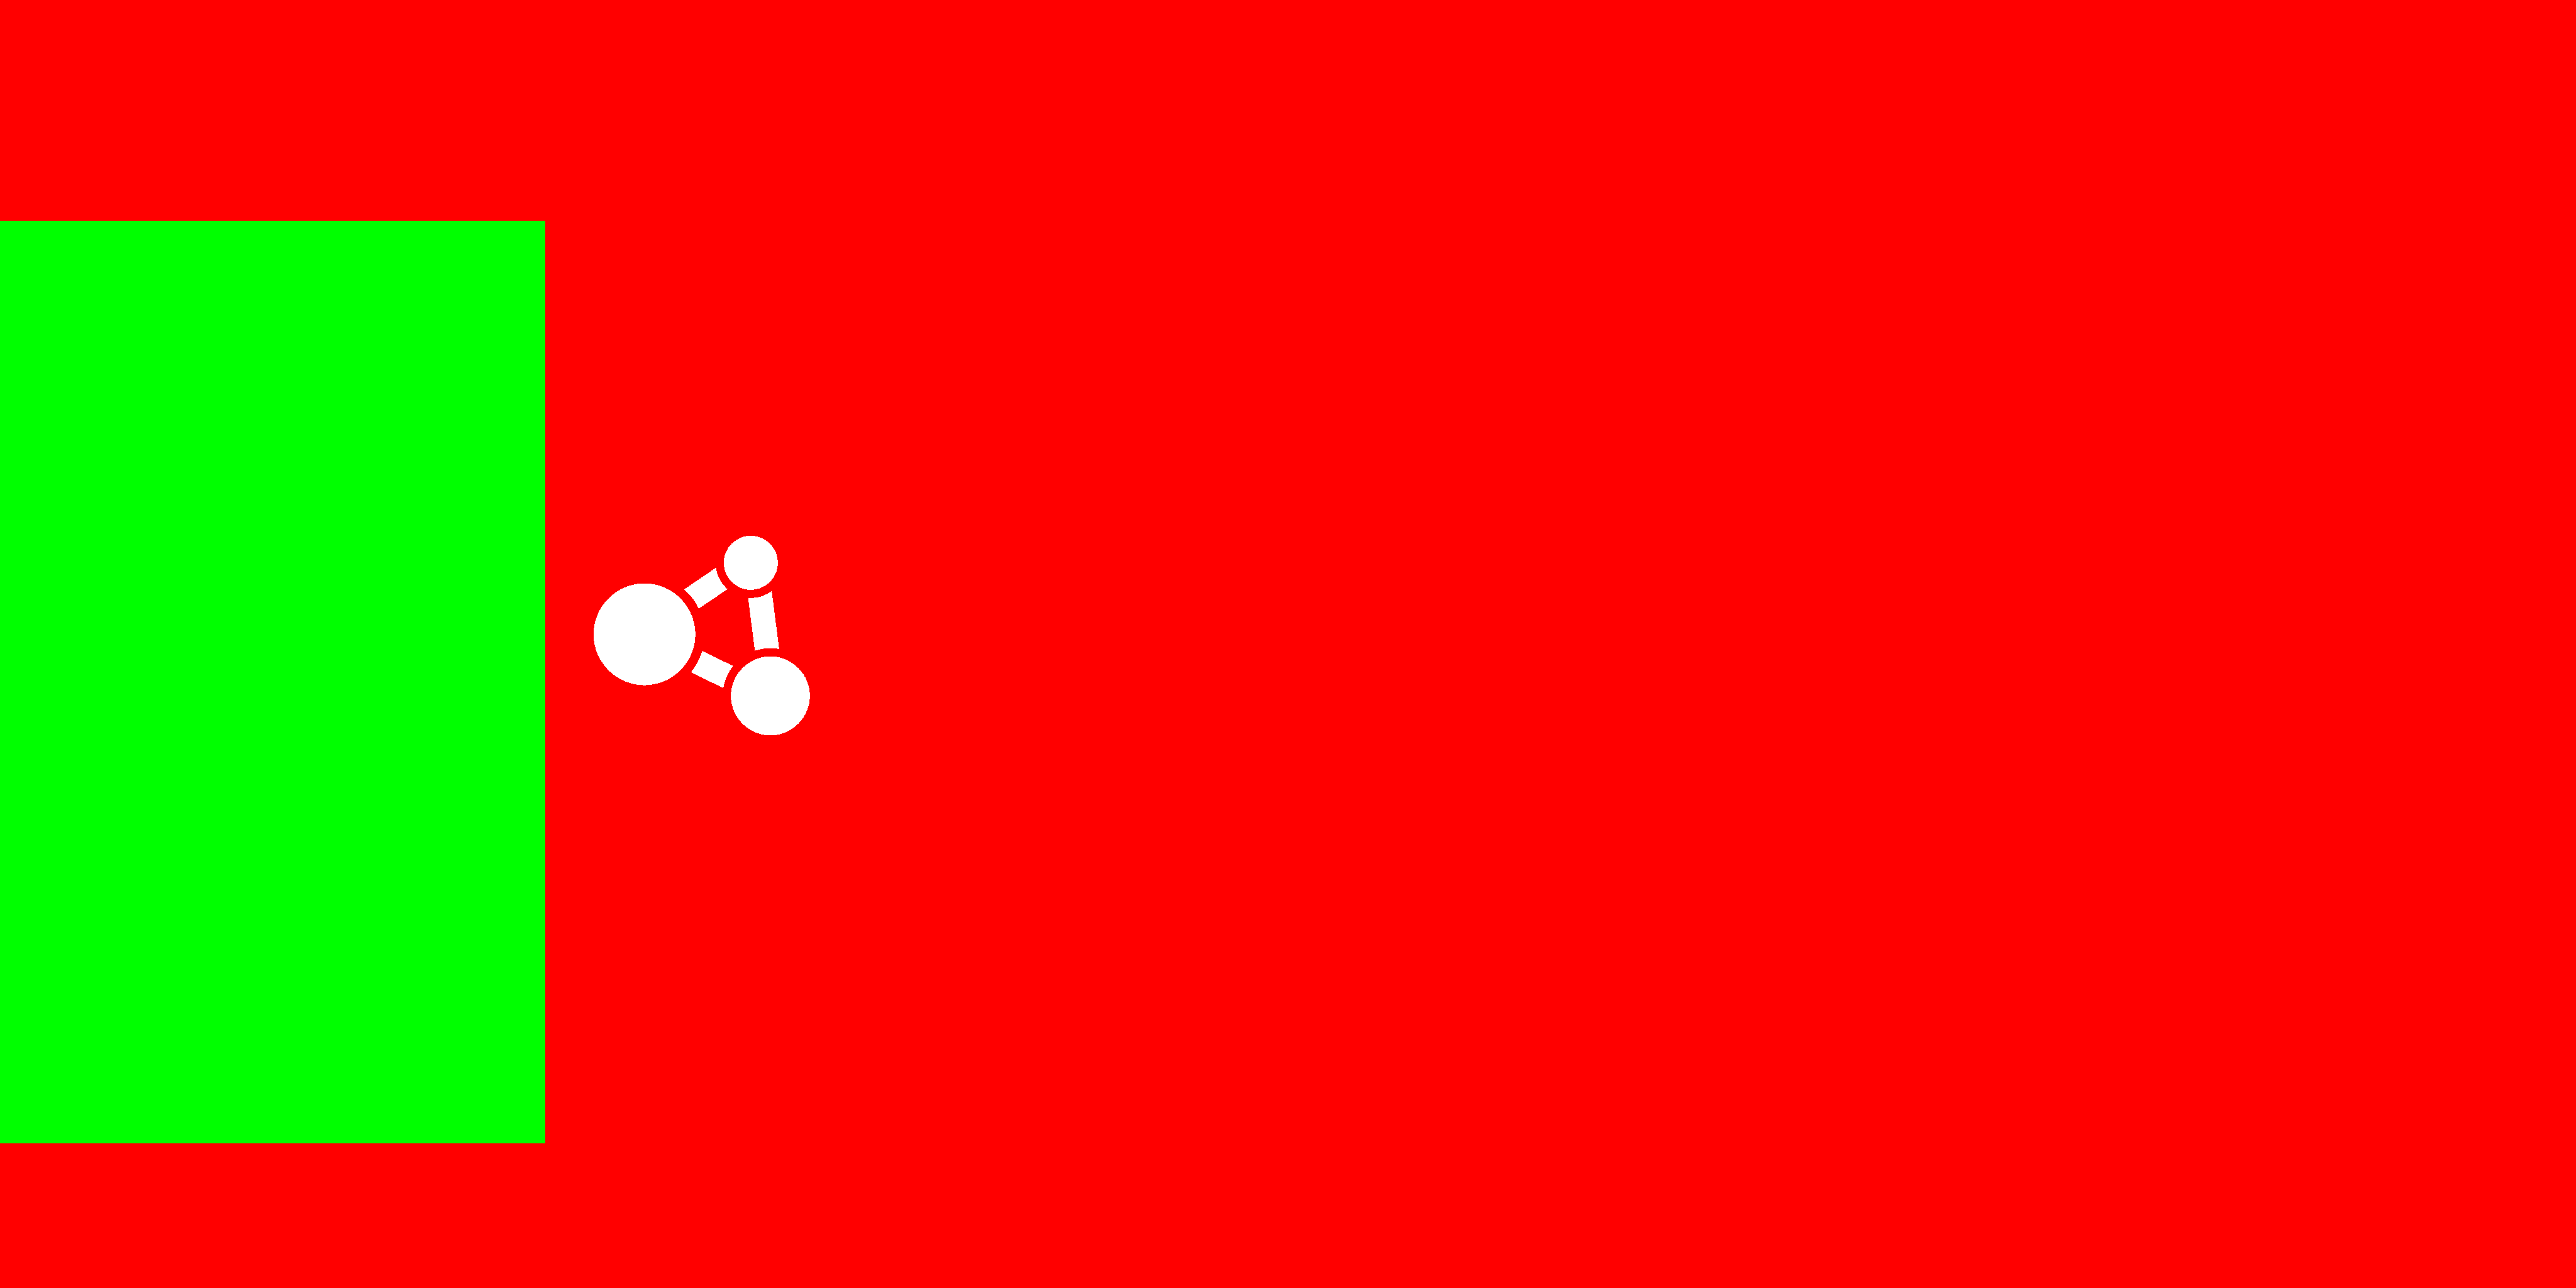
As for the baseColorMap, the only important aspect is that all the colorable areas should be white, to make sure those areas will only be the chosen color. There should not be any transparent areas on this skin.

Both textures should have a name that ends in .color.png, so the texture cooker recognizes them as colored textures.
As for the material, the colorpalettemap’s path will need to be changed, and a baseColorMap should be added, you’ll also need to change the baseColorMap on the second layer to use UVMap 1.

Using the previously defined textures, the in-game result should look like this.
Non colorable skins
This category includes things like emergency vehicles, where all the colors on the livery are fixed.
These skins only use a baseColorMap, and will not have adjustable roughness, metallicity or clearCoat parameters in the color selector, meaning you might want to adjust them in the materials file.
An example texture file would be this.

As for the materials file, you will need to add a baseColorMap, and change the baseColorMap on the second layer to use UVMap 1. You also need to un-tick “Instance BaseColor”, so the base color doesn’t get affected by the color selector.
Keep in mind that doing only those changes will result in a matte looking skin. You can adjust the metallicity, roughness and clearcoat of the material using their respective factor sliders in the material editor.

As usual, you should only make changes on the second layer.
Using the previously defined textures, the in-game result should look like this.
Troubleshooting
This interactive part of the tutorial will cover some common issues you can encounter when making skins.
Preparing the mod for release
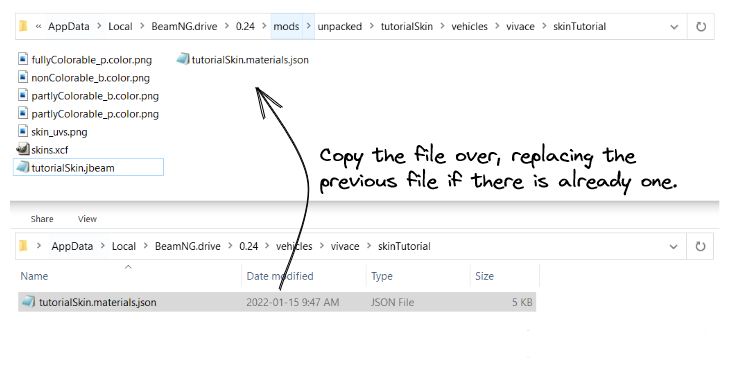
Once you have completed all the edits to your materials, and everything works correctly, it’s now time to do the finishing touches to prepare your skin mod for release.
The first step, if you haven’t done so already, is to copy over the modified materials file.
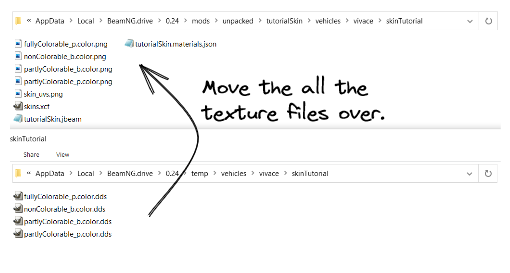
Then, we need to copy over the .dds files created by the texture cooker. You can find them in the temp folder. Just copy them over to your mod’s folder.
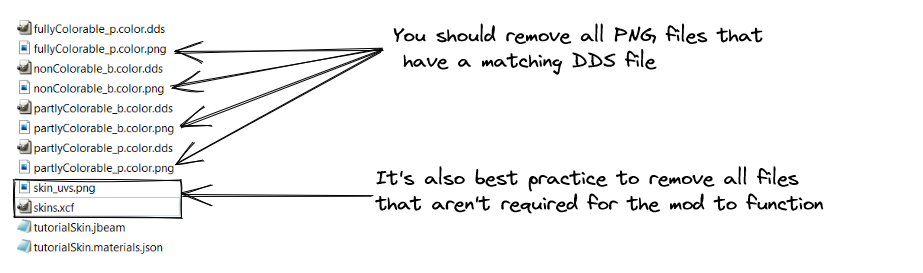
Once you’ve copied over the .dds files, you have to remove the png files from your mod’s folder.
You can do this by checking which png files have a .dds file with matching name.
You should also remove the files that aren’t required for the mod to function, like project files for your image editor and reference images.
The last step is to pack the mod into a zip file. To do so, go in the game, inside “Repository” -> “Mod Manager”. You can then select the mod in the list, and click on “Pack”

There should now be a zip file of your skin mod within the “mods” folder, which you can share with your friends, or with the rest of the community using the repository.
Was this article helpful?
