Steering Wheel Setup
BeamNG.drive supports steering wheels and controllers that are PC-compatible. Here’s a list of some devices that have been tested: Controller Support .
Driver configuration
Always install the latest drivers and firmware for your device. It doesn’t matter if things appear to work okay, you must still install the drivers. If unsure how to install them, you can read its instructions or contact its manufacturer.
Once installed, open the manufacturer configuration tool:
- Pick the highest possible steering angle and set the same angle in-game.
- Use separate (non-combined) pedals if there’s such an option.
- Some driver settings can impact the responsiveness and detail of the wheel. The default configuration is often aimed at safety and smoothness, preventing the use of the full hardware capabilities. The exact setting names vary from one manufacturer to another. At your own risk, you may want to tweak them, by removing or reducing filters (such as centering spring, damper, inertia, weight, friction…), and by increasing limits (such as speed, torque, acceleration…).
Simulator configuration
Once the drivers are installed, configured and running, you can tweak the BeamNG settings.
Our sim includes in-game configurations for some steering wheels: in these cases you can just drive.
For devices without a premade in-game configuration, you need to assign the controls in Options > Controls > Bindings > Vehicle:
- Click the plus sign to bind new controls (such as throttle, brake and steering).
- You can click an existing binding to tweak it.
Force feedback configuration guideline:
When tweaking the ‘steering’ binding, the force feedback settings will appear below the normal settings. Configuring force feedback can be difficult to get exactly right. Every driving style favours different force feedback settings.
Here’s some steps to use as a starting point:
- First of all, configure your steering wheel drivers (see the relevant section above).
- If you have previously modified the force feedback options, you may want to start fresh, by deleting the “steering” binding and creating a new one.
- Choose an official rear-wheel-drive car, like a K-series Kc6. Disable mods and do not use a custom setup to be safe, avoiding misleading suspension geometries.
- We recommend at least 60fps. The higher the framerate, the more responsive ffb will feel. For that, you may want to sacrifice graphics and traffic.
- Temporarily set Smoothing to the largest value. The wheel will feel very vague and slow, but this is only temporary.
- Go for a drive with your usual driving style (be it racing, stunts, offroading…), and tweak the “Strength” until the overall amount of force feels good to you (not too weak, not too strong).
- Ignore forces while you are parked.
- If car crashes feel too violent: you should lower the torque in your steering wheel configuration tool, and then bump the in-game strength to compensate. This will have reduced the maximum peak torque during crashes.
- Once you are happy with the “Strength”: go for a drive, and gradually decrease the in-game “Smoothing” to improve details and responsiveness.
- If or when uncomfortable rattling and vibration starts to appear, dial “Smoothing” back a bit.
- Finally, enable the “Reduce strength at low speeds” checkbox to reduce oscillations while parked.
This is your basic staring point. Feel free to tweak the rest of settings now. Note: If you modify the driver configuration, you may need to re-adjust the in-game configuration.
Response correction curves
Introduction
Force feedback works by asking the steering wheel drivers to apply certain torque (certain rotational force) through the motors housed inside your steering wheel.
In an ideal world, the resulting torques would be proportional to the torques you initially requested.
However, in practice, this is rarely the case. Sometimes, when you ask 1 unit of torque, you may get 1.2 resulting units of torque. And then you ask for 2 units, but get only 1.9 units back. The result can vary wildly along the range of torques, and is impossible to know without testing each of all the possible torque values.
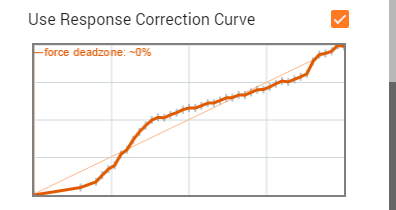
To compensate for this lack of linearity, we provide the option to use a Response Correction Curve. This curve basically tells BeamNG.drive how the steering wheel will respond to all possible requests. Based on that, BeamNG.drive will smartly “lie” to the drivers, requesting different torques, to get the actual desired resulting torque.
Reusability
Before continuing, one word about reusability of response curves:
The response curve will vary depending on the Windows drivers configuration.
For example, if you change the effects strength (or any other setting) in the Windows driver configuration panel, the response curve will most probably be different afterwards.
Keep that in mind if you are trying to use a response curve for your wheel while tweaking the Windows driver configuration.
Note: BeamNG.drive bundles response curves tailored to the recommended driver configuration (see the 2nd section of this guide). If you are not using the recommended configuration, the response curves may be off, and it is recommended to re-generate it for your specific drivers configuration. But even if you don’t, the result will typically be better than disabling the curve altogether.
Also note that the response curve is usually the same for a given brand and model of steering wheel (unless it has undergone some serious hardware revision but still keeping the same model identifier). If you create a response curve for certain steering wheel model and drivers configuration, it will most probably be reusable by other owners of your steering wheel.
Generating your own response curve
Generating a response curve involves precise testing of your hardware, noting down what happens each time you apply certain torques.
There are several tools out there that allow to do it in an automated way, and register the resulting curve in a file, on disk.
BeamNG.drive is able to directly read the response curve files generated by the most popular 3rd party tools (such as WheelCheck and Force Curve Modifier), without needing any further format modifications. So just run those tools, export the result to a file, and place it at <your user folder>\settings\inputmaps\wheel.*. You can locate and open your user folder in the Launcher.
Note: the numbers contained in LUT files have a different meaning than those contained in the rest of file types (even if they are all ‘just’ pairs of numbers). Please do not rename the “.lut” extension to something else, this way BeamNG.drive will know it needs to handle the LUT numbers differently than is usual.
For more information, please search the web for those 3rd party tool names, and follow any of the existing guides out there.
Note: Hover your mouse over the response curve graph of your BeamNG.drive FFB menu to get more detailed information about the naming conventions. Typically wheel.csv will do.
How the curve is used
BeamNG.drive internally sanitizes the curve you see on screen:
- The curve will be normalized, from 0 (no torque) to 1 (maximum torque supported by your steering wheel). You don’t need to normalize any values yourself.
- It will remove any valleys, so that the response is always incremental
- It will assume you start at 0 response for 0 requested torque, and that you end at 100% response for 100% requested torque.
After this sanitization has taken place, the curve is used in this way:
- When the resulting torque is too small, BeamNG.drive will bump up the requested torque, so that it gets its desired resulting torque.
- When the resulting torque is too big, BeamNG.drive will request a bit smaller torques, so the result is not that huge.
Tweaking the curve
You will typically want to tweak the curve just a little bit before it is used by the game.
If you have already placed the wheel.csv file in your inputmaps directory, the game will read it each time you restart the game or press Ctrl+L to reload the input system.
When that happens, the curve is embedded into your inputmap file. If you modify the source wheel.csv file, and press Ctrl+L, the inputmap file will be updated again. Remove the source file when you are happy with it.
Measurement errors:
If you have only generated the response curve once, it is possible that you have some error in the readings. For example, if you accidentally touched the wheel while it rotated, or bumped into your desk, then that curve point may be incorrect.
Repeating the measurement several times, and comparing the resulting curves, allows you to notice any possible outlier values that may have happened.
Noise:
If you correctly measure the curve several times, you will notice slight variations. This can happen because of many circumstances, e.g. temperature changes, slight gear or belt positioning differences, etc.
Measuring the curve several times not only allows to detect errors (as described before) but are useful to remove this kind of noise. You can average all of the curves together, and use the resulting curve in BeamNG.drive. Note that there shouldn’t be a huge difference from one run to the next (unless your wheel is damaged), so it’s okay if you decide to skip this step :-)
Low torque vibration:
Most wheels cannot handle low torques correctly. The response curve will usually be very plain in the first section, and this will force BeamNG.drive to request huge torques to compensate. This usually creates unwanted vibrations.
To prevent this, make sure you add a slight initial slope to the curve, even if the response curve clearly showed a huge dead zone in that region. This will smooth out the jerky response for low torque situations.
Visualizing the improvements
To assist you with tweaking or verifying the response curve, you can visualize the results in real time, while driving.
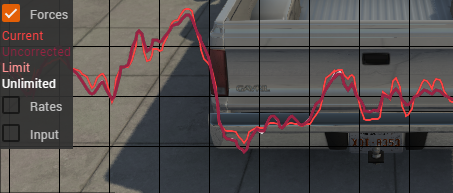
- Go to the menu
Apps>Add app - Place the
FFB Graphsomewhere on the screen and clickDone.
The data you are looking for here is:
- Current: shows what torque is being actually requested to the Windows drivers. This is usually not the torque we want, but remember we have to lie to the drivers in order to get the torque we want.
- Uncorrected: shows what is the expected resulting torque after having traveled through the drivers, firmware and hardware. In other words, the actually desired torque.
- Limit: is just the force limit the user has selected in the FFB menu. No forces greater than this will be generated.
- Unlimited: shows what would have been requested, if the force limit wasn’t in place.
For example, in most steering wheels, you will typically notice that uncorrected forces are smaller than current forces in low-torque situations, because of the initial FFB dead zone.
A very good steering wheel should have a very linear FFB response, and so the uncorrected and current forces should be almost the same through the entire range of torques.
Was this article helpful?


